
Salesforce integration
Salesforce is a customer relationship management (CRM) service that also provides customer serviced-based enterprise applications.
You can leverage Ortto’s powerful campaign, reporting, and dashboard features on your customer data from Salesforce. To do this, proceed through each of the following procedures to integrate Ortto with your Salesforce service as a data source.
Salesforce prerequisites
This integration process assumes you have an operating Salesforce service, and a Salesforce user account with System Administrator profile access to this service.
Note also that Salesforce opportunities must have a contact assigned to the primary contact role in order for the opportunity to be successfully associated with the contact in Ortto. Learn more about syncing opportunities to Ortto in Salesforce troubleshooting.
We have also written a guide on preparing to connect to Salesforce which describes the key the connection considerations, including merge strategies and selective sync filters, to help you have a smooth setup experience and minimise the need to alter your connection configuration later.
TIP: If you are using Person Accounts in Salesforce, refer to this article to learn how Person Account syncing works.
Connect from Ortto
If you initially followed the Configuring a new data source procedure, use this procedure to complete the integration between Ortto and your Salesforce service from the Ortto interface, by establishing the connection between the products.
- Ensure you have clicked through Popular / CRM > Salesforce > Get started (from the New data source page), to access the Connect to Salesforce page.
- If you want to alter the way Ortto allows Salesforce to update/modify people’s data values in your Ortto account’s customer data platform (CDP), click Advanced options to expand this section of options.
- To alter which data values of people in your Ortto CDP that Salesforce can modify:
- Clear or (re-)select the appropriate checkboxes in Modify system CDP fields (default).
- To prevent Salesforce from modifying any data values in your Ortto CDP, choose the Don’t modify system CDP fields option.
- If you are connecting to a Salesforce sandbox (i.e. a Salesforce staging environment), select the Salesforce sandbox checkbox. In most cases, you can leave this checkbox cleared on the assumption that you are connecting to a Salesforce production environment.
- Click Connect.
- On the Salesforce Allow Access page, click Allow to allow Ortto to connect to your Salesforce service through the currently logged in Salesforce user account.
- Back in Ortto on the Sync custom fields page, choose which Salesforce objects and their fields will be synchronized across to your Ortto account’s customer data platform (CDP), bearing in mind that there is a limit of 100 custom contact fields and 50 custom organization fields cumulatively across all objects (the limits do not include default fields). You can expand any objects on this page to then clear and select any other fields to be synchronized with Ortto.
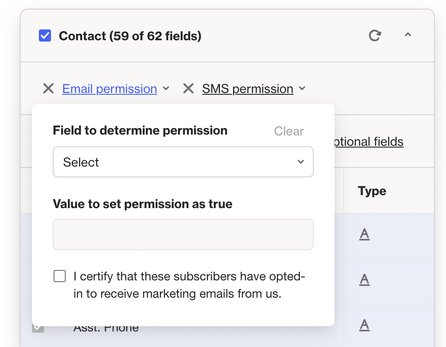
- At this point, you can set the Email permissions and SMS permissions for Salesforce contacts synced to Ortto. This ensures that any new contacts added to your CDP are given the correct permissions as set in Salesforce (otherwise, new contacts added to your CDP are automatically subscribed to email by default).
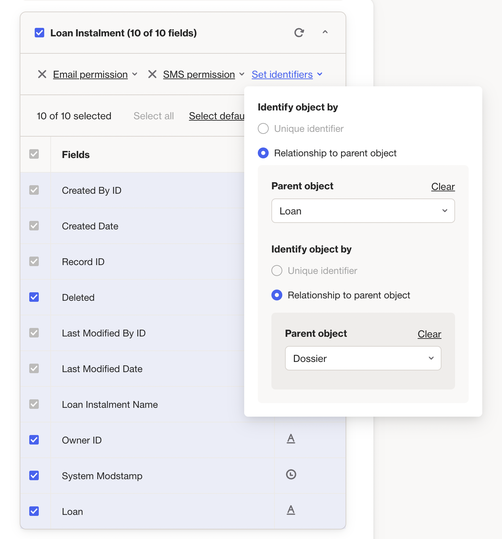
- If there are any additional objects and their field data you want to select to be synchronized in your Ortto account’s CDP, select these from the Custom objects section.Where Ortto cannot automatically link identifiers to a custom object, you can configure this using Set identifiers. This feature enables you to determine how objects are linked to contact fields or other objects. Learn more about identifying Salesforce objects.
- For each default and custom object selected you can map the object's fields to relevant Ortto fields. Learn more about field mapping.
- Click Next.
- On the Select records page, choose between syncing all your chosen object data in the previous step across to Ortto (by leaving Sync all selected), or click Selectively sync to specify conditions on Salesforce object data related to people or organizations in your Ortto’s CDP that will be synced.
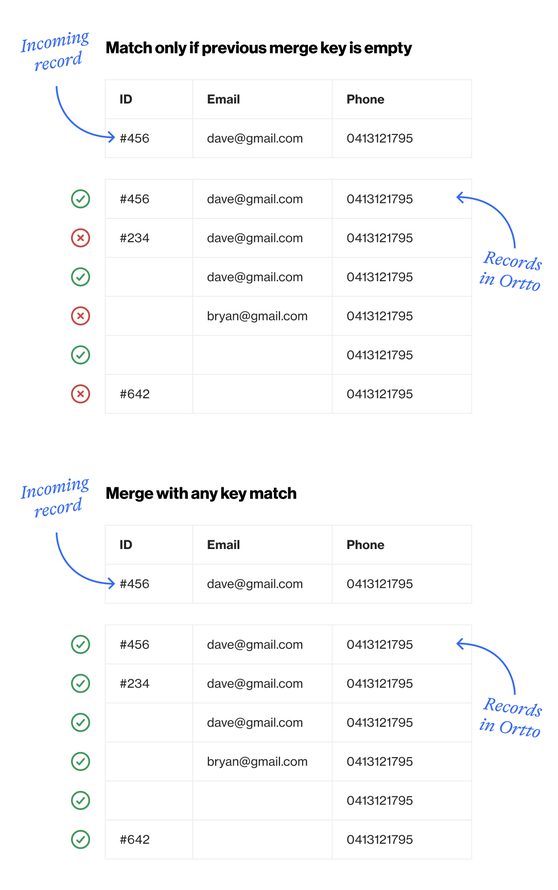
- On the Merge page, select the appropriate strategy by which people’s and organizations' data are merged from Salesforce into your Ortto’s CDP. The Import and merge new records only, Import and overwrite any records that exist, and Import new records only are equivalent to the respective Append only, Overwrite existing, and Ignore merge strategies for people and organizations described in the developer documentation.At Merge key strategy, choose how you want to match contacts and organizations using merge keys.Your chosen merge strategy (import and merge new, import and overwrite, or import new only) will be applied according to the merge key strategy you select. The merge key strategy refers to the unique identifiers set in your Ortto account when determining how to merge contacts and organizations.
- Merge with any key match. This merge key strategy will merge Salesforce contacts and organizations with existing Ortto records based on any key match. This strategy will look at both your primary and fallback unique identifiers (e.g. email and phone number) to determine whether a match can be found.
- Match only if previous merge key is empty. This merge key strategy will merge Salesforce contacts and organizations with existing Ortto records based on a primary unique identifier match (e.g. email) only — this strategy will not check your fallback unique identifier.
- Click Sync.
- Once the Syncing your data page appears, click Done.
Your Ortto account is now connected to and integrated with your Salesforce service.
NOTE: By default, Ortto allows Salesforce to modify all relevant data values of people in your Ortto account’s CDP, based on the equivalent data values of these people in your Salesforce service. This is the default behavior if you were to integrate Ortto with Salesforce when initially creating a new Ortto account.
A given person may be registered in multiple data sources, where a specific data value associated with this person (e.g. their phone number), might be different in each data source. When an Ortto account is integrated with these multiple data sources, each of which is allowed to modify data values in the CDP, then this person’s data value (e.g. phone number) could be modified in the Ortto account’s CDP, based on recent activities performed by the person through each of these different data sources.
Hence, data values for people in an Ortto account’s CDP can constantly change.
When a relevant activity in Salesforce is conducted by this person, Salesforce can update their data values (e.g. phone number) to the one/s configured in their Salesforce profile.
NOTE: If you are not yet logged in to Salesforce, specify your relevant Username or email address and Password credentials and click Log In. You will then be prompted to click Allow.
NOTE: A number of Default objects whose data is important to Ortto are automatically selected for synchronization with your Ortto’s CDP. Only the Contact object is required, others can be deselected.
The data in these objects consists of a combination of built-in and custom fields, which are created after the Salesforce integration process is completed.
Any additional objects detected in your Salesforce service are presented in the Custom objects section.
These objects relate to any connected accounts or contacts in your Salesforce service.
NOTE: Custom Salesforce objects synced to Ortto that do not have the Parent object set to a reference ID to a contact or lead can still create contacts in Ortto using an Identify object by method of Unique identifier (such as email). Ortto activity data associated with these type of contacts, and contacts created by a reference ID, can then be synced to Salesforce.
TIP: If you are applying a selective sync filter, selecting the option to Auto-archive contacts that no longer meet the criteria can help speed up your future ongoing syncs by reducing the data load.
If you disconnect then reconnect your Salesforce data source, the auto-archive feature will not auto-archive existing contacts that no longer meet the criteria (the auto-archive will only take effect on any contacts coming in from the most recent Salesforce sync). However, you can run a backfill of Salesforce data while auto-archive is enabled and it will clean up your contact list by auto-archiving existing contacts who no longer meet the filter criteria.
NOTE: Ortto applies a hidden unique identifier to Salesforce organization records so that organization records only merge when the Salesforce account ID matches.
As an example, you have 2 Salesforce accounts (A and B) connected to your Ortto account. In each Salesforce account, you have the same organization, called Rainy Day Insurance. The Rainy Day Insurance record has been synced to Ortto for Salesforce account A but not for Salesforce account B.
You then import Rainy Day Insurance from Salesforce account B to Ortto using the merge key strategy Match only if previous merge key is empty. If there is no primary identifier match, you may end up with 2 Rainy Day Insurance records in your Ortto account. This is because Ortto has identified that each Rainy Day Insurance record has a different account ID so each is treated as an individual record.
Here is an illustration of how the merge key strategies work. This example uses the email as the primary unique identifier and phone number as the fallback identifier. It also shows the hidden account ID applied by Ortto:
Manage Salesforce authorization
The connection between Salesforce and Ortto is enabled by OAuth authorization and uses a refresh token. Once your Salesforce integration is complete, we recommend that you set the Refresh Token Policy in your Salesforce account to Refresh token is valid until revoked to avoid your Salesforce account disconnecting from Ortto should the token expire.
To edit your Salesforce Refresh Token Policy:
- In your Salesforce account, navigate to Settings > Apps > Connected Apps > Connected Apps OAuth Usage.
- If you have not already done so, click Install next to Ortto, to be able to manage the app policies.
- Click on Manage App Policies under Connected apps OAuth usage or Manage Connected Apps under Settings Apps Connected Apps.
- Click on Ortto, then click Edit Policies.
- Under OAuth Policies:
- At IP Relaxation, select Relax IP restrictions.
- At Refresh Token Policy, select the radio button for Refresh token is valid until revoked.
- Click Save.
How is the data merged into Ortto?
Data is merged from Salesforce to Ortto on the initial connection. Subsequently, new modified objects are synced approximately every 15 minutes.
The Salesforce integration is initially configured as read only, which means that no data is sent from Ortto to Salesforce. Should you wish to send data from Ortto to Salesforce, you can:
- create a journey or playbook using Salesforce actions, or
- select up to 20 Ortto activities to sync to Salesforce.
Learn more about sending data from Ortto to Salesforce.
When a person is added to your CDP from the Salesforce data synchronization, if they do not already exist as a contact in your CDP, they are added as a new contact. If you did not determine your Salesforce contact’s email and SMS permission during the integration setup, then any new contacts are automatically subscribed to receive email communications. (New contacts are unsubscribed to SMS by default.)
If a contact synced from Salesforce already exists in Ortto, the contact will not have their email or SMS permissions changed; they will remain as they were set in Salesforce.
Initial data sync
Campaign, contact, lead, opportunity, and account details, along with default objects and any custom objects you selected are merged into the Ortto CDP. The merge follows the data merge strategy selected during the initial connection with Salesforce. Ortto activities store data based on the objects you chose to be synced during the integration.
Ongoing data sync
Salesforce data is merged in to Ortto approximately every 15 minutes.
If you have enabled syncing Ortto activities to Salesforce, the Ortto activity data sync is performed separately from the sync that brings Salesforce data into Ortto.
When you run a backfill of Salesforce data, it will put the data source into a dual Connected and Updating state, but this won’t interrupt your ability to use Salesforce in Ortto. Live events will still be synced to Ortto during this time.
Where you might see a delay in "live" (non-backfill) events coming through to Ortto is when there is a large amount of data being synced via both the ongoing sync and a backfill task. In this case, the size of the combined live event and backfill data may hit your API rate limit and cause delays in data being synced.
Resynchronizing data
Salesforce data is resynchronized when the data source is reconnected (e.g. you disconnect then reconnect Salesforce) and the data source moves into a Needs attention state (e.g. if your Salesforce token has expired).
The resync will not perform a full backfill of data, it will only import changes that occurred since the last Ortto request for Salesforce data.
A resync of the Salesforce data may affect the audiences and campaigns within the CDP by resetting the attributes for the person, and activities, causing a person to potentially re-enter an audience or campaign within the CDP.
What does the data source add to my account?
The Salesforce data source adds:
- Salesforce contact and account records and their associated fields to your CDP, known as people or organizations respectively in Ortto.
- Salesforce activities from the last 90 days including leads, opportunities, and campaigns. In some cases, however, it may be necessary to store an activity and its attribute data for longer. Therefore, Ortto provides a mechanism for customers on Business and Enterprise plans to opt-in to selectively store their activity data for longer. Learn more about data retention under Configuring data retention.
- Templates for:
- Dashboards, both Performance and SaaS metrics.
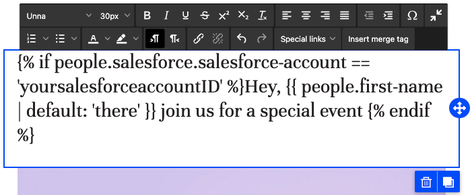
- The ability to use Liquid syntax in campaign messages to personalize your messages using merge tags for Salesforce person fields and activity attributes. Learn more about using Liquid syntax under Personalizing campaign content with Liquid.
NOTE: Deleting a Salesforce data source connection will not remove the current entries in the CDP for people or activities that were merged from that Salesforce connection.
In Ortto, the following aspects of your CDP are associated with the following Salesforce object data:
CDP aspect | Salesforce object data |
|---|---|
People | Campaign, Contact, Lead, Opportunity, Task |
Organizations | Account |
View Salesforce fields in your CDP
Customize your CDP field visibility and add Salesforce fields by clicking the cog icon, then select or clear the fields you want to show or hide. Salesforce fields are indicated with the small Salesforce icon.
Access the Salesforce data source view
When a data source is connected, you are provided with a data source view. On the Data sources page, click the data source you wish to view.
A data source’s view is the administration page where you can:
- view and manage the data source in the left-hand details panel, and
- under the relevant tabs on the right-hand side, view:
- an Overview of the data source,
- an Activity feed, and
- an Audience table, which displays the people imported from Salesforce.
In the details panel, you can give the data source a new name (this will not affect your Salesforce account settings). To do so, hover over the name and click the pencil icon, then type the new name and click on a blank area of the page to save the name. You can also disconnect the data source, and modify:
- whether to modify system CDP fields,
- the merge strategy,
- the default and custom Salesforce fields to sync
- Ortto activities to sync to Salesforce, and
- the data retention period.
Learn more about the data source view under Managing data sources.
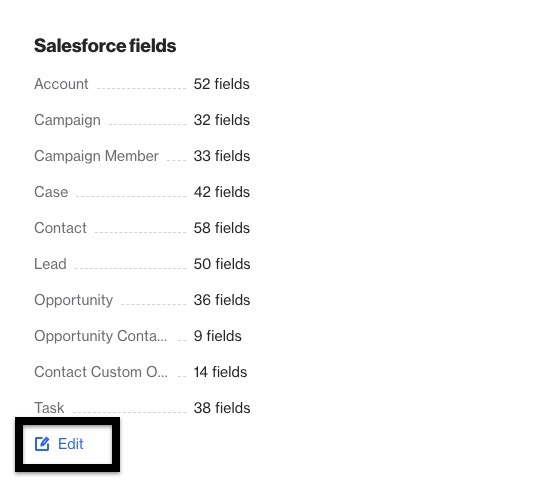
Adding or removing Salesforce fields
After the Salesforce data source has been connected, you can still connect or disconnect fields and objects as needed in the future.
To do so, you can scroll down the settings panel for the data source page and click the Edit button under the Salesforce fields section.
This will take you to the object and field manager for the data source where you can select the checkbox for the fields and objects that you'd like to include or uncheck the box for those that you'd like to remove.
Once the intended fields are selected, you can click on the Save button to have these fields updated for the data source connection.
TIP: When connecting a new field, you may want to backfill the field information for contacts who already had values present for that field in Salesforce.
The option to do so is available by clicking the Actions button at the top of the data source's page and selecting Backfill Salesforce Fields.
Our resource on backfilling Salesforce fielding can also be found here.
Using Salesforce
Learn about how you can use Salesforce with Ortto’s filters, reports, dashboards, campaigns, and coupons to get the most out of your integration under Using Salesforce in Ortto.
Troubleshooting Salesforce
For help with common questions or issues you may encounter when using Salesforce as a data source, including backfilling data and syncing Ortto activities to Salesforce, view Troubleshooting Salesforce.