
Preparing to connect to Salesforce
Overview
Before syncing Salesforce with Ortto, there are a few steps to help ensure a smooth setup.
Salesforce offers more flexibility than some of our other integrations, so it’s worth spending a little time planning how you want your data to connect.
This guide includes a quick-start template and tips to help you set up your Salesforce integration the right way from the beginning.
Choose your unique identifier and merge strategy
As with most data source integrations in Ortto, you get to choose a merge strategy by which people’s (contacts) and organizations' (accounts) data are merged from Salesforce into your Ortto CDP.
Records are merged (or not) into Ortto based on merge keys which consist of data source-specific record IDs and unique identifiers. These merge keys are used to determine which records are unique (and which are duplicates).
By default in Ortto, these are:
- Record ID: Salesforce object ID
- Unique identifier: Email address
- Fallback identifier: Phone number.
NOTE: The record ID cannot be adjusted.
TIP: If your Salesforce data does not use email or phone number to uniquely identify records, you should review your unique and fallback identifiers before connecting Salesforce to Ortto. See the recommended configurations table below for examples of setups based on common use cases.
About the merge strategy
In addition to setting relevant unique identifiers, you also need to consider the merge key strategy.
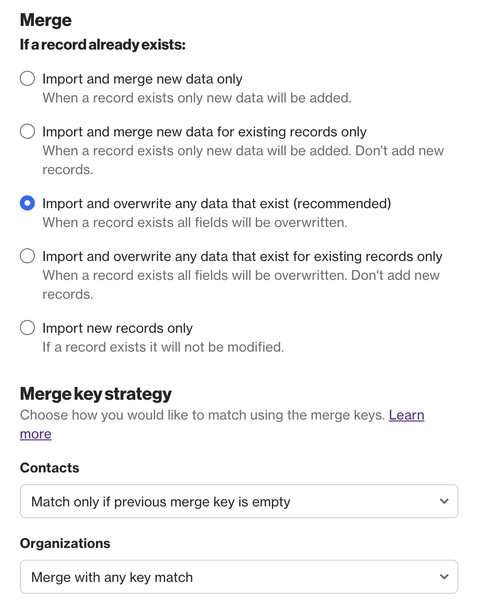
When you connect Salesforce to Ortto, at the Merge step (step 5 below) you will be able to select a Merge key strategy, which tells Ortto how you want to match Salesforce contact and organization records with existing records in your CDP using merge keys (your unique identifiers). The merge key strategy options are:
- Merge with any key match: This strategy will look at any of your merge keys to determine whether a match can be found. For example, if the inbound Salesforce object ID, email address or phone number matches with an existing Ortto record, the inbound data will merge into the existing record. If no Ortto record exists with a matching merge key, a new record will be created.
- Match only if previous merge key is empty: This strategy will review the merge keys present in the inbound data in priority order (record ID, unique identifier, then fallback identifier) and look for a matching record in Ortto. The first check will be for record ID. As all Salesforce records will have an object ID present, selecting this strategy will ensure that inbound data is always merged into the existing Ortto record based on the Salesforce record ID, if a match is found.
Recommended configurations
Use case | Unique identifier | Fallback identifier | Merge key strategy | Notes |
|---|---|---|---|---|
Multiple records share an email address. Phone number can be unique but is not always present | Email address | Phone number | Match only if previous merge key is empty | Records will be created based on their Salesforce object ID, and multiple records will be created with the same email address. This will need to be factored in when connecting other data sources to Ortto. |
Email address is reliably unique. Multiple records can share a phone number. | Email address | - | Merge with any key match | Remove phone number as a fallback identifier before proceeding to connect Salesforce to Ortto. |
Email address is reliably unique. Phone number can be unique but not always present. | Email address | Phone number | Merge with any key match |
|
About conversions
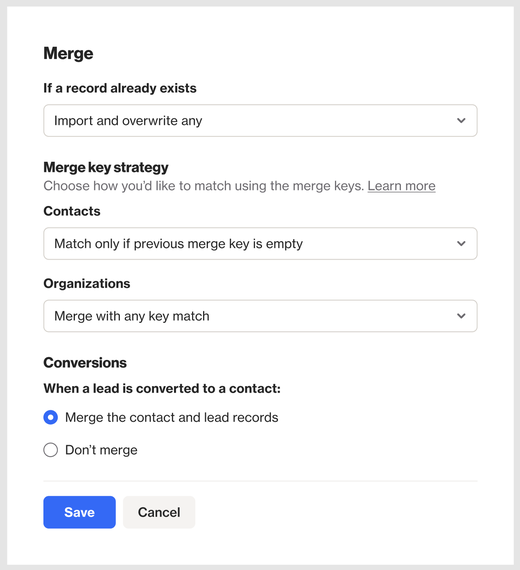
You can choose how you want Ortto to handle a Lead that converts to a Contact.
At Conversions, you’ll have the option to merge the contact and lead records, or choose not to merge these records. The setting for this is available when you connect a new Salesforce data source, or in the settings for an existing Salesforce connection, under Merge > Conversions.
If you are setting up a new Salesforce connection, we recommend enabling this setting (do merge) to keep your leads and contacts as one Ortto record.
If you've already set up your Salesforce connection and did not enable this setting, and kept leads and contacts as separate records, turning it on later could cause future contact updates to change which record (the lead or the contact) the updates are assigned to.
In Ortto, when a Lead is converted to a Contact, the person will have an associated Lead converted activity with a field called Converted contact ID.
When Merge the contact and lead records is selected, Ortto will merge a person’s Lead and Contact records, and set the Converted contact ID value as the person’s Contact ID value. This will help avoid creating duplicate records on merge, because a person’s Contact ID value will not be empty.
TIP: Per the above description of how Ortto handles Salesforce records, we recommend the following configuration:
- The Merge the contact and lead records conversion option enabled,
- Unique identifiers set to Email (primary), and optionally Phone number (fallback), and
- The merge key strategy Match only if previous merge key is empty selected for contacts.
More information about the merge key strategy and how Ortto identifies Salesforce records is available at the Merge step of the Connect from Ortto instructions, at Salesforce integration.
Prepare to sync Salesforce opportunities to Ortto
Salesforce opportunity objects must have a primary contact role that is connected to a contact, otherwise they will not sync into Ortto.
You can learn more about syncing opportunities to Ortto under Associating Salesforce opportunities in Ortto in Troubleshooting Salesforce.
Consider how you want to selectively sync Salesforce records
During the initial sync, you will have the option to set a Selective sync filter. This allows you to specify conditions on Salesforce object data related to people or organizations that will be synced into Ortto, as not all of your data may be relevant/necessary.
You can change/update the selective sync filters at any time after the initial sync.
We recommend using the Auto-archive option in conjunction with a selective sync filter. This option will automatically archive contacts that no longer meet the filter and will ensure that if you change your selective sync filter conditions later on, your CDP will be free from old, unnecessary data.
If you change your selective sync filter and haven't elected to auto-archive contacts, then data from previous syncs will remain inside of the Ortto CDP, which may cause unnecessary clutter. This is why we recommend that you try to determine the most relevant selective sync filters before the initial sync.
Here is an example of selective sync filters that you may want to apply. This example uses a custom field created in Salesforce called "Ortto sync" to help determine which contacts to sync.
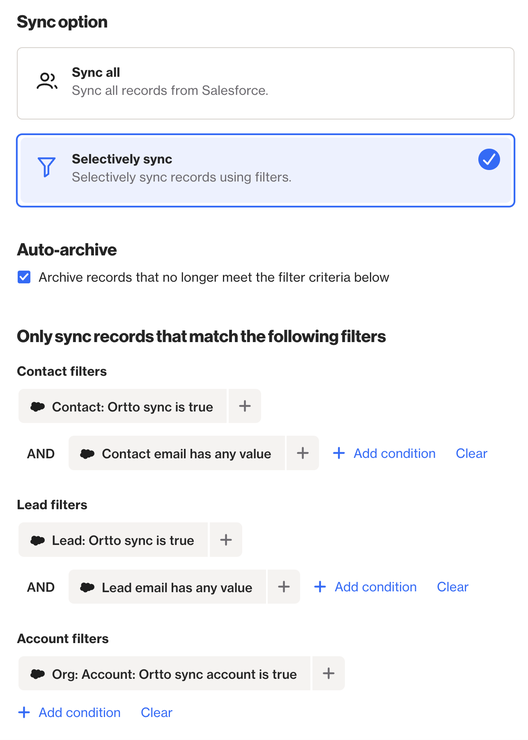
NOTE: You will need to apply Selective sync filter conditions separately for Contacts, Leads and Accounts.
Ortto does not only sync Accounts related to contacts that meet the filter conditions applied to Contacts; you need to set relevant conditions for Accounts too.
Salesforce email and SMS permissions in Ortto
You can manage and control the synchronization of email and SMS permissions between Salesforce and Ortto, ensuring that both systems remain up to date according to your preferences.
For detailed instructions on configuring this for supported objects, please refer to our help guide here.
Ortto connection overview
Once you have gone through the points above and you’re clear on how you want your Salesforce data syncing across to Ortto, follow the below steps to set up the integration:
1 — Connect. Ensure you are logged into your Salesforce account in the same browser where you are setting up the Ortto integration. In your Ortto account, navigate to Data Sources > New data source > Salesforce.
2 — Fields. Once the connection has been established, select the fields and custom objects that you want to sync.
NOTE: There is a limit of 100 custom contact fields and 50 custom organization (Account) fields cumulatively across all objects (the limits do not include default fields).
NOTE: At this point, ensure that any fields you want to use at the Records (selective sync) step (step 4) are selected here. If the field/s are not selected here, they will not be available for the selective sync filter.
3 — Retention. Choose your Data retention option (90 days or more than 90 days).
NOTE: All data source activities and their attributes are retained in Ortto for 90 days. The 90-day limit means that Ortto does not retain data that, in some cases, passes its period of usefulness. This could impair the performance of filters, journeys, audiences and other areas of Ortto over time. In some cases, storing an activity and its attribute data may be necessary for longer than 90 days. In such cases, Ortto provides a mechanism for customers to opt-in to store their select activity data for longer.
This is known as data retention.
When data retention is enabled, activity data will be stored for the defined period to be referenced against. To learn more about what enabling data retention allows you to do in Ortto, under Extend activity data storage in Understanding activity data in Ortto.
NOTE: If you choose to retain your Salesforce activity data longer than 90 days, Ortto will sync historical data based on the time period you select. For example, if you select an activity data retention period of 1 year, Ortto will sync data (for the selected activities) that is up to 1 year old.
Note that this differs to how data retention behaves for most other system, data source and custom activities, where, moving forward, data will be retained for the time period specified (it is not retroactive).
4 — Records (selective sync). This stage is important to ensure you are only bringing across the contacts from your Salesforce account that are relevant, based on the criteria you set.
Make sure you include the filter for each Contact, Lead and Account records, using AND/OR operators as required.
For example, "Ortto Sync is true" AND "Email has any value".
5 — Merge. Select the “recommended" option (Import and overwrite any data that exist).
In consideration of your unique identifiers, select the appropriate Merge key strategy.
6 — Sync. Once complete, your sync will start and begin pulling in your Salesforce records. Depending on the number of records you have, it may take some time to complete the initial sync.
For more detailed connection steps, and additional information on integrating Salesforce with Ortto, read our Salesforce integration guide. Troubleshooting and use cases can be found under Troubleshooting Salesforce and Using Salesforce in Ortto respectively.