
Troubleshooting Salesforce
This troubleshooting guide is designed to help you with common questions or issues you may encounter when using Salesforce as a data source.
For further assistance, please send an email to our Support team at help@ortto.com or lodge a support ticket from your account:
- In the left-hand navigation drawer of your Ortto account, click Support.
- On the How can we help? page:
- Under Quick links, click Submit a support ticket.
- Populate the Submit a support ticket form and click Submit ticket when you are done.
Disconnect and delete the data source
You must disconnect and archive a data source before you can delete it.
Disconnecting a data source from Ortto will stop new data from the data source merging with the CDP.
Learn about disconnecting, archiving and deleting a data source under Managing data sources.
Warning: Disconnecting a data source allows for future reconnection. However, deleting a data source permanently removes the connection, along with all associated activities and field data.
If the Salesforce account is re-added in the future, it will be assigned a new data source ID. Any operations using fields or activities from the deleted data source will need to be updated to use the fields from the new connection.
If you are troubleshooting an issue, we recommend disconnecting and reconnecting the data source without deleting it and contacting our support team for assistance if the behavior persists.
Data source already connected
Disconnect, archive, and delete the existing Salesforce connection before attempting to connect again; the existing data source must be deleted.
Connect more than one Salesforce account
Ortto can connect to more than one Salesforce account at a time. You may wish to do so if you have 2 Salesforce accounts, for example, with a contact named John Smith in both Salesforce accounts. By connecting both of your Salesforce accounts with your Ortto account, Ortto will store John Smith as 1 person (contact) in your CDP. This will help you see John Smith’s activity all in once place, as you can view John Smith’s profile and see activity from both of your Salesforce accounts.
To connect to another Salesforce account, log in to the Salesforce account you wish to connect, then repeat the steps outlined in Connect from Ortto.
Missing Salesforce fields or field values
To ensure new Salesforce fields or field values sync correctly with Ortto, some manual steps are required after they’re created in Salesforce.
Learn more about missing Salesforce fields or field values.
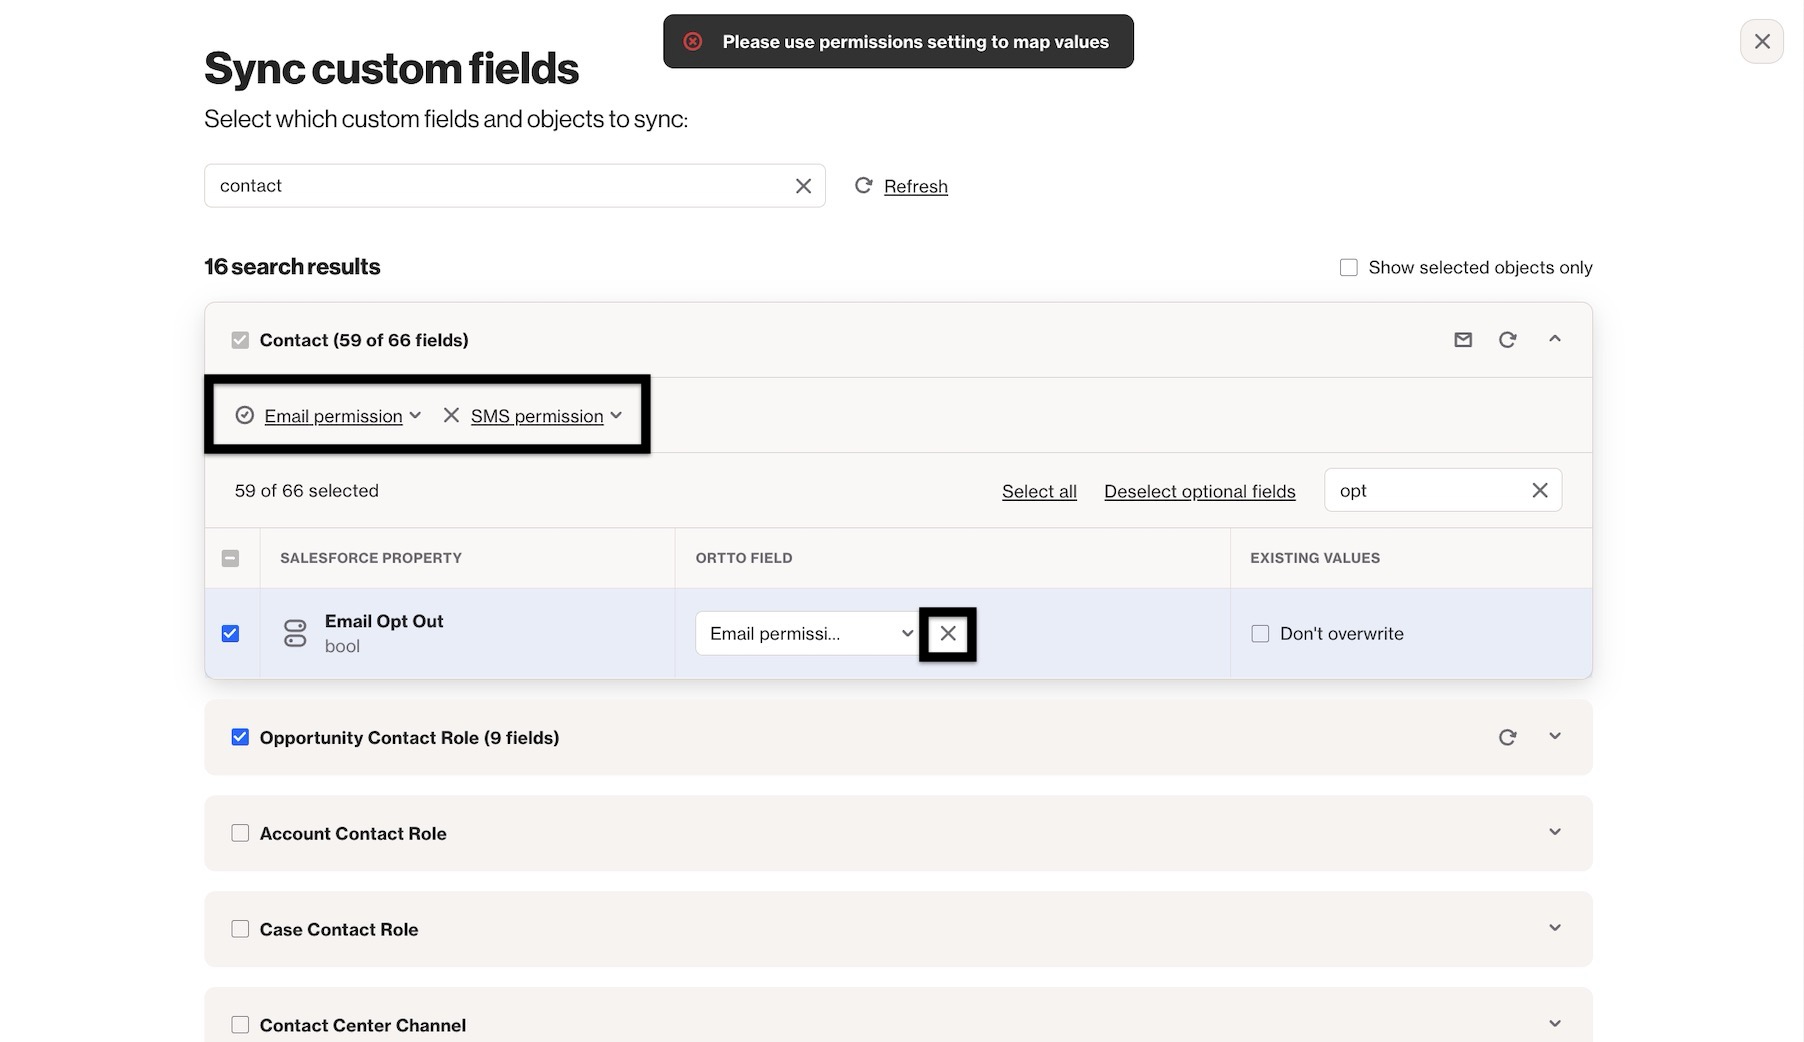
Permissions settings error response
The Please use permissions setting to map values error occurs when a Salesforce field is mapped to the Email Permission or SMS Permission Ortto field.
Marketing permissions have a dedicated setting in the top-left of the object for managing record permissions. These permission fields cannot be mapped as standard fields and must be configured using the dedicated setting. The fields can be checked to allow syncing, but they cannot be mapped.
Use the X option next to the Ortto field name to unmap the Email Permission or SMS Permission field.
Learn more about managing Salesforce permission settings.
Salesforce data source still displays as 'syncing' after x minutes/hours
Depending on the amount of records in your Salesforce account the initial sync may take up to several hours in some cases.
How do I backfill Salesforce field data?
If you select a new/additional Salesforce field to sync to Ortto (under Data sources > Salesforce > Salesforce fields), the field will only be populated with data from new (future) updates.
If you wish to backfill the field data, you can select Backfill Salesforce fields, which will populate data for the newly-added Salesforce fields against existing contacts (people) in your CDP. You can access the backfill feature two ways:
- On the Data sources page, by clicking the more icon next to your Salesforce account, then Backfill Salesforce fields.
- In the Salesforce data source view, under Actions > Backfill Salesforce fields.
For example, say you have contact ID data populated in your Salesforce account but you did not set up your Salesforce integration in Ortto to capture contact ID field data. You can add the contact ID field in Data sources > Salesforce > Salesforce fields. Once you have done so, in the Salesforce view, select Actions > Backfill Salesforce fields to backfill the contact ID data for your existing contacts.
NOTE:
- The Backfill Salesforce fields feature only populates data for contact fields.
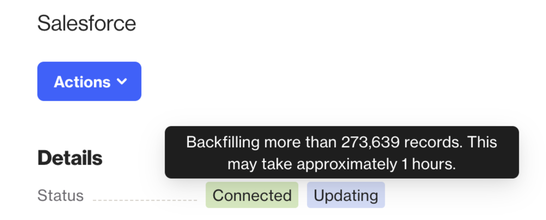
- Backfilling Salesforce fields will put the Salesforce data source into a dual Connected and Updating status. This means the backfill is happening in the background and won’t affect your ability to use Salesforce in Ortto.
Backfilling Salesforce status and timeframe
If the Salesforce data source is updated to backfill, we may provide an Updating status that can be hovered over to provide an approximate timeframe for completion.
This is an estimate and timeframes can be subject to factors including the amount of data needing to poll and Salesforce's API rate limits.
My Salesforce selective sync is missing updates for contacts or leads
If you configured your Salesforce data integration to selectively sync Salesforce data using filter conditions to capture only contacts, the sync will filter out leads (and vice versa). As such, you will not be able to find data on leads in your CDP, for example, because leads do not have contact fields in Salesforce.
If you wish to capture both contacts and leads, your filter conditions will need to be configured to capture both record types, using an OR operator. For example, the filter conditions Primary object name is Contact OR Primary object name is Lead, and group those conditions with any additional contact or lead field conditions as required.
Learn more about grouping conditions and AND/OR operators in Working with filters.
How do I send data from Ortto to Salesforce?
There are two ways in which you can send data from Ortto to Salesforce:
- Create a journey with Action shapes that update object records, such as an action to change a campaign’s status. Learn more about Salesforce actions.
- Select up to 20 activities to sync to Salesforce. This creates custom objects in your Salesforce account with the same names as the activities selected in Ortto.
Learn more about syncing Ortto activities to Salesforce.
Associating Salesforce opportunities in Ortto
Salesforce opportunities must have a contact assigned to the primary contact role in order for the opportunity (and related activities) to be successfully associated with the contact in Ortto. Even if an opportunity has one or more contacts, you need to make one contact the primary contact.
This means that for opportunities with multiple contacts, only the contact assigned to the primary contact role will be associated with the opportunity in Ortto.
Assign a primary contact in an existing opportunity
To assign a contact to the primary contact role for a Salesforce opportunity:
- In Salesforce, view the opportunity you want to add a primary contact to.
- In Contact Roles section, at the relevant contact, click the drop-down arrow then Edit.
- In the Edit Opportunity Contact Role modal, select the Primary checkbox then Save.
Create a new opportunity with a primary contact
To create a new Salesforce opportunity with a primary contact:
- In Salesforce, at Opportunities, click New.
- Populate the opportunity fields as required then click Save.
- On the new opportunity view, in the Contact Roles section, click the drop-down arrow then Add Contact Roles.In the Primary Contact field at the top of the Add Contact Roles modal, select the contact then Save.
For detailed guidance on configuring Salesforce Opportunity associations, including one-to-many and many-to-many setups, refer to our help guide here.
How do I sync scores to Salesforce?
To send your scores to Salesforce, you need to:
- Install the latest Ortto package using the link in the note at Syncing Ortto activities to Salesforce.
- Check the remote site settings related to the Ortto package in Salesforce.
Install the latest Ortto package
To enable contact scores to sync to contact-related record pages in Salesforce, you need to click the link in the note at Syncing Ortto activities to Salesforce:
- During the installation, select Install for all users and click acknowledgement checkbox, then click Install.
- You’ll see an Approve Third-Party Access pop-up alerting you that 3 remote sites are included in the package (this is to accommodate each of the regions in which Ortto can host data). Select the checkbox to grant access to the sites then click Continue.
- When the installation is complete, click Done to return to Salesforce.
- You then need to check the 3 remote sites are active.
Check the remote site settings
When you installed the Ortto package for Salesforce (using the link at Syncing Ortto activities to Salesforce), it automatically added 3 remote sites to your Salesforce account.
When the remote sites were installed, they may not be active, so you will need to check this in Salesforce:
- In Salesforce, at Setup, choose from the left-hand panel Security Remote site settings.
- On the All Remote Sites page, click Edit at each of the Ortto remote sites:
- Ortto_AU: https://salesforce-integration-api.au.autopilotapp.com,
- Ortto_EU: https://salesforce-integration-api.eu.autopilotapp.com, and
- Ortto_US: https://salesforce-integration-api.autopilotapp.com.
- Select Active if not already selected to enable each remote site. There is no need to alter other settings.
- Click Save to finish.
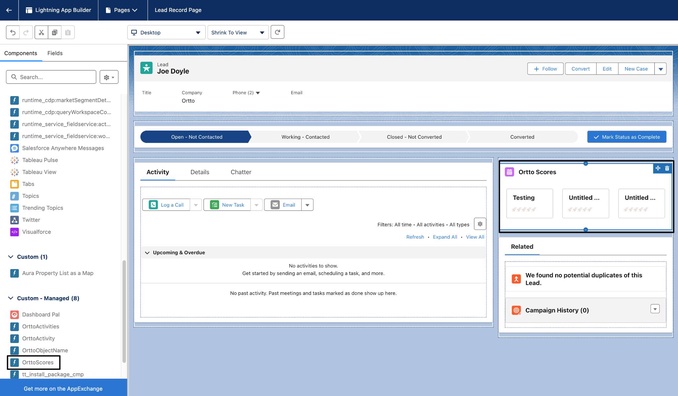
Add the Ortto Scores component to Salesforce records
To add Ortto Scores, on a record page (e.g. lead record or contact record):
- Click the Setup cog, then Edit page.
- In the page builder, in the left-hand Components panel, locate the Ortto Scores page component.
- Click and drag Ortto Scores onto the record page view.
- When you are finished setting up the record page, click Save.
- When prompted, Activate the page so it is visible to all users in your Salesforce account.
- Once the record page setup is complete, you can return to a lead or contact record to see the Ortto Scores section. The section will be populated with scores when the sync occurs.

Needs attention: Fields
If your Salesforce data source displays fields that need your attention due to changes and are no longer syncing, further steps are needed to review.
Learn more about Salesforce fields that need your attention.
Needs attention: Couldn’t connect Salesforce
If your Salesforce data source has a status of Needs attention and you get an error message saying Couldn’t connect data source it may mean that you need to:
- In Salesforce, review your Refresh Token Policy. We recommend having this set to Refresh token is valid until revoked under OAuth Policies. This can be updated by managing your Salesforce authorization.
- Reset your Salesforce security token.
- Reset your Salesforce password.
- Once the token and password are updated, try again in Ortto to connect to Salesforce.If you are asked to login to Salesforce from Ortto during the reconnection, populate the Password field with your Salesforce password followed by your Salesforce security token. For example, if your password is "mypassword" and your security token is "XXXXXX", enter "mypasswordXXXXXX".
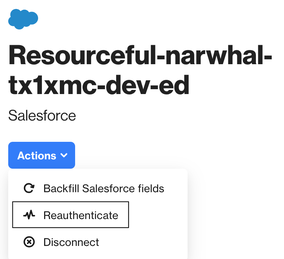
Reauthenticate Salesforce
Reauthenticating allows you to generate a new authentication token for Ortto to connect with Salesforce. This process doesn’t require the original user and is useful when:
- The original user is no longer authorized in Salesforce.
- You’ve reset your Salesforce security token.
Reauthentication ensures your data source stays active and prevents it from getting stuck in syncing mode.
NOTE:
- When reauthenticating with a different Salesforce user, we recommend using an incognito browser to ensure you're prompted for the new Salesforce login.
- This will update the authentication credentials, but the Created by information for the data source will still show the original user's name.
To reauthenticate Salesforce, go to CDP > Data Sources > Salesforce > Actions > Reauthenticate.
Salesforce account connection interrupted
Ortto connects to Salesforce using authentication tokens, which are used to verify and maintain the connection between the two platforms. When Salesforce experiences an outage due to maintenance or an update release, Salesforce may reset these tokens as part of that process; this is outside of Ortto's control.
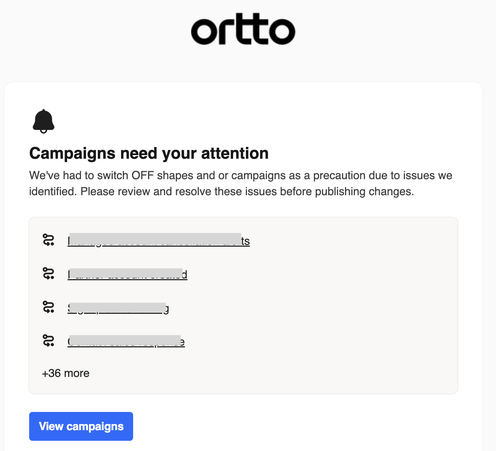
If this occurs, we will notify you by email that campaigns with Salesforce-related actions and/or activities synced from Ortto to Salesforce need attention. For example, an email like this:
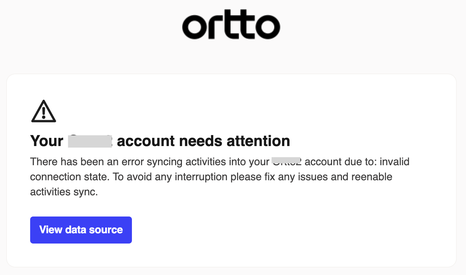
If this occurs, you need to perform the following in Ortto:
- Reconnect the Salesforce data source. You can do this from the Data sources page, click the … more icon > Reconnect. Or from the Salesforce data source view under Actions > Reconnect.
- Turn on any campaigns that were turned off (if required). The email we send to you will list the campaigns that have been affected by the connection disruption so that you can click the link to view the specific campaign, or click View campaigns to access your campaigns list.
- Reconfigure activities to sync from Ortto to Salesforce (if required). If your Ortto > Salesforce activity sync was interrupted, you will need to reconfigure it in Ortto. In the email we send you, click View data source to access the Salesforce data source view and re-add the activities. Advice regarding this issue is available in an earlier section of this page.
Salesforce field mapping can't be edited
Sometimes, the Salesforce fields section cannot be edited (the Edit link is disabled). This usually happens when the Data Source is updating, preventing field mapping changes to avoid data loss. You can update the mapping once the update is complete.

Campaign member removed and campaign member deleted activities
Salesforce handles campaign member deletion in two ways, which impact how data is processed in Ortto:
- Campaign Member removed: This triggers when the isDeleted field on the member is set to true.
- Campaign Member deleted: This occurs when the member record is fully deleted.
Since Salesforce does not provide campaign IDs or names in the Campaign Member deleted action, this information cannot be captured in Ortto.
Ensuring campaign member removed activities are recorded
If you need to receive Campaign Member removed activities in Ortto, ensure campaign members are marked with isDeleted instead of permanently deleted.
If some Campaign Member removed activities are triggering while others are not, we recommend consulting with your Salesforce technical support team or account manager. They can help clarify why certain records are working successfully and assist in replicating the necessary steps across all cases.
Troubleshooting support
Salesforce's handling of deletions (hard vs. soft deletes) is system-driven, and we are unable to modify this behavior within Ortto. If you need an alternative solution, we recommend contacting Salesforce support to:
- Ensure campaign members are marked with isDeleted instead of permanently deleted.
- Verify if your Salesforce account settings or version impact how these activities trigger.
For further assistance, please refer to Salesforce's documentation or reach out to their support team.