
How do I send data from Ortto to Salesforce?
Overview
Discover how to sync data from Ortto to Salesforce. This feature ensures that your Ortto data is accurately reflected in Salesforce.
Data syncing
There are two ways in which you can send data from Ortto to Salesforce:
- Create a journey with Action shapes that update object records, such as an action to change a campaign’s status. Learn more about Salesforce actions.
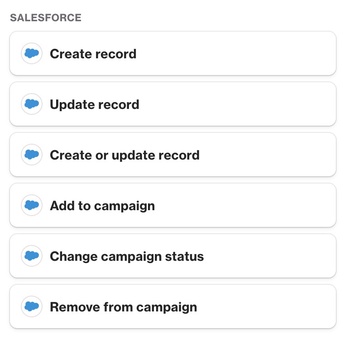
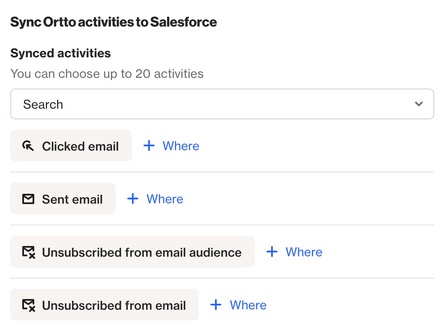
Salesforce action shapes available in journeys. - Select up to 20 activities to sync to Salesforce. This creates custom objects in your Salesforce account with the same names as the activities selected in Ortto.
IMPORTANT: This is how specific data behaves when the record is archived in Ortto:
- Activities synced from Ortto to Salesforce remain visible, even if a contact is archived, due to the custom object nature of the Ortto Salesforce component.
- Scores synced from Ortto to Salesforce will not display if a contact is archived, as we rely on our API to fetch them, and a matching record must exist in Ortto.
Syncing Ortto activities to Salesforce
NOTE: If you set up the Salesforce activity sync before April 17, 2024, you may need to update your Ortto package to version 1.13 or later.
- To install the latest version, follow the link to the package installer:
- If you are installing into a sandbox organization, you must replace the initial portion of the URL with http://test.salesforce.com.
To send Ortto activities to Salesforce:
- In Ortto
- Go to CDP > Data sources > Salesforce > Sync Ortto activities to Salesforce.
- Choose up to 20 activities.
- In Sync settings, decide if you want to sync these as activities, tasks, or both.
2. Save and Install the Package
- Click Save.
- When prompted, click Install package.
- Log in to Salesforce and choose Install for all users.
- Find the package in Salesforce under Settings > Apps > Packaging > Installed Packages.
3. Final Steps
- Once installed, return to Ortto and go to Data sources > Salesforce > Sync Ortto activities to Salesforce.
- Your selected activities will sync to Salesforce during the next data merge.
IMPORTANT:
- If syncing Salesforce Task objects to Ortto, avoid syncing Task object activities from Ortto to Salesforce to prevent an infinite loop.
- Syncing non-Task activities as tasks may create duplicates in Ortto.
NOTE:
- Custom Salesforce objects synced to Ortto that don’t reference a contact or lead by ID can still create contacts in Ortto using a unique identifier (like an email).
- Ortto can then sync activity data for these contacts, as well as those created by reference ID, back to Salesforce.
- Ortto will automatically import the most recent Ortto activities into Salesforce as they occur. If you need to backfill previous Ortto activities to Salesforce, please reach out to our Support team for assistance.
Viewing Ortto activities in Salesforce
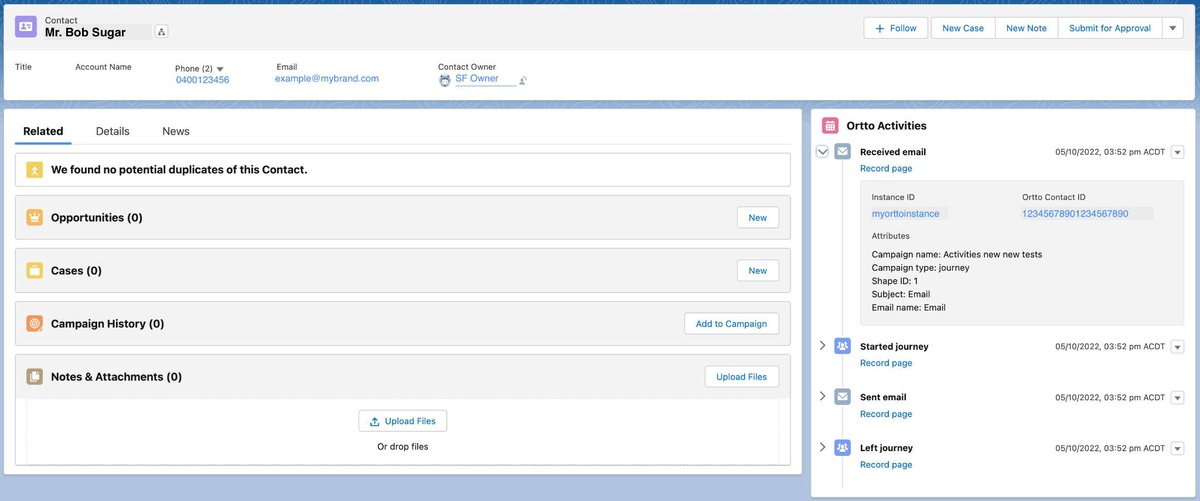
The Ortto package in Salesforce includes an app called Ortto with an object named Ortto Activities. This object links to Salesforce contacts, leads, or other objects synced using a unique identifier.
To add Ortto activities to your Salesforce records
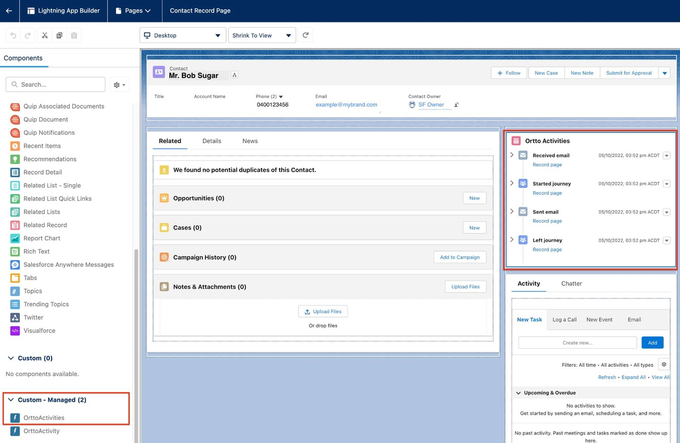
- Open a record page (e.g., lead or contact) and click the Setup cog, then select Edit page.
- In the page builder, find Ortto Activities in the Components panel on the left.
- Drag Ortto Activities onto the record page.
- Click Save.
- Activate the page for all users and choose the device types where you want the page to be visible.
After setting this up, return to a lead or contact record to see Ortto Activities. The section will update with activity events after syncing.
Configuring the Ortto activities object
To set up the Ortto activities section in Salesforce:
- Go to Setup and select Objects and Fields > Object Manager.
- Choose Ortto Activity.
- Click Contact > Page Layouts and either create a new page layout or edit an existing one.
- In the page layout editor, drag and drop field components to customize the Ortto Activity Detail panel.
- Click Save to complete the setup.
Ortto activities not syncing to Salesforce
If Ortto activities stop syncing to Salesforce and you see an error with the Salesforce/Ortto connection, the activities might be cleared from the Ortto data source view.
This issue could be due to:
- Exceeding the Salesforce storage limit.
- Denied access to create records.
- Other Salesforce-related issues.
To resolve this, re-select the activities you want to sync in Ortto. If you’re unsure which activities were previously synced, check the Activity log in the Salesforce data source view.