
Using Salesforce in Ortto
This page helps you discover how you can get the most out of your Salesforce integration with Ortto’s filters, reports, dashboards, campaigns, and coupons.
Filters
The Salesforce activities, person (contact) and account (previously organizations) fields that are added to your Ortto account can be used anywhere you can create a filter (such as in campaigns, to create an audience, or just to view a segment of people), as well as in reports and dashboards.
Use Salesforce activities and person fields as filter conditions:
- In a journey:
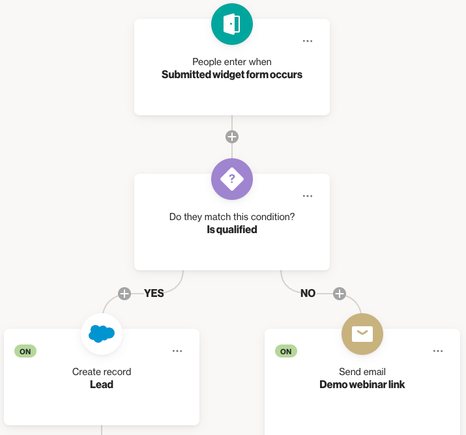
- As a an entry criteria when an activity occurs. See an example below for using occurs as an entry criteria in a journey to assign new leads to your sales team.
- Within a Filter or Condition shape to filter people in the journey using a Salesforce person or activity field. For example, in the assign new leads to your sales team journey below, you could include a condition based on the data included in the form to establish whether a lead is qualified. If so, the lead continues down the Yes path where a lead is created in Salesforce and the person receives a personalized email message. If No, the person could instead receive an email with a link to a demo recording.
TIP: Using an occurs condition gives you a fresh data set, as people enter the journey when they perform the specified activity (as opposed to using has occurred, which qualifies people who have already performed an activity).
- To create an email or SMS campaign audience, to send a confirmation link for an upcoming event.

- To view a segment of people on the People page, such as people who have moved to the qualification stage within an opportunity (a segment from which you can create an audience, send a campaign, export, or archive).

Actions
Actions allow you to use Ortto to update data within a data source. One way to use Salesforce actions is to add an Action shape in a journey or playbook to:
- create or update a record,
- change a campaign status,
- add to or remove from a campaign, or
- create or update a record.
Learn more about setting up Salesforce actions in Salesforce actions.
The following are some examples of how you can use Salesforce actions.
Assign new leads to your sales team
Create a playbook to welcome new subscribers. Within the playbook, add an action to add subscribers as leads to your Salesforce account.
Or for a journey, add the following Action shapes in your journey flow editor:
- Create a record with the Object type as Lead to add the lead to your account. In this shape you can assign the lead owner, including multiple people to round robin.
- Create a record with Object type as Task to create a task to call the lead.
Add record to a Salesforce campaign
Create and add members to different Salesforce campaigns based on the lead source. This example adds people in the journey to 2 different campaigns set up in Salesforce: one for Google leads and one for website leads.
Update a person’s campaign status if they opened or clicked on a campaign email (they showed interest). This can help your sales rep identify who to prioritize when outreaching and to personalize the communication based on what the user clicked on/viewed.
You could also create a task for a sales rep to follow up and reach out to a contact based on campaign activity. In the task you can add merge tags to populate the task with the campaign name and email name to provide your sales rep with additional context.
Update Salesforce fields via a journey action
If you have a Salesforce record with a date/time field, you can set a journey action Update record to add or set:
- a merge tag,
- a specific date,
- the date when the action occurs,
- or clear the field’s value.
To do so:
- In a journey you are creating, add an Action shape and select Salesforce Update record.
- Select the Salesforce account (if you have more than one connected to you Ortto account), then choose the Object type to update.
- At the field you wish to update, choose from the dropdown menu the relevant option.
- Click Save to finish the shape setup.
For records with other field types, such as a text or single-select field, you can set a merge tag as the field value, and it will populate the Salesforce record field with the value set in your Ortto CDP.
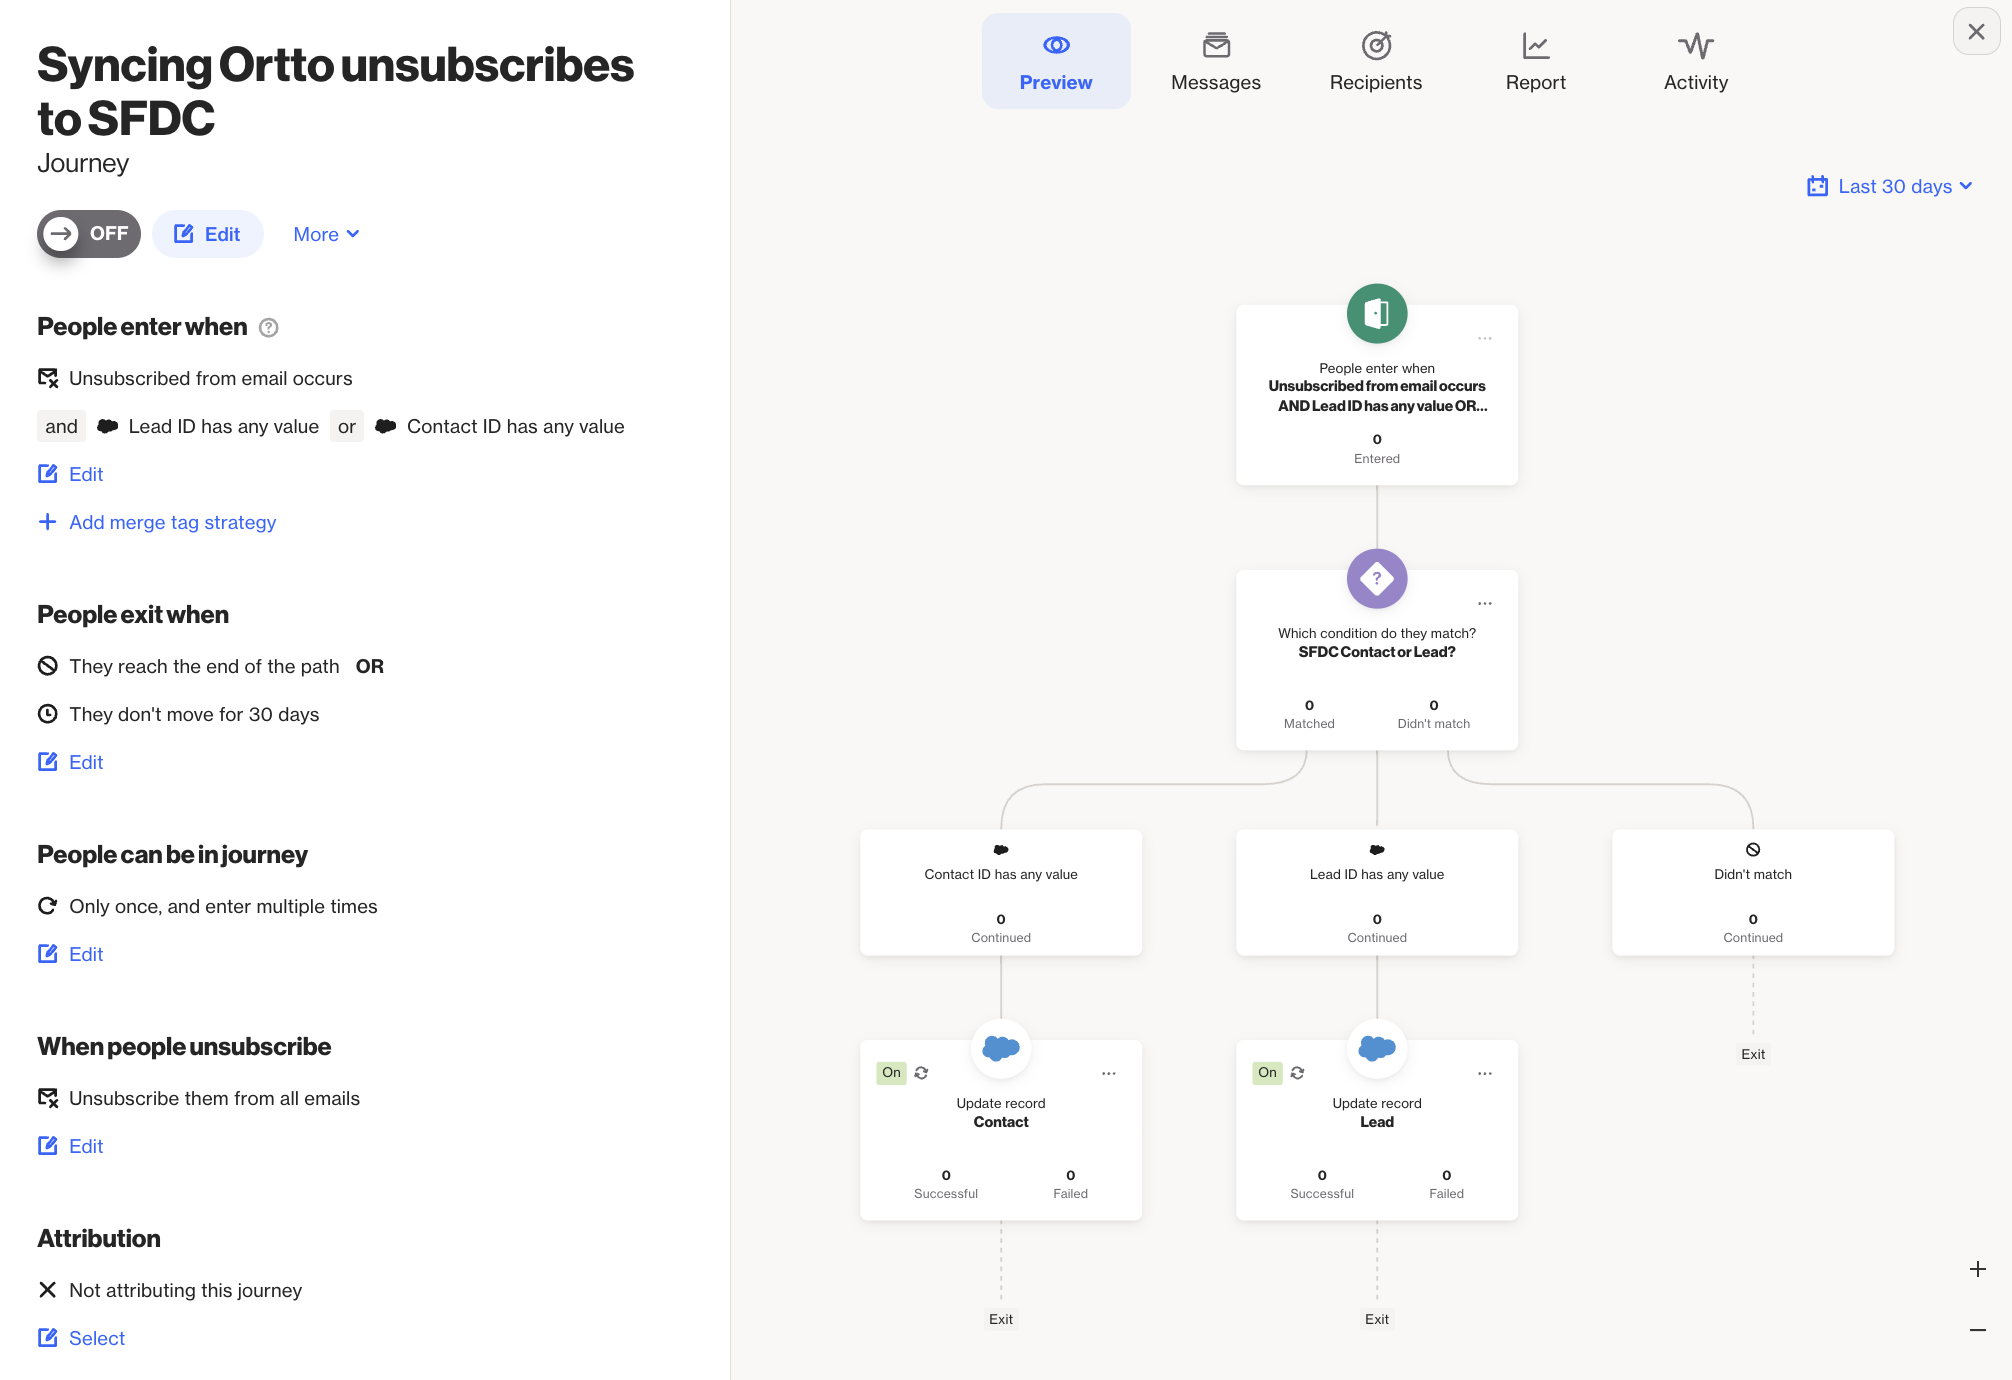
Syncing Ortto unsubscribes to Salesforce
If your Salesforce account uses a custom field to manage opt-in permissions, you can use a journey to have the permission field updated when a contact unsubscribes in Ortto.
To do so:
- Set the journey's entry condition as "Unsubscribed from email occurs" to have contact enter that journey when the contact unsubscribes. Additional conditions can also be added for "Contact ID has any value or Lead ID has any value" to ensure contacts only enter when they have an existing Salesforce record.
- Use a Condition shape to determine whether the contact has a Contact ID or Lead ID to create separate paths for the intended record type.
- Add an Update Record shape in a journey to have that permission field updated in Salesforce.
TIP:
- If you'd like to archive the contact, you can use an Archive action shape. To ensure that the unsubscribe activity is included in the campaign's reporting, it is recommended to include a 48 hour delay shape beforehand so that the activity is aggregated into the report prior to the archive.
- Please visit our resource on archiving contacts via journey actions here for more information.
- To prevent the contact from being added back in through Salesforce, you may also want to add the opt-in field as a selective sync condition for the data source.
- You can visit our resource here for additional information regarding selective sync.
Reports
You can use the default Salesforce reports that are added to your account upon integration to gain insight into your Salesforce opportunities and leads.
One way you can use the Salesforce report templates is to visualize leads created over time by lead owner using the New leads by day report template and group by attribute Lead owner name.
To find this report:
- On the Reports page, click New report.
- Under New report, click Salesforce.
- Select the report you wish to use, then Get started.
- Edit any of the default settings a required, then click Create to view your report.
Alternatively, you could build a custom report to discover which leads resulted in opportunities.
To build this custom report:
- On the Reports page, click New report.
- Under on the Quick start tab, click Start from scratch.
- For the Type, select Funnel, then Next.
- Give your report a name then click Add metric.
- In Metrics, select the activity as Lead created.
- Add another metric to select the Opportunity created activity
- Click Create to view your report.
Learn more about reports in Working with reports.
Dashboards
On the Dashboards page, select Salesforce from the drop-down menu to view a SaaS metrics dashboard populated with reports on Salesforce metrics, such as leads, opportunities, win rate and revenue breakdowns by owner.
Learn more about data source dashboards under Default data source dashboards.
Send Ortto activities to Salesforce
Having the ability to send Ortto activity events to your Salesforce account enables you to have a a more comprehensive view in Salesforce of your contacts' behavior.
Selecting activities to sync to Salesforce depends on your goals and needs. Here are a few ideas:
- See which website pages a contact viewed before they requested a quote — ensure your tracking code is configured to associate a known user, then sync the User session activity to Salesforce.
- See which email campaign messages a contact has interacted with — sync the Opened email and Clicked email activities to Salesforce.
Send scores to Salesforce
Sending your custom contact scores to Salesforce enables your team to see at a glance a contact’s score rating.
Learn how to set this up at How do I sync scores to Salesforce.