
Intercom integration
When you connect to Intercom, we sync your contacts (people), companies (organizations), conversations, and selected teams and agents. You can leverage Ortto’s powerful campaign, reporting, and dashboard features on your customer data from Intercom.
Intercom prerequisites
This integration process requires having a Intercom workspace for which you have administrative permission to install apps.
It is also a requirement that the Intercom account you are connecting is on a paid plan (not a free plan) to ensure that conversation data can be successfully synced to Ortto.
Connect from Ortto
To connect to Intercom:
- On the Data sources page, click New data source.
- Under Customer support or All data sources, select Intercom, then Get started.
- On Connect to Intercom, if needed, select Advanced options to:
- Choose which CDP fields can be modified from the Intercom data source, or
- Choose not to modify CDP data fields that already have a value.You also have the option to automatically archive records in Ortto when they are deleted in Intercom.
- Click Connect then sign in to your Intercom account.
- Choose the Intercom account to connect, then click Authorize access.
- At Fields, choose which Intercom objects and their fields will be synchronized across to your Ortto account’s customer data platform (CDP).
- At Teams, you’ll import team members as Ortto users so they can act as agents in the Talk inbox, and use other Ortto features per their role and permissions.
- Select a User role for each team member or Intercom user to inherit in Ortto. You can change a user’s role and permissions after import at Settings > User management.
- At Teams and/or Users that don’t belong to a team (if applicable), select the teams and users/team members that you want to import.Teams can be imported without members (you can add the members later). You can also import members of a team without importing the whole team.If you have a user who is on multiple teams and deselect that member from 1 team, they will still be imported as a user, but won’t appear on the team they were deselected from.
- Click Next to continue.
- At Data retention, select to either:
- store only the last 90 days of activity data, or
- select the time frame for the data stored, and the activities which will be stored.
- On the Select records page, choose between syncing all your chosen object data in the previous step across to Ortto (by leaving Sync all selected), or click Selectively sync to specify conditions on Intercom object data related to people or accounts (previously organizations) in your Ortto’s CDP that will be synced.
- On the Merge page, select the appropriate strategy by which people’s (customers') data is merged from Intercom into your Ortto’s CDP.
- Click Done to exit the setup.
NOTE: Intercom users imported during the integration with Ortto will be sent an invite (via email). Once the user has accepted the invitation, then you can manage their role and permissions.
NOTE: It is recommended to set the data retention limits while setting up the data source. Updating the data retention limits in the future will require a resync of the data source, which may affect multiple audiences and campaigns within your customer data platform (CDP). Learn more about configuring data retention under Configuring data retention.
NOTE: Each Intercom object can be associated with a maximum of 50 records.
NOTE:
The merge options:
- Import and merge new records only,
- Import and overwrite any records that exist, and
- Import new records only
are equivalent to the respective emerge strategies for people:
- Append only,
- Overwrite existing, and
- Ignore
How is the data merged into Ortto?
Data is merged from Intercom to Ortto on the initial connection. Subsequently, newly modified objects are synced when they occur, as the connection is based on webhooks.
The Intercom integration is initially configured as read only, which means that no data is sent from Ortto to Intercom.
When a person is added to your CDP from the Intercom data synchronization, if they do not already exist as a contact in your CDP, they are added as a new contact. New contacts are automatically subscribed to receive email communications (but are unsubscribed to SMS by default).
If a contact synced from Intercom already exists in Ortto, the contact will not have their email or SMS permissions changed; they will remain as they were set in Intercom.
Initial data sync
Data associated with the default objects and any custom objects you selected are merged into the Ortto CDP. The merge follows the data merge strategy selected during the initial connection with Intercom. Ortto activities store data based on the objects you chose to be synced during the integration.
Ongoing data sync
Intercom data is merged in to Ortto shortly after it occurs.
Resynchronizing data
Intercom data is resynchronized when the data source is reconnected and when the data retention limits are adjusted. The resync will not perform a full backfill of data, it will only import changes that occurred since the last Ortto request for Intercom data.
A resync of the Intercom data may affect the audiences and campaigns within the CDP by resetting the attributes for the person, and activities, causing a person to potentially re-enter an audience or campaign within the CDP.
What does the data source add to my account?
The Intercom data source adds:
- Imported intercom teams and agents can be managed as users in Ortto.
- Intercom contact and company records and their associated fields to your CDP, known as people or organizations respectively in Ortto.
- Intercom activities, based on the objects selected during setup, from the last 90 days. In some cases, however, it may be necessary to store an activity and its attribute data for longer. Therefore, Ortto provides a mechanism for customers on selected Ortto plans to opt-in to selectively store their activity data for longer. Learn more about data retention under Configuring data retention.
- The ability to use Liquid syntax in campaign messages to personalize your messages using merge tags for Intercom person and organization fields, and activity attributes. Learn more about using Liquid syntax under Personalizing campaign content with Liquid.
- The ability to import articles into your Ortto knowledge base so that you can consolidate your marketing and support tools.
NOTE: Deleting a Intercom data source connection will not remove the current entries in the CDP for people or activities that were merged from that Intercom connection.
View Intercom fields in your CDP
Customize your CDP field visibility and add Intercom fields by clicking the cog icon, then select or clear the fields you want to show or hide. Intercom fields are indicated with the small Intercom icon.
Access the Intercom data source view
When a data source is connected, you are provided with a data source view. On the Data sources page, click the data source you wish to view.
A data source’s view is the administration page where you can:
- view and manage the data source in the left-hand details panel, and
- under the relevant tabs on the right-hand side, view:
- an Overview of the data source,
- an Activity feed, and
- an Audience table, which displays the people imported from Intercom.
In the details panel, you can give the data source a new name (this will not affect your Intercom account settings). To do so, hover over the name and click the pencil icon, then type the new name and click on a blank area of the page to save the name. You can also disconnect the data source, and edit:
- whether to sync all or selected records,
- whether to modify system CDP fields,
- the merge strategy,
- the default and custom Intercom fields to sync, and
- the data retention period.
Learn more about the data source view under Managing data sources.
Manage Intercom users
Intercom users and team members added to your Ortto account when you connected Intercom to Ortto can be found at Settings > User management.
In User management, you can modify a user’s role and permissions, and add more users, as required.
NOTE: Intercom users imported during the integration with Ortto will be sent an invite (via email). Once the user has accepted the invitation, then you can manage their role and permissions.
If a user hasn’t accepted their invitation, you can resend the invitation or delete the user.
The Intercom teams imported during the integration with Ortto will be created as teams for Talk. You can view and manage the teams in Ortto at Settings > Inbox > Teams and members.
Using Intercom
Integrating Intercom with Ortto allows you to import your existing customer data, conversations, articles, and teams and agents. This makes it easy to migrate to using Ortto’s Talk feature as your primary means of providing support to customers and leads.
When you import your Intercom data into Ortto, you can:
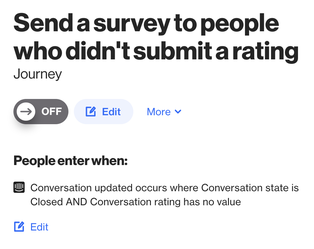
- Use Intercom contact and conversation data to create highly-customized filters to find specific segments of people for campaigns and audiences. For example, create a filter to trigger a contact’s entry into a journey to receive a detailed customer service survey after the contact’s conversation has been closed.
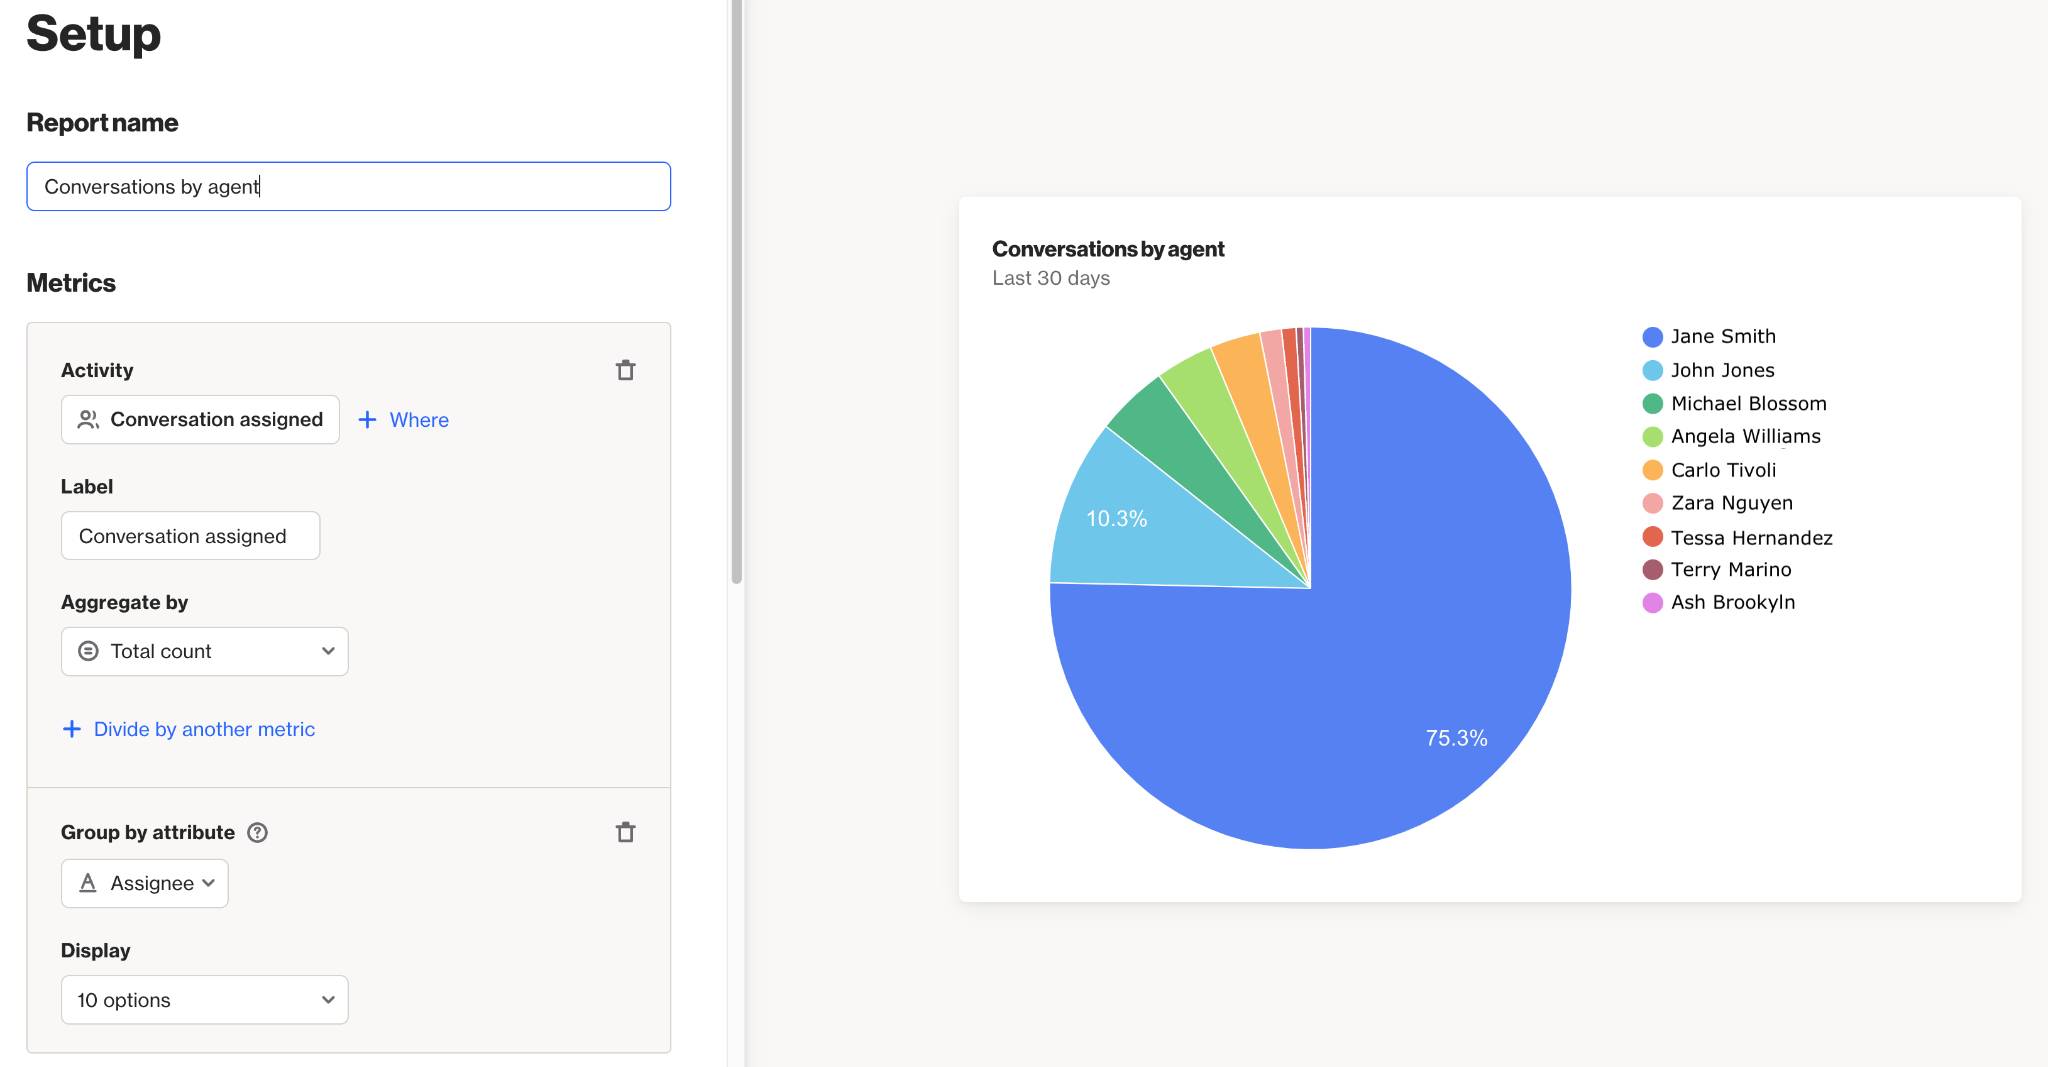
- Use Intercom conversation data to create reports and dashboards to capture metrics like new number of conversations, number of closed conversations, conversation ratings by team or member (agent), number of conversations assigned to a particular team, subjects and messages relating to a particular word or phrase, and so on.
- Automate conversation assignment to existing Intercom teams when using Talk. Set an Intercom team you’ve imported as the assignee for an assignment rule, or as the default assignee to conversations that don’t meet an assignment rule.
- Create campaigns to educate customers about specific topics or features based on conversation data. For example, your health food company gets a lot of customers asking about certain ingredients in your products. You could use conversation subject, tag and message data to create playbook with a series of messages to educate customers on the uses and benefits of specific ingredients.
- Import articles into your Ortto knowledge base so that you can consolidate your marketing and support tools. Knowledge base articles require no code to create or manage, so your whole team can contribute to article updates. And while a knowledge base allows customers to self-serve answers to their queries, if an article doesn't resolve their issue they can easily start a conversation with a support agent via the article feedback widget.
Troubleshooting Intercom
This troubleshooting guide is designed to help you with common questions or issues you may encounter when using Intercom as a data source.
For further assistance, please contact our Support team:
- In the left-hand navigation drawer of your Ortto account, click Support.
- On the How can we help? page:
- Under Quick links, click Chat with support.
- Type your message in the Talk messenger widget to start a conversation with our team.
Disconnect and delete the data source
You must disconnect and archive a data source before you can delete it.
Disconnecting a data source from Ortto will stop new data from the data source merging with the CDP.
Learn about disconnecting, archiving and deleting a data source under Managing data sources.
Data source already connected
Disconnect, archive, and delete the existing Intercom connection before attempting to connect again; the existing data source must be deleted.
Connect more than one Intercom account
Ortto can connect to only one Intercom account at a time. To connect to another Intercom account, you must first disconnect and delete the data source for the current Intercom account.