
Getting started with Ortto
Getting started with Ortto is easy.
All you need to do is click Try Ortto free on our website or navigate to https://ortto.app/signup.
Then, create a new Ortto account using either a Google or Microsoft account, or by providing your:
- First name.
- Last name.
- Job title.
- Work email address.
- Password of your choice.
NOTE: Passwords must be a minimum of 8 characters and a maximum of 50 characters in length.
We recommend choosing a password that is not an easy to guess word. Ideally, your password will:
- Be 8 to 12 characters in length.
- Use a mix of different cases (uppercase and lowercase).
- Contain digits.
- Contain at least 1 special character (e.g. _ ! &).
If you already have an Ortto account, Sign in to access it.
Create an Ortto account
- Start on the Ortto website
- Go to Ortto’s main website to begin creating your account.
- Sign up options
- Click Sign up with Google or Sign up with Microsoft and follow the prompts, or
- Fill in your First Name, Last Name, Work Email, and Password in the provided fields.
- Complete sign up
- Click Sign up. Check your email for a verification message from Ortto and click Verify email address.
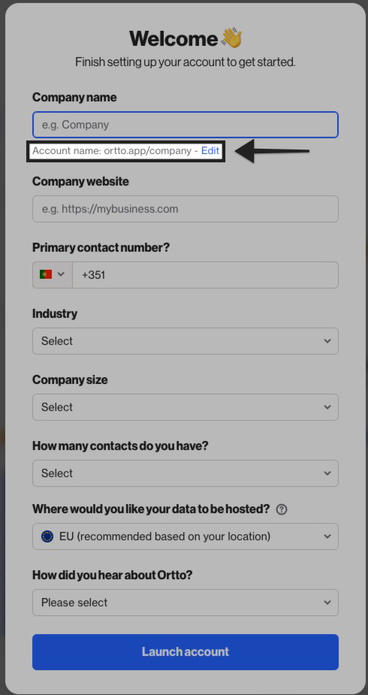
- Welcome page
- Enter your business details:
- Company name.
- Click Edit to modify your account name.
- Company website.
- Primary contact number.
- Industry.
- Company Size
- Number of Contacts (select an approximate range).
- Data Hosting Location (choose from US, EU, or AU)
- Learn more about data hosting.
5. Launch your account
Click Launch account to finish the setup.
IMPORTANT:
- Make sure your Account name is correct, as it determines the URL you’ll use to access Ortto. This name cannot be changed later.
- You can change the Company name after your account is created; this name is mainly used in email footers and preference centers.
14 day trial plans
When you sign up for a free trial of Ortto, you have 14 days to explore the platform (SMS features are excluded). During this time, you can manage up to 10,000 contacts and send up to 100 emails.
After 14 days, you’ll need to choose a plan to keep using Ortto.
Learn more about 14 day trial plans.
Complete the setup checklist
Once your trial begins, we recommend following the onboarding checklist to make the most of Ortto. Here are the key steps to start:
- Add contacts: Upload your existing contacts via CSV or connect a data source.
- Set up your Brand Book: Standardize your communications.
- Build your first Campaign:
- Invite team members: Collaborate on your marketing efforts.
If you need to return to the onboarding checklist, just click Get Started in the left-hand menu.
Once you finish the checklist, you can explore additional suggestions, including:
- Setting up your tracking code.
- Enabling talk messenger.
- Creating reports and dashboards.
- Setting a custom domain.
When you’re done, click Dismiss Getting Started to remove the menu option.
Sign in to Ortto
If you’ve already created an Ortto account, you can sign in at ortto.app. This will redirect you to the login page.
You can log in using your Google or Microsoft account, or with your Ortto email and password.