
Creating an email campaign
Overview
This article explains how to create a one-time send email campaign.
Creating an email campaign
Navigate to Marketing > Campaigns > New Campaign > Email.
TIP: Make sure campaign names are unique so you can easily identify them when using them in filters.
Email campaign wizard pages
This section describes each successive page of the email campaign creation process.
Template
On the Template page, choose a template that suits your needs or data source integration. If none fit, select Start from scratch.
You can also access:
- My saved templates.
- Shared with me (templates shared from other Ortto accounts).
- Autopilot emails (if your Ortto account is integrated with Autopilot).
To use a custom design, select HTML upload to upload your own HTML file, including any Liquid syntax. If the file is valid, you can move to the Review step.
NOTE:
- For A/B testing, upload 2 separate HTML files, as only one can be uploaded at a time.
- Once you reach the Review tab, you cannot edit the email content. To make changes, update your HTML file and re-upload it.
Brandbook settings:
You can apply your brand book settings by checking Use brand book settings and click Use template to get started. If your template pulls data from a connected source, select the relevant account before proceeding.
Recipients
On the Recipients page, choose one audience, a subscriber tag, or a segment from a filter. You can only select one option at a time.
Learn more about working with recipients.
Setup
The Setup page allows customers to configure key aspects of their email campaigns, such as subject lines, A/B testing, sender email and name, and marking emails as transactional. It also includes options for open rate optimization, tracking, and delivery load distribution.
Learn more about email campaign setup.
Content
On the Content page, use the email editor to easily drag and drop images and text into your template. If you have an e-commerce data source connected, you'll also see content blocks for products, recently viewed items, and order details.
Learn more about email campaign content.
Learn more about personalizing campaign content with liquid.
TIP: Gmail does not support custom fonts, which can lead to the loss of button colors and images. To ensure your email design remains intact across different email clients, use more common fonts.
Review
The Review page helps you confirm your audience, campaign settings, and that all links are working. If any links are broken, they’ll be marked as errors for easy review. You can navigate between steps or go back to any section using the menu in the footer.
Send now
Click Send Now to send your campaign immediately. After confirming, your email will be sent. Send times may vary depending on the audience size.
NOTE: If this is your first email campaign or you’ve recently created an Ortto account, your details and account may need to be verified before you can send emails.
Learn more about this process in untrusted accounts.
Schedule the campaign
You can either send the campaign immediately or schedule it for a later time by selecting a date and time.
When delivery load distribution is enabled, emails will start sending in batches at the scheduled time, following the specified sending rate.
Learn more about scheduling your email campaign.
Delivery optimization
When enabled, this setting schedules the email to send at the specified time in each contact’s local timezone, based on their geolocation. If a contact's location is unknown or the send time has already passed in their timezone, the email will send at the specified time in your account's set timezone instead.
Translate email message content
If you selected in the email Setup to translate your email content to other languages, you will need to use merge tags and Liquid syntax to ensure the message content is conditionally shown to recipients in those languages.
NOTE: Ortto does not automatically translate message content. You’ll need to write your text in the required languages.
EX: If your campaign supports both English and Spanish, you'll need to include both language versions of the subject lines and message text. Use conditions to ensure English readers see the English text and Spanish readers see the Spanish version.
Learn more about how to display translated email message content.
Delivery load distribution
When setting up delivery load distribution, Max recipients per batch defines the maximum number of people in each batch.
EX: With an audience of 750, the first batch could include up to 500 recipients, and the second batch will include the rest.
Ortto's minimum delivery rate is 500 recipients every 5 minutes. If you need a slower send, you can split your audience into two and apply the rate limit to each batch separately.
NOTE: Delivery load distribution is not available when running an A/B test.
Automatic UTM parameters
By default, Ortto adds UTM parameters to your email URLs to help track performance in tools like Google Analytics. With this option enabled (recommended), your URL will look like this:
https://www.mystore.com/blog/?utm_campaign=campaign-name&utm_content=message-name&utm_medium=email&utm_source=ortto
Here’s what each parameter means:
- Campaign = campaign name.
- Content = campaign name (or the message name if sent from a journey or playbook).
- Medium = email or SMS.
- Source = ortto.
NOTE: The utm_campaign parameter has a 26-character limit. Non-letter or digit characters (such as spaces, #, &, and $) will be replaced with a dash (-), unless they appear at the beginning or end of the name, in which case they are ignored.
EX: The campaign name Summer sale promotion for Australian customers will be shortened to summer-sale-promotion-for (the space at the 26th character is ignored).
TIP: Custom UTM parameters can be included in the URLs input for the campaign when automatic parameters are enabled. The automatic parameters will be added to the URL alongside the custom parameters.
When manually including one of the default parameters, such as utm_campaign-name, the URL will use the custom value rather than the automatic value generated for the campaign.
Email hash
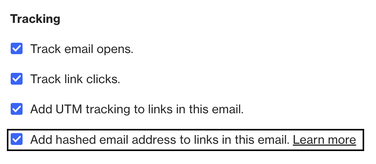
You can add a hashed version of a recipient's email address to links in your emails. When a recipient clicks a link, the URL will include a user_email parameter, which contains a hashed (SHA-256) version of their email.
EX: user_email=dba8b520e037f1acf4845f5c8e5630939912218cdac77a1e4d9d46a2ba8c3602
This allows you to track clicks and associate them with specific users in your own analytics tool.
Learn more about email tracking.
NOTE: You must have Track link clicks selected to enable the email hash feature.
Email campaign reactions
Email reactions enable your email campaign recipients to express their sentiment regarding your email content. Reactions are on by default when you create a new email campaign.
Learn more about email campaign reactions.
Schedule the email campaign
When creating an email campaign, you'll need to choose an audience, tag, or filter of subscribers to send your campaign to.
If you schedule your campaign instead of sending it immediately, the list of recipients may change before it’s sent (e.g., new subscribers may be added or existing ones removed).
If delivery load distribution is enabled, the batches will begin sending at the scheduled time and deliver in accordance with the rate specified.
Learn more about working with recipients.
NOTE: Ortto will automatically update the recipients based on the selected audience at the time the campaign is scheduled to send.
Delivery optimization
With delivery optimization enabled, your email will be sent based on the recipient's local timezone, if known. If the timezone is unknown or the selected time has passed, the email will be sent using the default account timezone.
Unsubscribe links in the footers
Every email includes an option for subscribers to opt-out, with two unsubscribe links depending on the recipient:
- Unsubscribe from all emails – This option appears when you send an email using a filter or tag. Clicking it will globally unsubscribe the subscriber, and you won't be able to email them again unless they opt back in.
- Unsubscribe from this list – This link appears when sending to an audience included in the email preference center. Unsubscribing here only removes the subscriber from that specific list, but they can choose to unsubscribe from all emails in the preference center.
Learn more about the preference center.
Custom HTML email upload
The custom HTML upload feature is designed to make it easy for you to upload email message content if you have a lot of emails prepared in HTML format or you are transferring your email content from another platform to Ortto.
Learn more about custom HTML upload.
Dynamic content
The dynamic content feature allows you to pull content to put into your email from a JSON endpoint you control.
Learn more about how to use a JSON endpoint for dynamic email content.