
Creating a push campaign
Push notifications for web and for iOS/Android are available on selected Ortto plans and platforms are configured in Settings > Push notifications.
Use push campaigns to alert your contacts about sale events, subscription renewals, or new product announcements via notifications sent through their browser (web), or iOS or Android device via your mobile application (native).
NOTE: Push notifications are not currently supported for:
- iOS web browsers (Safari/Chrome/Firefox).
- Desktop applications.
Push campaigns can be sent as an individual campaign, or as a shape within a journey. This page describes how to create an individual push campaign. Learn more about adding push notifications to a journey at Creating a journey campaign.
NOTE: You can send a maximum of 30 notifications per contact per day.
To create a new Ortto push campaign:
- On the Campaigns page.
- On this page, click New campaign.
- On the New campaign page, click Push to begin creating your push campaign, followed by Next.
Push campaign wizard pages
This section describes each successive page of the push campaign creation process.
Template
On the Template page, create a push from scratch or select a template based on a particular use case as the basis to build your push campaign. You can select My saved templates or choose from templates shared with you from another Ortto account under Shared with me.
When you choose a template, click Use template to get started. Once selected, you can also rename the campaign if needed. If the template you selected uses data from a connected data source, you’ll need to choose the relevant accounts.
Recipients
On the Recipients page, select either an audience, subscribers with a certain tag, or a segment of people from a filter. You can only select a single audience, tag or filter segment.
Setup
On the Setup page:
At Platforms, select the platform/s on which to serve your push campaign.
NOTE: Currently, push permissions requests are not supported by iOS web browsers (Safari/Chrome/Firefox). As such, push campaigns cannot currently be delivered to iOS web browsers (Mac and Windows desktop browsers, and Android web browsers are supported).
The platform breakdown pie chart will show the expected recipient percentages per platform.
A contact who is subscribed to multiple platforms will receive notifications via, and be counted for, each platform they are subscribed to.
Contacts who fall under the No push opt-in permission category are those who have not yet opted-in to push notifications and those who have disabled notifications.
Learn more about contact push permission preferences.
A/B test. If you want to A/B test the push campaign, click Add A/B test and configure as required.
Attempt to deliver notification for (TTL). Select the lifespan of the notification (the time to live (TTL)). This is the time frame in which Ortto will attempt to deliver the notification. For example, your web notification campaign has a TTL of 8 hours. Once the campaign is sent, over the next 8 hours Ortto’s service worker will "listen" for when the subscriber goes online (opens their browser), then the service worker delivers the notification. If the subscriber does not go online during the TTL, the notification will not be delivered.
Expand the Advanced options menu for:
Delivery load distribution — You can rate limit the push notification delivery and extend your send time by up to 48 hours. Rate limiting the notification send to a large recipient base can help you manage expected recipient responses, such as a high website or call center demand following an event announcement.
Should you wish to rate limit the send further than Ortto’s minimum limit, you could consider splitting your campaign audience into two, and rate limit the send to each audience, one after the other.
Max recipients per batch is the maximum amount of people that will be in a batch. For example, if you have an audience of 750 people, a maximum of 500 will be in the first batch and the remainder in the second.
UTM Tracking. To automatically add UTM tracking parameters to links that don’t already have UTM parameters in your push notification, select Automatically add UTM tracking to links to this push notification. Where a link has an existing UTM parameter, we won’t replace it. Learn more about UTM tracking parameters in these Wikipedia and Google articles.
Attribution. To attribute your push campaign to a custom (non-system) activity, select Enabled, and select the appropriate activity (and its attributes, if required) to be attributed by this push campaign.
NOTE:
- This list is only available if an appropriate data source has been configured in your Ortto account.
- If a custom activity is not specified on this page, then the default Activity to attribute specified through the Settings > Attribution page is used instead.
Click Next to proceed.
Content
Configure the push message and actions.
For the push Message, add text, including emojis and merge tags, and images as required. Liquid language is supported, simply follow our guide to using Liquid in push notifications.
If adding an image, the image will replace your logo on Mac Chrome and Firefox because the notification always shows the browser logo and can only accommodate 1 additional image. Images must be a minimum of 192 x 192 pixels and a maximum of 2048 x 2048 pixels. Permitted image file types are: .png, .gif. jpg and .jpeg.
Determine the primary and any secondary actions to implement when a contact clicks the push notification and any buttons.
Click Add button to create a new button.
The button Label should clearly tell contacts what will happen when they click, e.g. "Shop now" will take them to your products page.
NOTE:
- Buttons will not appear in push notifications for Safari or Firefox browsers.
- Maximum secondary actions that can be added:
- 2 for web notifications and Android Chrome
- 3 for Android (native)
- 4 for iOS.
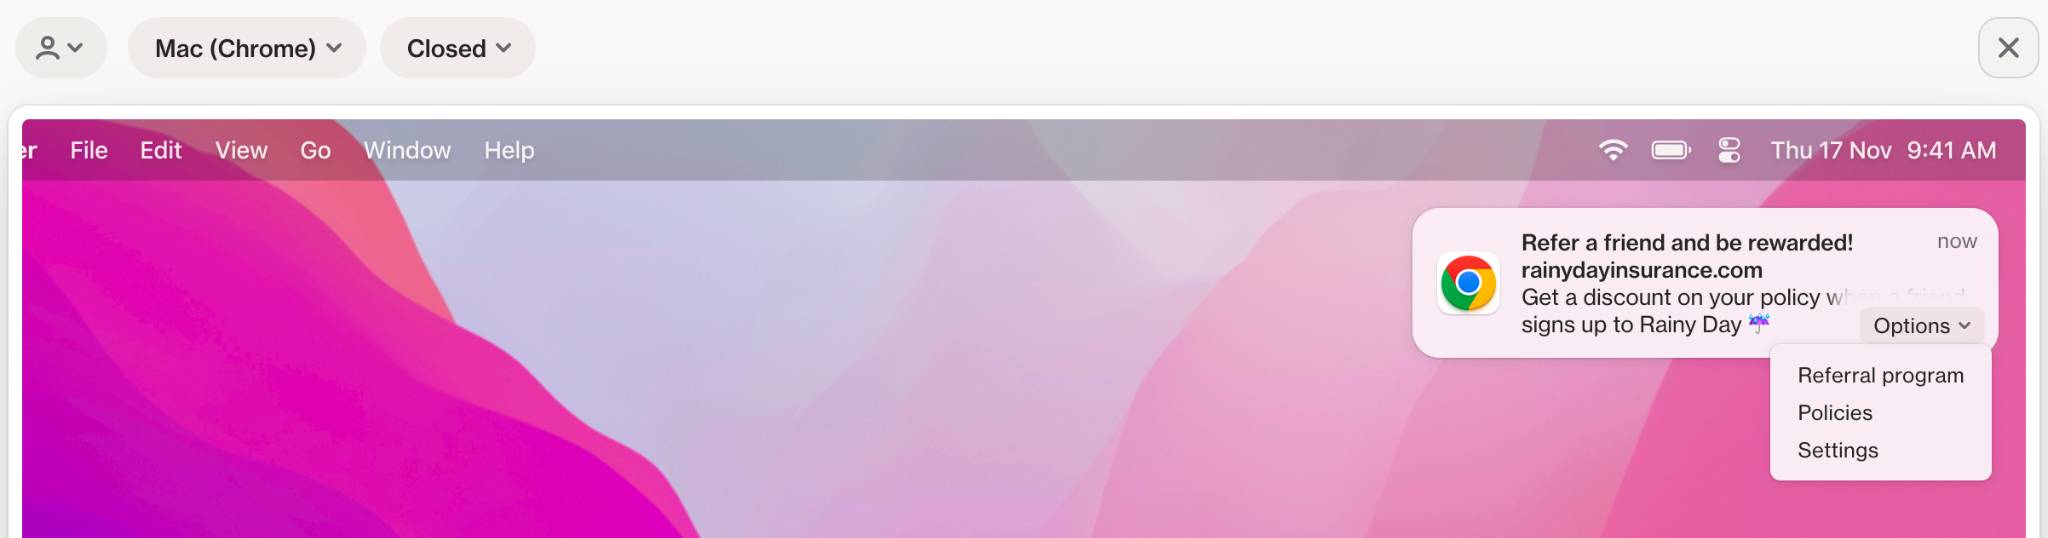
- The Settings button that appears in a Mac Chrome notification (at Options Settings) takes people to their Chrome Privacy and security > Notifications settings. This button appears by default as part of the browser configuration and is not editable in Ortto.
An Android or iOS deeplink is a path that takes a person to a specific part of your app or perhaps a particular state. Deeplinks need to be configured appropriately in your app when installing Ortto’s Android or iOS software development kit (SDK). Because the deeplink is unique to your use case and app configuration, it needs to be handled within your app’s code so that when a person clicks on the button (deeplink), your app can handle the data that Ortto passes to it and take the person to the required destination.
Learn more about handling deeplinks in Ortto’s Android and iOS SDK guides in our Developer docs.
Review
At the Review page, double check you have the correct audience and campaign settings.
For the Audience, valid subscribers are people in your audience who have given permission, by responding to a push capture widget (web) or allowing notifications in your app (Android and iOS), to receive push notifications.
You can preview how the push notification will look by clicking through the preview options at the top for people, platforms and actions.
Click Send to send the push campaign.