
Push capture widget
Overview
To send a web push campaign, you first need to create a capture widget that asks visitors for permission to receive push notifications.
Without this, your push campaign won’t have an audience to send to.
IMPORTANT: To show a push capture widget on your site, make sure:
- The Ortto tracking code is installed
- A service worker file (
service-worker.js) is added to the root of your website
The service worker is essential—it allows Ortto to recognize who gave permission and send them push notifications. Without it, even approved subscribers won’t receive notifications.
NOTE:
- Push permissions for iOS and Android apps are managed through your app directly.
- When a user allows notifications, Ortto automatically inherits that permission — no capture widget needed.
Once someone interacts with the push permission widget, their browser will show a system prompt asking them to Allow or Block notifications.
This prompt is controlled by the browser, not Ortto.
Request push permission
To ask visitors for push permission, add a link or button in your capture widget with the On click destination set to Request push permission.
You can add this:
- In the Text section (e.g. link the words Enable notifications).
- Or as a Button.
When a visitor clicks it, their browser will show the system prompt to allow or block notifications.
- If they click Allow, their push permission in Ortto is set to true (subscribed).
- If they click Block, it's set to false (unsubscribed).
NOTE: Push permission requests aren’t supported on iOS web browsers (Safari, Chrome, Firefox). This means push campaigns can’t be delivered to users browsing on iPhones or iPads.
Push notifications are supported on:
- Mac and Windows desktop browsers
- Android web browsers
NOTE: If your capture widget only requests push permission (and doesn’t collect details like email), users who click Allow or Block won’t be added to your CDP as contacts.
However, Ortto will still save their response—so if they become a contact later, we’ll link their push permission to their profile.
You can also choose to store unidentified users as contacts, but keep in mind:
- They’ll have limited data
- They can still be included in future push campaigns
- This may create duplicate contacts in your CDP
Learn more about handling unidentified users.
Create a push capture widget
To create a push capture widget:
- Navigate to Marketing > Capture and click New widget.
- Choose a template or click Start from scratch, then click Next.
- If starting from scratch, select a widget type.
- Click Create.

Creating a Prompt capture widget (Click on the GIF to maximize it). - On the New widget page:
- Click the widget name to rename it.
- Configure the widget settings.
- Customize the content and style.
- When you're ready, switch it ON to publish it to your website.
TIP: The Prompt widget type is ideal for capturing push permissions, as it closely matches the look and feel of the browser's system request.
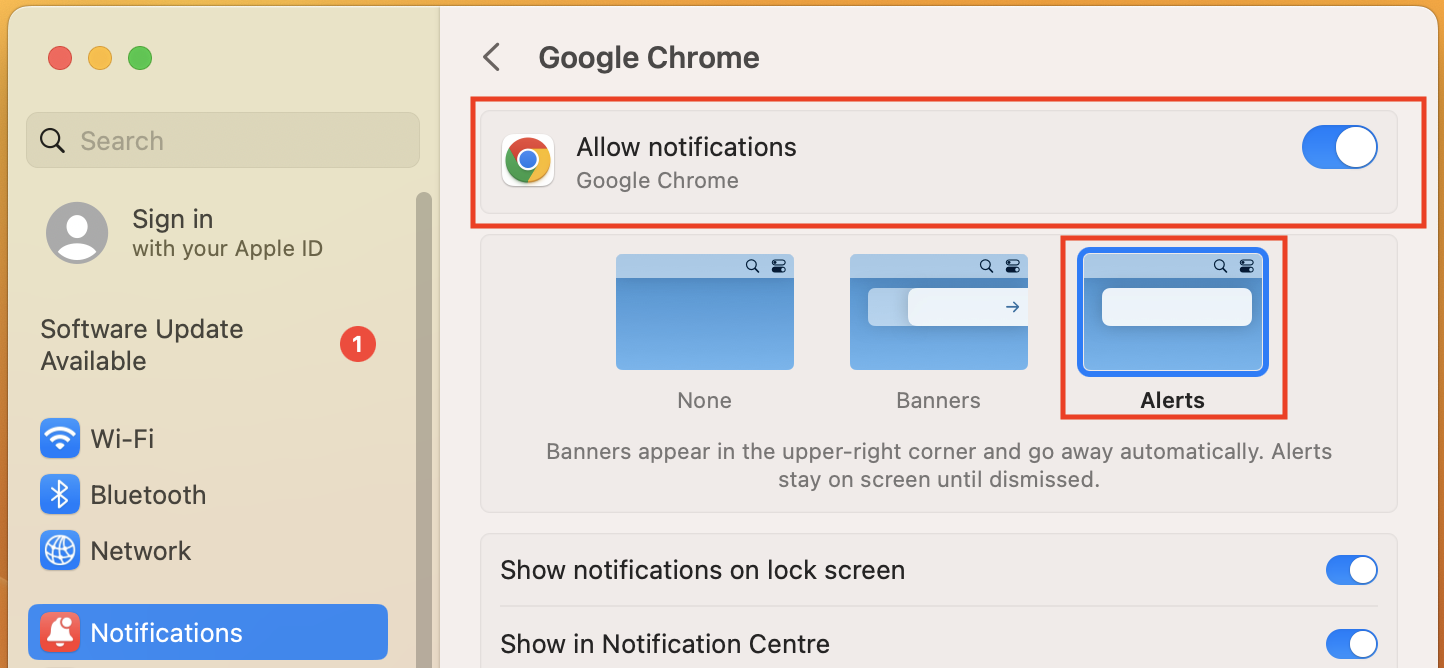
Contact not receiving push notifications
A contact might allow notifications in their browser but still not receive them if their system settings block notifications.
EX: on a MacBook using Chrome, they’ll need to go to: System Settings > Notifications > Google Chrome and turn on Allow notifications.
For best results, we recommend setting the notification style to Alerts so the message stays visible until dismissed (Banners will disappear automatically).
If a contact has notifications disabled at the system level:
- Ortto will still attempt to send the first notification, since we don’t yet know it won’t be delivered.
- If that send fails, all future attempts will also fail, and the contact will be automatically unsubscribed from web push notifications.
To help improve opt-in rates, use a soft ask (via a capture widget) before the browser's system prompt.
This lets you explain:
- What kind of notifications they’ll receive (e.g. feature updates or subscription alerts).
- How often they can expect to hear from you.
This added context helps build trust and encourages more users to opt in.