
Using Magento 2 in Ortto
Overview
This page helps you discover how you can get the most out of your Magento 2 integration with Ortto’s filters, reports, dashboards, campaigns, and coupons.
Learn more about connecting Magento 2.
Filters
When connecting Ortto to Magento 2, activities and person fields are automatically generated for this data source. These can be used in filters across campaigns, audiences, CDP segmentation, as well as in reports and dashboards.
Examples of how to use Magento 2 activities and fields in filters:
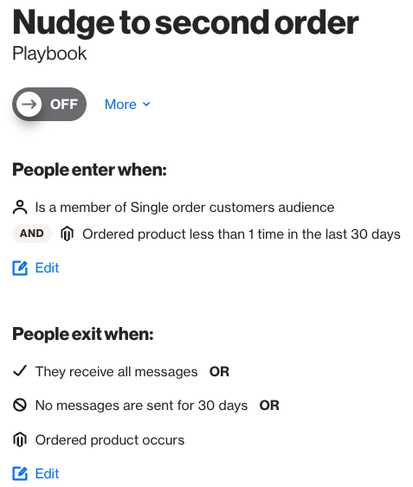
- Create playbook to nudge customers who have ordered once to order again by creating a filter.
- You can recover abandoned checkouts from your Squarespace store automatically by creating a journey campaign with a series of email and SMS messages. We’ve created a template for this journey, which you can modify with Squarespace activities and fields.
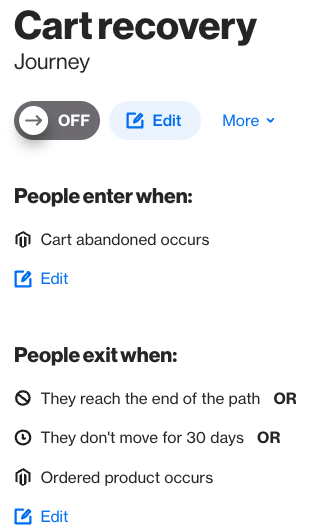
TIP: Using an occurs condition gives you a fresh data set, as people enter the journey when they perform the specified activity (as opposed to using has occurred, which qualifies people who have already performed an activity).
Learn more about filter conditions.
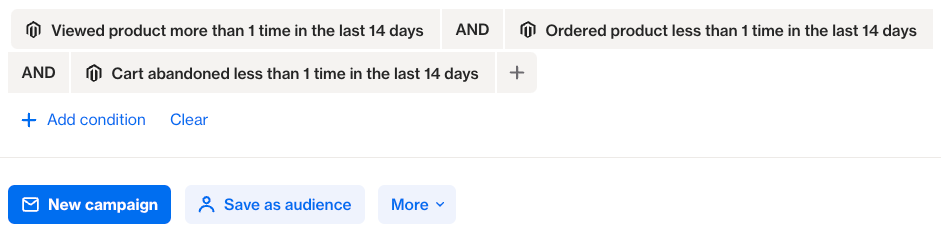
- Create an email or SMS campaign audience, to turn browsers into buyers and send window shoppers a reminder of the products they were most interested in.
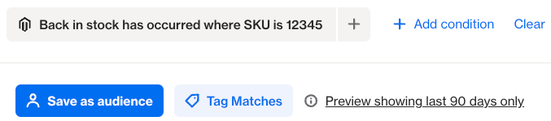
- View a segment of people on the People page, such as people who asked to be notified when a product is back in stock (a segment from which you can create an audience, send a campaign, export, or archive).
Email message widgets
When you create an email campaign or an email asset within a journey or playbook, you can access a number of content widgets to customize your email message with Magento 2 data.
Choose from the following content widgets to drag and drop into your email message.
Then click Configure to set up the widget as you’d like it.
Reports
You can use Ortto’s powerful reports to gain insight into your Magento 2 customers' cart, checkout, order, and waiting on stock activities.
Examples of how to use Magento 2 in Ortto reports
- Visualize the impact of your advertising campaigns on revenue:
- On the Reports page, click New report.
- Under New report, choose a Pie type, then click Next.
- For the Metrics:
- add Attributed and Aggregate by Sum of attribute.
- choose Group by attribute Campaign name.
- Edit any of the default settings a required, then click Create to view your report.
- Find out how many people made a purchase after being notified that an item was back in stock:
- On the Reports page, click New report.
- Under New report, choose a Funnel type, then click Next.
- For the Metrics, add Back in stock and Ordered product for Magento 2.
- Edit any of the default settings a required, then click Create to view your report.
Learn more about reports in working with reports.
Dashboards
Track your Magento 2 metrics and performance via Ortto’s dashboards. Customize a default dashboard to add Magento 2 reports or create a new dashboard with specific reports.
Learn more about default data source dashboards.
Coupons
Creating a coupon in Ortto syncs the coupon and its attributes to your Magento 2 account.
NOTE: Coupons in your Magento 2 account will not be synced to Ortto.
To create a coupon, follow these steps:
- In the left-hand navigation drawer, click Settings.
- Select Coupons.
- On this page, click New coupon.
- Choose your Magento 2 account then configure the coupon as required.
- Click Create.
NOTE: Magento 2 allows you to select both Limit the total number of times this coupon can be used by each customer and Unique code so you can set a limit per customer for unique coupon codes.
Using Magento 2 coupons
Any coupons you create, or the default coupons added to your account, can be added to email and SMS campaigns.
- Add a coupon to an email message on the Design page by clicking and dragging the coupon widget into your message.
- Click Configure in the coupon row and select Magento and the coupon you wish to use.
- Add a coupon to an SMS message on the Design page by clicking Add content > Coupon.
- Once you have added the coupon element, the Coupon section will appear for you to select the coupon you wish to use.