
Adding and managing users
Overview
The user page enables users to add and manage account users, revoke a user, view user activity and reset passwords.
NOTE: The number of users you can add depends on your Ortto plan.
Accessing users
To access the users page, go to Settings > User management > Users.
Managing users
The users page contains the following configurations:
Add a user
- Navigate to Users.
- Click New user.
- Enter the user’s Email address. You can add multiple users with the same permissions by separating their email addresses with a comma.
- Choose the Role you want the user(s) to have. You can learn more about roles below.
- Check Enable agent access for this user if they need access to conversations in the Talk inbox. Note: This may count towards your agent seats and could incur a fee (the first seat is free).
- If you use Teams in Talk, select the appropriate team(s) for the user.
- Click Send invite. Ortto will then send an email to the new user(s).
NOTE: Only users with an Admin role are authorized to add and manage other users within the account.
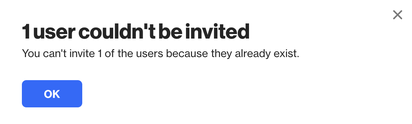
TIP: If you get an error saying a user couldn't be invited because they already exist, check your revoked users in Settings > User Management > Users > Filter.
Agent roles
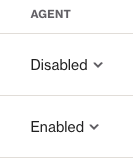
The Agent column on the users page indicates whether a user has talk access.
Learn more about creating and adding agents to a team.
NOTE: All plans include 1 free talk/agent seat; additional seats are available for an extra cost.
CAUTION: If you disable a user, any open tickets they have will be reassigned to the unassigned queue.
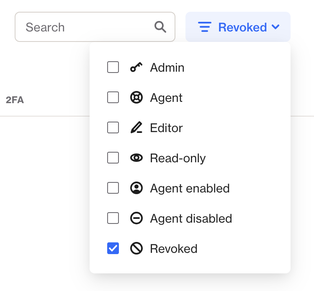
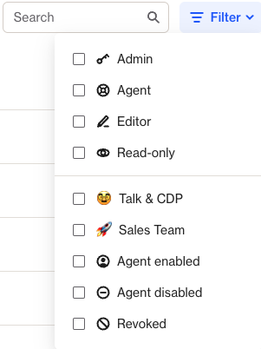
Filter users
Use the filter option to sort Users by role, team, or status (disabled/revoked).
Two-factor authentication
The 2FA column shows if a user has two-factor authentication enabled. Users who have been invited but not accepted won't have a 2FA status displayed.
If you've enforced Google, Okta, or Microsoft single-sign-on, an Enforced auth column will appear.
NOTE: Users can enable two-factor authentication via their profile settings.
Manage user roles
Ortto includes four default roles: Admin, agent, editor, and read-only. Each user is assigned a role that determines their permissions.
Additionally, there are roles for Owner and billing contact that can be assigned to any agent.
- Owner: The Owner is typically the account creator and holds Admin-level privileges.
- There can only be one Owner per account.
- The Owner can transfer ownership to another user by clicking the ... icon next to their profile > click Transfer owner > select the new owner's user profile.
- Only the account owner can Cancel the account or undo a cancellation.
- Billing Contact: The Billing contact receives billing information and invoices but cannot modify the account plan or payment details.
- There can only be one Billing Contact, and their role does not require Admin privileges.
- The Owner or an Admin can transfer billing responsibilities to another user by clicking the "..." icon next to a user's name.
Example of how to change billing contact. - Admins: Users with an Admin role can edit other users' roles and permissions, as well as revoke access. If access is revoked, Admins can reactivate the user's account or delete it permanently.
- Admins can also manage user access to the Talk inbox directly from the Users page.
NOTE: When you change a user’s role (for example, from Editor to Read-only):
- The update takes effect within approximately 15 minutes if the user is currently signed in.
- Alternatively, the change applies immediately after the user re-authenticates by signing out and back into Ortto.
Change a users role
To change the role of a user:
- Navigate to Users.
- Find the User you want to update.
- Click on their name to open their profile.
- Under Role select edit.
- Here, you can update their Role and team membership for the talk function (if enabled).
TIP: Learn more about creating roles.
User role permissions
The table below provides an overview of the default user roles and permissions.
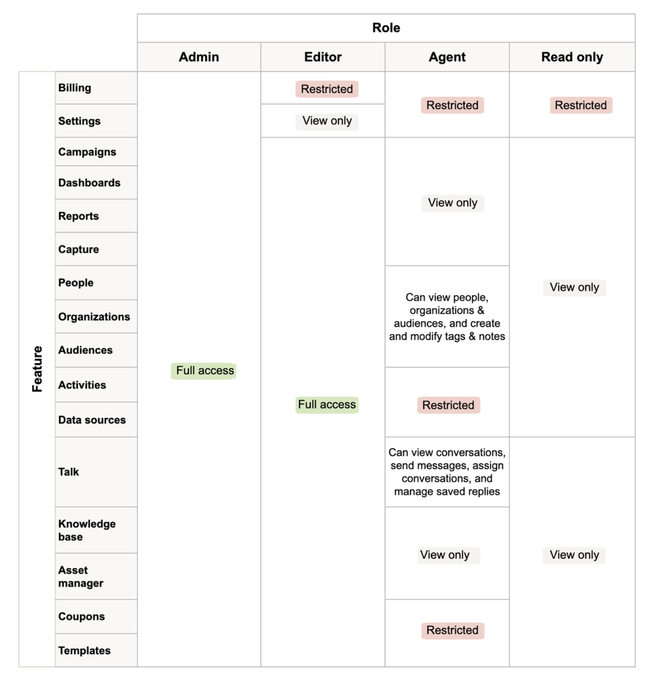
To see the default roles and permissions in more detail, navigate to Settings > User management > Roles. Then, click a role’s name to see it’s permissions.
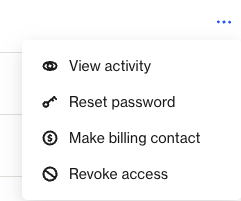
Revoke a user
To revoke a users access:
- Navigate to Users.
- Locate the User you want to revoke access for.
- Select the more "…" option next to the user.
- Select Revoke access.
- Select OK to proceed.
NOTE: If a user is revoked, any campaigns, templates, assets, etc., they created will remain in the account.
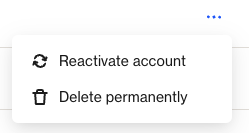
Reactivate or delete a revoked user
When you revoke a user, it doesn't delete them from the account; it simply removes their access. This allows you to either reactivate them later or permanently delete them.
- Navigate to Users.
- Tick Revoked.
- Locate the User you want to reactivate or delete.
- Click the more "…" option next to the user.
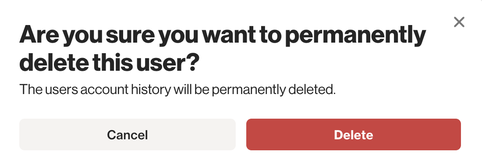
- Select Reactivate account or Delete permanently.
CAUTION: Deleting a user is a permanent action that will remove the user's account history. While version history changes related to this user will still be retained in any associated Journeys, all activity logs from the user will no longer be accessible. Please note that this action cannot be undone.
Reset user password
If a user needs to reset their password and requires help from an admin user, follow these steps:
- Navigate to Users.
- Locate the User for whom you want to initiate a password reset.
- Click the more "…" option next to the user.
- Select Reset password.
- Select OK.
View user activity
To view a users activity, follow these steps:
- Navigate to Users.
- Locate the User you want to view.
- Click on their name to open their profile.
- On the right-hand side, use Filters to see timestamps for specific activities.
NOTE: Filtering activities is limited to actions actually performed by the user. For example, if a user has not created a report, you cannot filter by the Report created activity for that user, but you can for users who have.
TIP: To view all users who have performed a specific activity, you can access this information from the activity log.