
Using Chargebee in Ortto
Overview
This page helps you discover how you can get the most out of your Chargebee integration with Ortto’s filters, reports, dashboards, campaigns, and coupons.
Learn more about connecting Chargebee in Ortto.
Filters
The Chargebee activities and person (contact or customer) fields that are added to your Ortto account can be used anywhere you can create a filter (such as in campaigns, to create an audience, or just to view a segment of people), as well as in reports and dashboards.
Examples of how to use Chargebee activities and fields in filters:
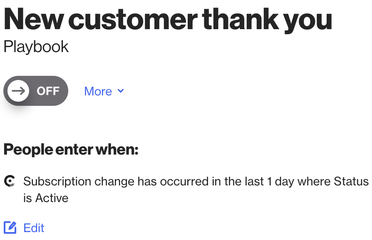
- Create a playbook to thank customers when they begin a paid subscription by using the Subscription change Chargebee activity in the campaign's entry criteria.
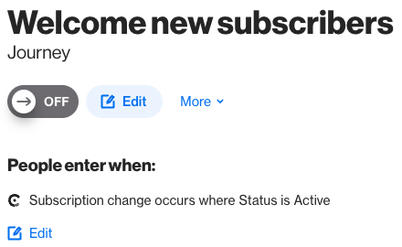
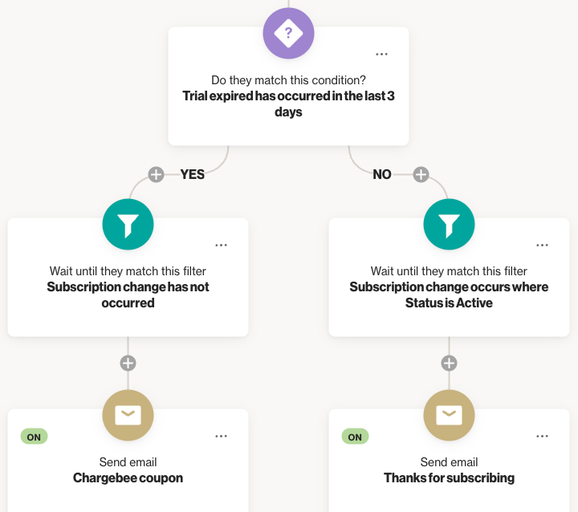
- Create a welcome journey and use the Subscription change Chargebee activity as the entry criteria. For this example, it is ideal to use the occurs condition so that people enter the journey when they perform the specified activity (as opposed to using has occurred, which qualifies people who have already performed an activity).

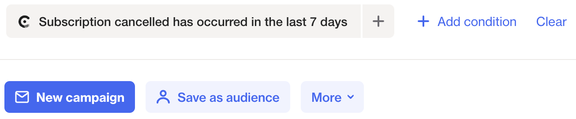
- View a segment of people on the People page, such as people who have cancelled a subscription in the last week (a segment from which you can create an audience, send a campaign, export, or archive).
Reports
You can use the default Chargebee reports that are added to your account upon integration to gain insight into your Chargebee customers, trial, subscription, charge and invoice data.
Chargebee report templates are helpful to:
- Visualize the impact of your advertising campaigns on MRR using the Net MRR report template and adding a filter for Ad clicked.
- Track your average sale price using the Average Sale Price report template.
To create Chargebee reports, follow these steps:
- On the Reports page, click New report.
- Under New report, click Chargebee.
- Select the report you wish to use, then Get started.
- Edit any of the default settings a required, then click Create to view your report.
Alternatively, you could build a custom report to discover which UTM campaigns lead to the most revenue.
To build this custom report, follow these steps:
- On the Reports page, click New report.
- Under on the Quick start tab, click Start from scratch.
- For the Type, select Pie chart, then Next.
- Give your report a name then click Add metric.
- In Metrics, select the activity as Attributed.
- Click Group by attribute or field to group by Campaign name (under Attributes) or Initial UTM campaign source (under Fields).
- Click Create to view your report.
Learn more about reports in working with reports.
Dashboards
On the Dashboards page, select Chargebee from the drop-down menu to view a performance dashboard populated with reports on Chargebee metrics.
Or, create a SaaS metrics dashboard using Chargebee data by creating a new dashboard.
Learn more about data source dashboards under default data source dashboards.
Coupons
Default coupons are added to your Ortto account upon integration with Chargebee.
You can also create a new coupon for Chargebee. Creating a coupon in Ortto syncs the coupon and its attributes to your Chargebee account. Any coupons you create in your Chargbee account will also sync to Ortto.
NOTE: If you are on Chargbee’s API Version 1.x, you will be able to create a coupon and sync it to your Chargebee account. However, once created, the coupon will be read-only (not editable) within Ortto.
Users on Chargbee’s API Version 2.x and later will be able to create and sync editable coupons.
To create a coupon, follow these steps:
- In the left-hand navigation drawer, click Settings.
- Select Coupons.
- On this page, click New coupon.
- Choose your Chargebee account then configure the coupon as required.
- Click Create.
Using Chargebee coupons
Any coupons you create, or the default coupons added to your account, can be added to email and SMS campaigns.
- Add a coupon to an email message on the Design page by clicking and dragging the coupon widget into your message.
- Click Configure in the coupon row and select Chargebee and the coupon you wish to use.
- Add a coupon to an SMS message on the Design page by clicking Add content Coupon.
- Once you have added the coupon element, the Coupon section will appear for you to select the coupon you wish to use.