If using APNS, in your Ortto account Settings>Push notifications>iOS notifications you simply need to select the Keys tab and provide the keys and IDs specified.
NOTE: Push notifications only work on physical devices and the iOS simulator will not be able to register for push notifications from Apple.
Install
There are five key elements to the SDK installation:
Install the and initialize SDK — install and initialize the Ortto iOS SDK along with the relevant Firebase or APNs packages.
Firstly, you’ll need to set up your dependencies. Below are instructions for both Swift package manager and Cocoapods, simply expand the section relevant to you.
Instructions for Swift package manager
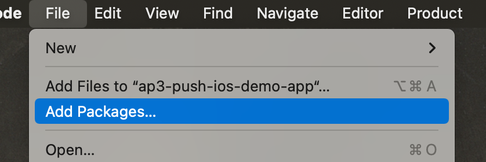
In Xcode, in your app’s project, select File>Add Packages.
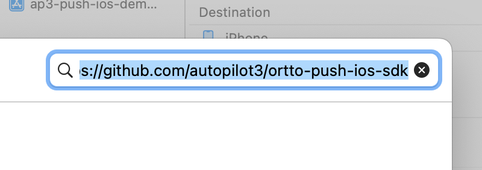
In the package manager, paste the URL and search for Ortto’s iOS SDK GitHub repository: https://github.com/autopilot3/ortto-push-ios-sdk.
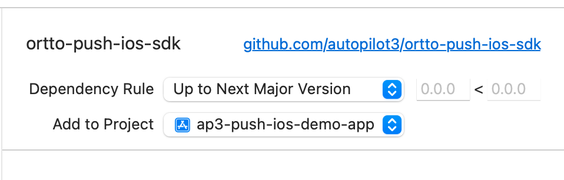
At Dependency Rule, we recommend you set Up to Next Major Version to keep your app up to date with the latest SDK, including new features that are added.
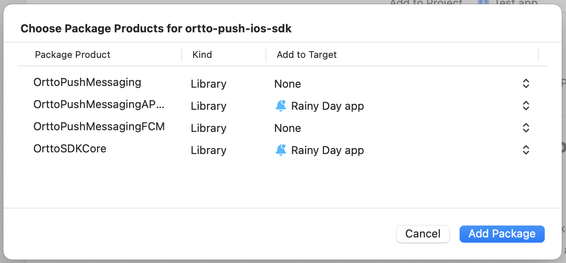
You’ll see a list of packages available to install. Select:
OrttoSDKCore (required, this is the SDK for Ortto’s push notifications), and
OrttoPushMessagingAPNS (required for APNs-based projects), or
OrttoPushMessagingFCM (required for Firebase-based projects) as relevant.
OrttoPushMessaging (not required).
Click Add package.
Instructions for Cocoapods
In your Podfile, add the relevant dependencies:
OrttoSDKCore (required, this is the SDK for Ortto’s push notifications), and
OrttoPushMessagingAPNS (required for APNs-based projects) orOrttoPushMessagingFCM (required for Firebase-based projects).
pod 'OrttoSDKCore', '~> 1.4'
pod 'OrttoPushMessagingFCM', '~> 1.4' # For Firebase
pod 'OrttoPushMessagingAPNS', '~> 1.4' # For Apple APNS
After you have added the core (OrttoSDKCore) and push (OrttoPushMessagingFCM or OrttoPushMessagingAPNS) pods to your Podfile, run pod install to install the required dependencies.
Instructions for a UIKit project
To configure OrttoSDKCore, add the following to your project’s AppDelegate object:
A service extension is required to enable your app to receive notifications when the customer does not have the app open (the app is running in the background or not running at all). The service is a special registered target that iOS passes notifications to for modification before presenting it to the user.
To add the service extension, in Xcode:
Navigate to the File>NewTarget.
At Choose a template… search for "notification" in the modal.
Select Notification Service Extension.
Click Next.
Configure the extension target.
Click Finish.
Once the extension target is added, modify it as follows:
swift
import UserNotifications
import OrttoPushMessagingAPNS
class NotificationService: UNNotificationServiceExtension {
var contentHandler: ((UNNotificationContent) -> Void)?
var bestAttemptContent: UNMutableNotificationContent?
override func didReceive(_ request: UNNotificationRequest, withContentHandler contentHandler: @escaping (UNNotificationContent) -> Void) {
self.contentHandler = contentHandler
//1
let handled = PushMessaging.shared.didReceive(request, withContentHandler: contentHandler)
//2
if !handled {
print("Handled!")
}
}
override func serviceExtensionTimeWillExpire() {
// Called just before the extension will be terminated by the system.
// Use this as an opportunity to deliver your "best attempt" at modified content, otherwise the original push payload will be used.
//3
if let contentHandler = contentHandler,
let bestAttemptContent = bestAttemptContent {
contentHandler(bestAttemptContent)
}
}
}
1
Call the PushMessaging.shared.didReceive() method with the UNNotificationRequest object. The function will return true if Ortto has handled the notification and false if Ortto has ignored the notification request.
2
If the handled var is equal to false, this means that Ortto has skipped processing and you can handle the modification of the notification content yourself.
3
If the notification request timeout is hit (30 seconds) you will have a chance to quickly modify the UNMutableNotificationContent object before it is presented to the contact.
IMPORTANT: Ensure your NotificationExtension target has imported the required SDK packages.
Example required packages for using APNS to send notifications
Firebase additional setup
If you are using Firebase, in addition to the setup described in Firebase cloud messaging setup, you’ll need to perform a few extra steps.
In your AppDelegate object (<project>/AppDelegate.swift):
Add the following to the didFinishLaunchingWithOptions method:
swift
// Set up firebase
FirebaseApp.configure()
// Assign the AppDelegate to Firebase
Messaging.messaging().delegate = self
2. Extend the Firebase MessagingDelegate protocol to intercept Firebase messages:
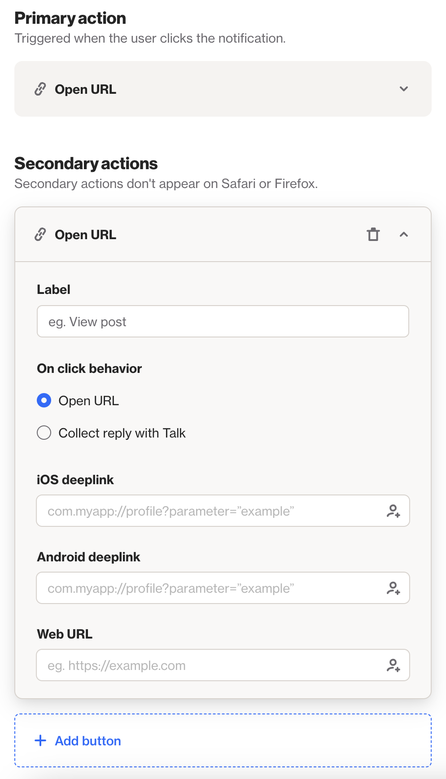
All actions utilize deeplinks and are routed to your SceneDelegate. Add code similar to the below to your SceneDelegate (<project>/SceneDelegate.swift) to intercept these inbound deep links and route to your controller:
To get an iOS deeplink value to use in a push campaign (at the Content step, as a button destination — see screenshot below), access it from here using the following steps.
2
Look for a URL context passed into the scene method.
3
Get the navigation controller for the scene.
4
Route and instantiate a new controller to handle the deeplink.
5
Present the controller to the contact in the navigation controller.
Push registration
Push registration (authorization) is handled automatically by your AppDelegate when implementing the didRegisterForRemoteNotificationsWithDeviceToken method. Ensure you are passing along the appropriate token to the PushMessaging shared instance like below:
IMPORTANT: You must call registerDeviceToken and receive a session ID before you can identify people (using identify()). Otherwise, Ortto’s API will not be able to handle the identify request.
Identify people (contacts)
A contact is considered anonymous when they are not logged in to the app or they cannot be identified using the identify function.
While push notifications can be sent to anonymous contacts, we recommend identifying your contacts so they can be linked to your existing CDP records. This then gives you the opportunity to personalize push notifications based on that contact’s data
The identify method identifies contacts who are subscribed to push and recognizes them when they log in to your app. Once logged in, the contact can receive notifications.
The identify method can capture the following contact attributes:
firstName,
lastName,
contactId,
email,
externalId,
phone, and
acceptsGDPR.
IMPORTANT: You must identify contacts by a minimum of 1 of the following attributes:
email,
phone
contactId, or
externalId.
Additional attributes are optional.
To identify contacts, where relevant (such as your login or main activity), create a UserIdentifier object:
swift
let user = UserIdentifier(
contactID: "abc123",
email: "name@domain.com",
phone: "+61404040404",
externalID: currentUser?.uid,
firstName: "Potato",
lastName: "Head"
)
Ortto.shared.identify(user)
The UserIdentifier object:
saves the contact’s information on the device and enables tracked events to be associated with the contact, and
associates the authorization token with the contact to handle push notifications (using OrttoSDKCore).
IMPORTANT: The contact’s device must be authorized (using registerDeviceToken) before you can identify them (using identify()). Otherwise, Ortto’s API will not be able to handle the identify request.
The SDK can only identify one contact at a time, and will save the most recently identified contact. If Jane Smith is identified, then the identify function calls John Smith, the SDK will consider John Smith the contact using the app.
We recommend updating the contact data at least every 2 months with an identify() call to capture any contact attribute changes. This function calls Ortto’s API to collect the current contact attribute data.
swift
Ortto.shared.identify(user);
Unidentified users
Unidentified users are people who have allowed push notifications but for whom you do not yet have any identifying information.
Unidentified users are people who have allowed push notifications but for whom you do not yet have any identifying information.
You have the option to store an unidentified user as a contact immediately when they provide push permission, and be able to send them push notifications, however the contact will have no identifying information.
Or, you can choose to save the contact’s push permission but only record them as a contact once you receive identifying information, and you won’t be able to send messages to them until their identity is confirmed.
Managing unidentified users is performed in the Ortto app, at Settings>Push notifications>iOS notifications>Unidentified users.
Permission prompts
iOS push notification permissions are obtained by the contact (subscriber) accepting the notification request prompt per the app install. Apps are able to query notifications to see the current status of the notification permission.
To obtain a contact’s iOS push notification permission, you need to register your app delegate as the UNUserNotificationCenterDelegate.
If the contact has not yet accepted the Ortto-specific notification permission, iOS will prompt the contact to accept it. To enable this at the`AppDelegate` object, add application.registerForRemoteNotifications():
swift
class AppDelegate: UIApplicationDelegate, UNUserNotificationCenterDelegate {
func application(_ application: UIApplication, didFinishLaunchingWithOptions launchOptions: [UIApplication.LaunchOptionsKey: Any]?) -> Bool {
if #available(iOS 10.0, *) {
// For iOS 10 display notification (sent via APNS)
UNUserNotificationCenter.current().delegate = self
let authOptions: UNAuthorizationOptions = [.alert, .badge, .sound]
UNUserNotificationCenter.current().requestAuthorization(options: authOptions, completionHandler: { _, _ in })
} else {
let settings: UIUserNotificationSettings =
UIUserNotificationSettings(types: [.alert, .badge, .sound], categories: nil)
application.registerUserNotificationSettings(settings)
}
application.registerForRemoteNotifications()
let center = UNUserNotificationCenter.current()
center.requestAuthorization(options: [.alert, .sound, .badge]) { granted, error in
if let error = error {
print("err: \(error.localizedDescription)")
return
}
}
}
Set push permission
We give you more control over contacts' push notification permissions with the setPermission(Permission) method. Use this method if you wish for further control around how Ortto understands your contacts' messaging preferences.
swift
// Let the SDK determine if the user has granted permission (Default)
Ortto.shared.setPermission(Permission.Automatic)
// The user has explicitly granted permission
Ortto.shared.setPermission(Permission.Accept)
// Opt the user out of push notifications
Ortto.shared.setPermission(Permission.Deny)
// Note: Starting in v1.4.0 you can simply set the enum value directly to the `permission` instance variable
Ortto.shared.permission = .Deny
Track actions and events
Delivery events
Push message delivery (receipt) is automatically tracked in the Ortto SDK. Delivery events will be reflected in the Ortto app as a Delivered Push activity associated with a contact.
Click tracking
The Ortto iOS SDK automatically tracks which action the contact clicked in the notification message before calling UIApplication.shared.open(url, options: [:], completionHandler: nil) with the deep link string.
This method will populate the Clicked push activity for a contact, including the deep link URL in the activity attributes.
Ortto setup
In Ortto, at Settings>Push notifications>iOS notifications > Setup, you have 3 options by which to enable Ortto to send push notification campaign data to your app:
Certificates — follow the instructions at iOS certificate and key to generate a .p12 file to upload.
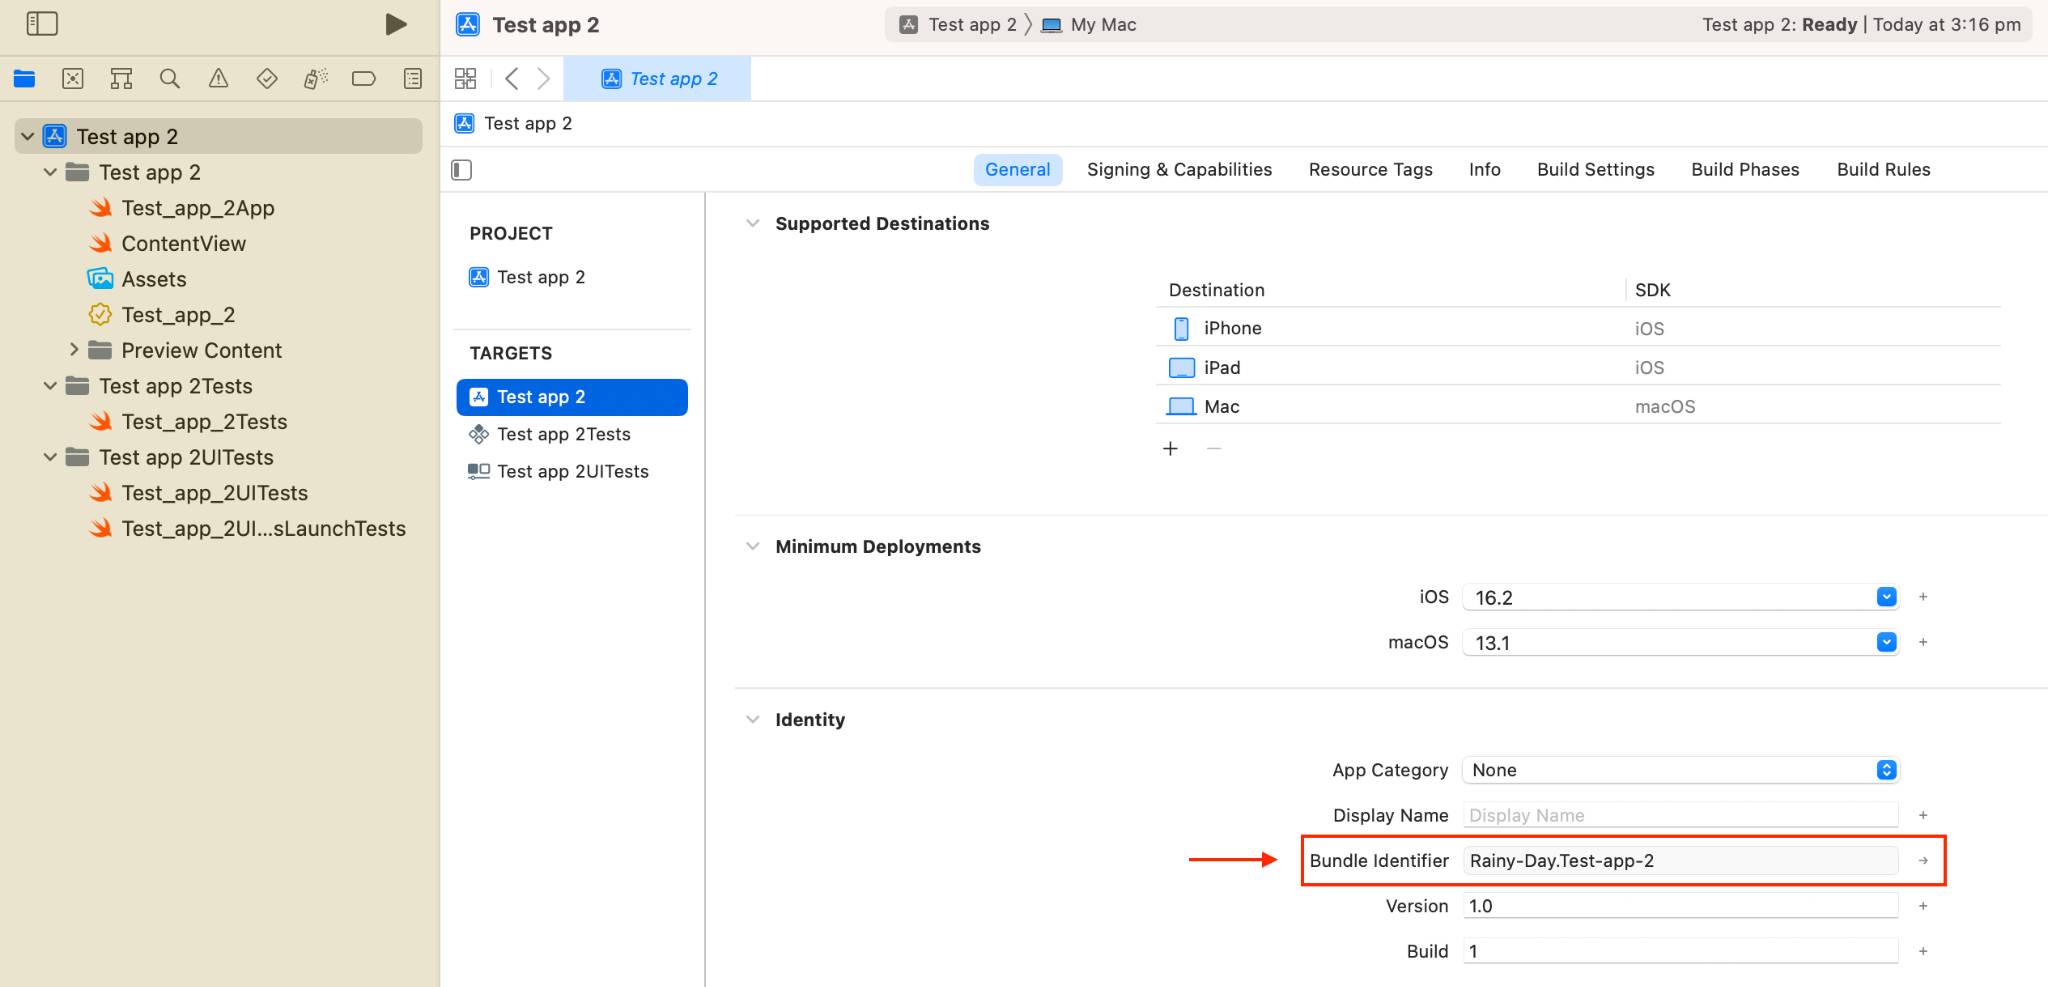
Firebase cloud messaging (FCM) — use the Service account (.json) file and Bundle ID created during the Firebase Cloud Messaging setup.
The Bundle ID can be found in Xcode in your project at Targets>General>Identity.
Once the SDK installation and configuration is complete, and you have have provided the required credentials in the Ortto setup, Ortto will wait until it detects activity from your app before your iOS platform can be switched ON. Ortto needs to receive an initial request from your app to enable push permissions for a contact (via the permission prompt or an explicitly set push permission), which confirms that your app is correctly configured and is ready to deliver notifications to subscribers. Once the activity is successfully detected, Ortto sets your iOS notifications to ON, and you can select the platform when creating a push campaign.