For full details on setting up a Firebase project and connecting to your Ortto account, please see Firebase Cloud Messaging Setup.
Installation
Open your Flutter project using the command line.
Add the Ortto Flutter SDK.
shell
# install ortto sdk
$ flutter pub add ortto_flutter_sdk
# Which will add this to your pubspec
dependencies:
ortto_flutter_sdk: ^1.0.0
Add Firebase messaging:
shell
flutter pub add firebase_messaging
3. Run pod install.
shell
pod install --repo-update --project-directory=ios
# Pod installation complete! There are <number> dependencies from the Podfile and <number> total pods installed.
4. Ensure google-services-plugin is enabled in android/build.gradle.
5. Fetch the google-services.json from your Firebase project and copy it to android/app/google-services.json.
NOTE: The elements Application key, Datasource ID, Capture JS URL and API Endpoint required for this step and step 3 (below) are found in your Ortto account's settings at Settings > In-app notifications > Android in-app notifications.
A contact is considered anonymous when they are not logged in to the app or they cannot be identified using the identify function.
While push notifications can be sent to anonymous contacts, we recommend identifying your contacts so they can be linked to your existing CDP records. This then gives you the opportunity to personalize push notifications based on that contact’s data
The identify method identifies contacts who are subscribed to push and recognizes them when they log in to your app. Once logged in, the contact can receive notifications.
The identify method can capture the following contact attributes:
firstName,
lastName,
contactId,
email,
externalId,
phone, and
acceptsGDPR.
IMPORTANT: You must identify contacts by a minimum of 1 of the following attributes:
email
phone
contactId, or
externalId.
Additional attributes are optional.
To identify contacts, create a UserID object:
dart
const uuid = Uuid();
final user = UserID(
externalId: uuid.v4(),
email: 'pete@example.com',
);
await Ortto.instance.identify(user);
The UserID object saves the contact’s information on the device and enables tracked events to be associated with the contact.
NOTE: The contact’s device must be authorized before you can identify them (using identify()). Otherwise, Ortto’s API will not be able to handle the identify request.
The SDK can only identify one contact at a time, and will save the most recently identified contact. For example, if Jane Smith is initially identified, and then the identify function calls John Smith, the SDK will consider John Smith the contact using the app. To clear the currently identified contact, call clearIdentity() as shown in the example below:
Push message delivery (receipt) is automatically tracked in the Ortto SDK. Delivery events will be reflected in the Ortto app as a Delivered Push activity associated with a contact.
Click tracking
Within your deep link activity handler, call the Ortto instance trackLinkClick with the link that was inserted into the deep link activity.
This method will send a message to Ortto’s servers with the tracking information and return a LinkUtm object with campaign, medium, source and content attributes you can use for marketing data analysis.
The trackLinkClick accepts one argument with the link string passed to your app from the deep linking mechanism you decide to use.
dart
await Ortto.instance.trackLinkClick(link);
This method will populate the Clicked push activity for a contact, including the deep link URL in the activity attributes.
Register push notification token
Fetch the current Firebase token (generated when you created the Firebase project) and pass it onto the Ortto identity API using the following method:
dart
final fcmToken = await FirebaseMessaging.instance.getToken();
if (fcmToken != null) {
Ortto.instance.registerDeviceToken(fcmToken);
}
This method should be called in an activity where you have identified the contact using identify() so Ortto can register which contact the push notification token is attached to.
Please note that:
dispatchPushRequest() ONLY works after registerDeviceToken() is called
registerDeviceToken() happens automatically for Android but needs to be called manually for iOS
Notification handling
To handle notification messages while your application is in the foreground, listen to the onMessage stream.
The stream contains a RemoteMessage, detailing various information about the payload, such as where it was from, the unique ID, sent time, whether it contained a notification and more. Since the message was retrieved while your application is in the foreground, you can directly access your Flutter application's state and context.
Notification messages which arrive while the application is in the foreground will not display a visible notification by default, on both Android and iOS. It is, however, possible to override this behavior:
On Android, you must create a "High Priority" notification channel.
On iOS, you can update the presentation options for the application.
Background notifications
Handle background notification messages by registering a onBackgroundMessage handler. When messages are received, an isolate is spawned (Android only, iOS/macOS does not require a separate isolate) allowing you to handle messages even when your application is not running.
There are a few things to keep in mind about your background message handler:
It must not be an anonymous function.
It must be a top-level function (e.g. not a class method which requires initialization).
When using Flutter version 3.3.0 or higher, the message handler must be annotated with @pragma('vm:entry-point') right above the function declaration (otherwise it may be removed during tree shaking for release mode).
When both the push notification and popup widget are switched ON, they will be linked so that when a user clicks on the push notification, it will trigger the popup widget to show.
Troubleshooting
Ensure that this code is added to your application entry-point where required
dart
// Main entrypoint
void main() async {
WidgetsFlutterBinding.ensureInitialized();
// Initialize Firebase first
await Firebase.initializeApp(
options: DefaultFirebaseOptions.currentPlatform,
);
// Set up Ortto SDKs
await Ortto.instance.init(
appKey: '<KEY>',
endpoint: '<ENDPOINT>'
);
await Ortto.instance.initCapture(
dataSourceKey: '<DATA_SOURCE_KEY>',
captureJsUrl: '<CAPTURE_URL>',
apiHost: '<CAPTURE_API_HOST>',
);
// Identify User
const uuid = Uuid();
final user = UserID(
externalId: uuid.v4(),
email: 'pete@example.com',
);
await Ortto.instance.identify(user);
// Enable foreground notifications for iOS
// https://firebase.flutter.dev/docs/messaging/notifications/#foreground-notifications
FirebaseMessaging.instance.setForegroundNotificationPresentationOptions(badge: true, alert: true, sound: true);
// Listen to foreground notifications
// https://firebase.google.com/docs/cloud-messaging/flutter/receive#foreground_messages
FirebaseMessaging.onMessage.listen((RemoteMessage message) {
if (message.notification != null) {
Ortto.instance.onbackgroundMessageReceived(message.toMap());
.then((handled) {
print("handled $handled");
return handled;
});
}
});
// Listen to background notifications
// https://firebase.google.com/docs/cloud-messaging/flutter/receive#apple_platforms_and_android
FirebaseMessaging.onBackgroundMessage(_firebaseMessagingBackgroundHandler);
}
@pragma('vm:entry-point')
Future<void> _firebaseMessagingBackgroundHandler(RemoteMessage message) async {
// If you're going to use other Firebase services in the background, such as Firestore,
// make sure you call `initializeApp` before using other Firebase services.
await Firebase.initializeApp(
options: DefaultFirebaseOptions.currentPlatform,
);
await Ortto.instance.init(
appKey: '<KEY>',
endpoint: '<ENDPOINT>'
);
// Pass the message to Ortto
Ortto.instance
.onbackgroundMessageReceived(message.toMap())
.then((handled) {
print("handled $handled");
return handled;
});
}
For iOS
Ensure you have:
Installed pods pod install --repo-update --project-directory=ios
Enabled notifications and background processing entitlements
Added a UNNotificationServiceExtension target
swift
import UserNotifications
import OrttoSDKCore
import OrttoPushMessagingFCM
class NotificationService: UNNotificationServiceExtension {
var contentHandler: ((UNNotificationContent) -> Void)?
var bestAttemptContent: UNMutableNotificationContent?
override func didReceive(_ request: UNNotificationRequest, withContentHandler contentHandler: @escaping (UNNotificationContent) -> Void) {
self.contentHandler = contentHandler
// 1. Pass notification to Ortto to attempt to handle
let handled = PushMessaging.shared.didReceive(request, withContentHandler: contentHandler)
// 2. If handled === false, Ortto has ignored the notificatio and it requires processing
if !handled {
bestAttemptContent = (request.content.mutableCopy() as? UNMutableNotificationContent)
if let bestAttemptContent = bestAttemptContent {
// Modify the notification content here...
bestAttemptContent.title = "\(bestAttemptContent.title) [🙏]"
contentHandler(bestAttemptContent)
}
}
}
override func serviceExtensionTimeWillExpire() {
// Called just before the extension will be terminated by the system.
// Use this as an opportunity to deliver your "best attempt" at modified content, otherwise the original push payload will be used.
if let contentHandler = contentHandler, let bestAttemptContent = bestAttemptContent {
contentHandler(bestAttemptContent)
}
}
}
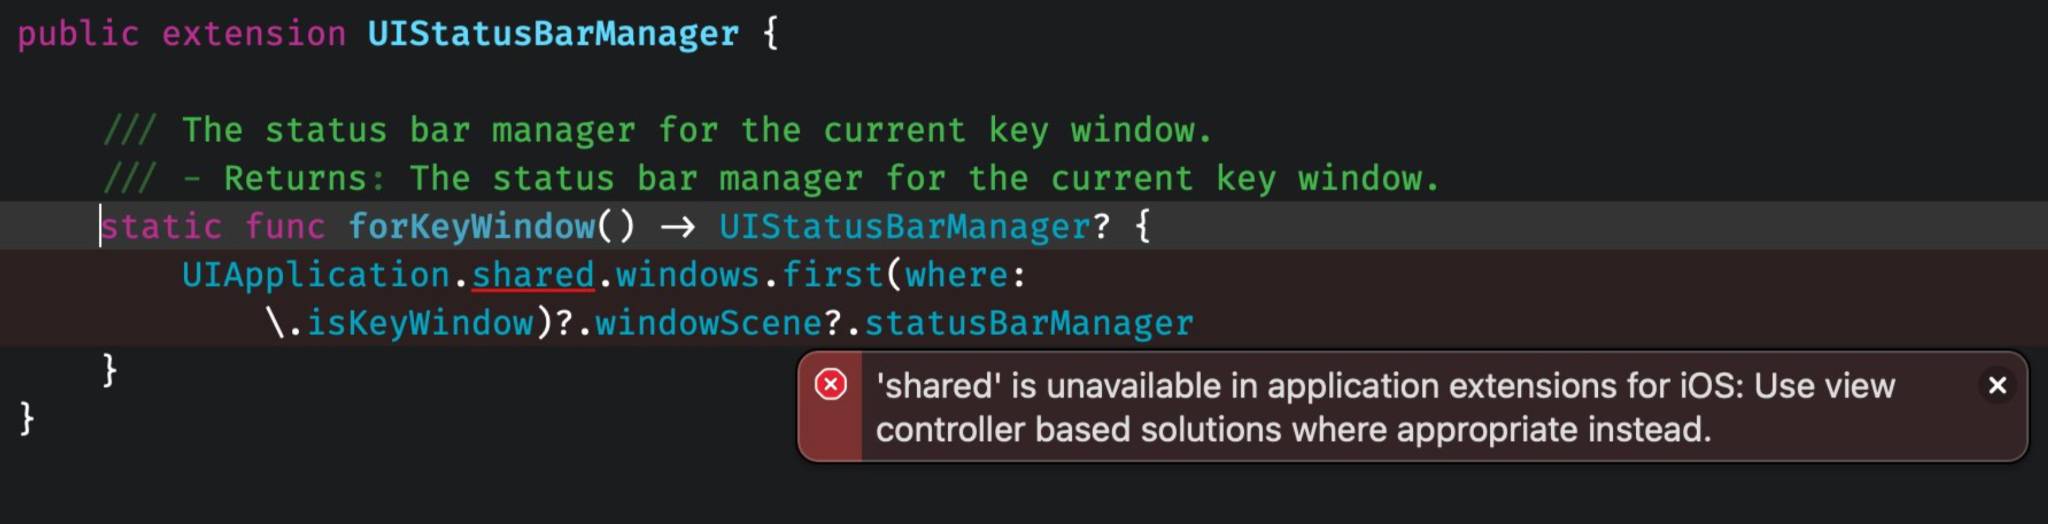
NotificationService error
If you see an error relating to the Flutter build step when trying to install the Capture code for iOS, like this:
'shared' is unavailable in application extensions for iOS: Use view controller based solutions where appropriate instead.
Example error message for Flutter package installation
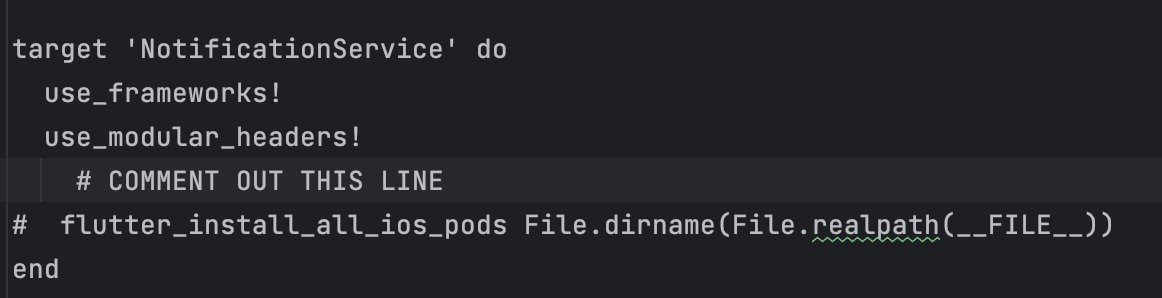
you need to remove the "install all packages" section in the NotificationExtension target: