
Managing activities
The Activities page provides you with access to all activities currently configured in Ortto, which allows you to view a specific activity and edit it.
View an activity
To view a configured activity:
- On the Activities page, click the activity to view.
- On the specific activity view page, click the appropriate option (Overview, Activity, Audience, and Location along the top-right) to view more information about the activity’s details, along with the people who conducted them, and the location.
By default, Ortto automatically creates relevant activities in your Ortto account. Learn more about system activities.
Edit the activity
You can also edit a number of the activity’s aspects from the activity’s page.
Description
Activity descriptions help train Ortto AI to provide smarter assistance throughout the app while also giving users context to understand their purpose.
To add descriptions to activities, follow these steps:
- Navigate to CDP > Activities.
- Select the activity you want to add a description for.
- Click the pencil icon in the Description section.
- Enter the description and click Save.
NOTE: Descriptions can't be added to system or data source activities, as they are automatically populated on the backend. Descriptions can only be added to custom activities.
Settings
Under Settings you can enable or disable Client-side data source, Track as touch and Conversion value, and edit your Data retention period. Learn more about editing data retention under Configuring an activity’s data retention period.
To edit Client-side data source, Track as touch and Conversion value, click Edit and select or deselect the checkboxes as required.
NOTE: Rate limits apply to client-side data source activity creation. For each activity (based on the activity_ID), we allow a maximum of:
- 10 activity events per contact per day.
- 100 activity events per hour, per activity IP address (
source_IP).
Learn more about client-side data source under Creating a new activity.
Learn more about the touch attribution models under Attribution model and conversion value under Value label in Attribution.
Configuring an activity’s data retention period
By default, the data for all built in (system) and custom activities you create (and their attributes) are only retained in Ortto for 90 days. This ultimately affects your ability to:
- filter data based on these activities and attributes, and
- create new reports based on these activities.
Learn more about configuring an activity's data retention period.
Custom activity design
You have control over how custom activities you send to Ortto are displayed.
The 3 options available to you are:
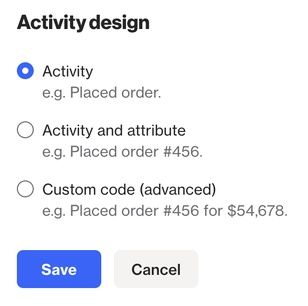
The first option, "Activity" will simply display the activity name, so for example: James Smith placed order.
The second allows you to pick an attribute from the activity you send in and will display that along with the name, for example: James Smith placed order #456.
The final option, the advanced option is what requires further explanation. This allows you to use a simple template to display whatever you like out of the available data.
An example of this syntax is: Placed order #{{attribute.order_id}} from the {{attribute.category}} category.
Data destinations
In this section you can select a webhook to send activity data to. Events associated with the activity are sent to your webhook when they occur. You can view the webhook actions on the webhook’s view, under Logs (accessed via Data sources > your webhook).
NOTE: Due to the technical nature of webhooks, we can’t guarantee the order of webhook events.
For example, if you’re sending webhooks for the Sent Email and Received Email activities, you might receive the Received Email webhook before the Sent Email webhook, even though the Sent Email event occurred first in Ortto. Therefore, you should design your system to reconcile state using timestamps, message/contact IDs, or other identifiers.
TIP: If the webhook is attached to an Email or SMS activity, we will add the "bol::t": true parameter to the relevant webhook payload, indicating that the campaign is transactional. If it's a non-transactional campaign, this parameter will not be included.
Conversion destinations
The conversion destinations feature enables you to send system, data source (such as Shopify) and custom activity events to your Google Ads account.
Once you have enabled conversion destinations for a particular activity, events associated with the activity can be sent as conversion data to Google Ads. This allows you to create ad campaigns in Google Ads linked to the custom conversion action sent from Ortto.
Learn more about conversion destinations.
Export activity data
You can export your activity data with selected contact fields as attributes.
To do so, on the activity view:
- Click Actions > Export activity data.
- If required, select contact fields to add as activity attributes.
- Click Export. You’ll receive an email with a link which will download a
.jsonlfile with your activity data.
NOTE:
- For each activity, you can export activity data once per 24 hours.
- You can add up to 10 contact fields to the activity data export.