Custom activities guide
Overview
Activities track user actions like email clicks, purchases, or logins. They help users understand customer behavior, segment audiences, and create detailed reports. Custom activities lets users define specific behaviors throughout the customer journey.
Users can utilize activities to add people to playbooks, journeys, build target audiences, and generate reports and dashboards.
This guide shows users how to add custom activities to Ortto using the API. Custom activities provide deeper insights, better reporting, and more control over users audience communications.
Accessing custom activities
To access custom activities, go to CDP > Activities.
Managing custom activities
Getting started
In this guide, we'll use the Logged in activity as an example. This activity is created every time someone logs into our app.
We also want to capture additional details:
- Payment plan.
- Login location.
- Account owner status.
- Web browser used
This information should be linked to the customer who logged in. If a matching customer doesn’t exist in Ortto, we’ll add them.
Generating a private API key
Learn more about this process in Configuring a custom API key.
NOTE: Do I need more than one data source?
Each Custom API data source has its own API Key associated with it. It is fine to use the same API key for sending many kinds of activities from within your application. However, if they are different systems, and you may wish to disconnect or regenerate the key separately, perhaps if one system was compromised in some way, then you can create more than one.
Each data source has its own statistics, logs, activities location graph and activities list associated with it, so if you would like to separate data on that basis you can create a separate Custom API data source for each.rere
See also
Creating a custom activity
Navigate to Activities > click New activity.
Activity name
This should be a verb such as Purchased, Visited, Downloaded or Logged in - it will be used in the activity feed for items such as:
Art Vandalay logged in.
You will be able to edit the activity name later, but it will not update previously recorded activities in the activity feed for a person. It will update it in the filters, reports and other places where it is displayed dynamically.
NOTE: Although you can rename an activity through the user interface, the activity ID linked to the custom activity will stay unchanged. To update the activity's ID, you will need to create a new custom activity.
Icon
The icon is associated with your custom activity and will appear in the person activity feed and filters. While it isn’t necessary to have a unique icon per activity, it helps you identify them quickly.
Data source
Select the API data source that will trigger this activity. If you haven’t already, you can learn more about creating an API data source here.
Object
Select whether this will be an account (organization) activity or a person (contact) activity.
TIP: Choosing whether an event should be recorded as a person activity or an account activity comes down to what the event truly represents.
A person activity reflects an individual’s behavior. If you’d describe the event as something “the company” did, it’s probably an account activity.
Learn more about account activities.
Attributes
Any attributes you want to send along with your activities must be defined here. If they are not, they will be ignored by the API.
When you name attributes you don’t have to give them programmatic names. These names will appear in filters and likely be used by non-technical people in your company. So you can call them things like Product name, or Size preference.
Once you create the activity the system will give them internal field names based on their name and type, e.g. str:cm:size-preference, which you will use when sending requests to the API.
You are required to define the type of each field, these include:
Type | Description | Code example |
|---|---|---|
Text | Any combination of letters and numbers below 255 characters. |
|
Long text | Text longer than 255 characters |
|
Number | A whole number. |
|
Decimal number | A decimal number. |
|
Currency | A decimal number displayed as a currency. |
|
Multi currency | A decimal number displayed as an international currency. |
|
Date | A specific day, month and year. |
|
Time and date | A specific time, day, month and year. |
|
Boolean | True or false. |
|
Phone number | A local or international phone number. |
|
Link | A web page or URL. |
|
Single select | A single value selected from a list you define |
|
Multi select | Multiple values selected from a list you define |
|
JSON object | A JSON object with custom data |
|
NOTE: Why are decimals and currencies sent as "int"?
In order to not lose precision in decimal operations internally, the Ortto API treats decimals as integers, multiplied by 1000.
For a decimal number, multiply the number by 1000. So for 64.28, you send 64280. For currency, multiply the number by 1000 and no $. So for $24.99, you send 24990.
Note, our system can store up to 3 decimal places for accuracy, but throughout the Ortto app we only display up to 2 decimal places.
NOTE: When a search is performed against activity attributes using the Has any value filter option, results containing 0 or "" will be included, and results set as null will be excluded. Learn more about empty values.
See also:
WARNING: Do not add attribute for person fields like First name, Last name and Email.
Person fields can be sent with the payload and not need to add attributes for these. You can pass these into the create activity call along with the person to either automatically create people to go with the activity, or update existing people with the new data.
Map value to CDP
The map value to CDP option allows you to use attributes sent in your payload to update the fields on the person in question for that activity. For example, you might want to create custom fields on people for each of the attributes you are sending, then update them each time you send an activity payload. You can also update fields like First name and Last name in case the activity caused an internal update to this information. Mapping to fields is optional.
Conversion value
If you enable conversion value, you can provide an extra value in your payload like so "int::v": 15300. This value is then considered to have been attributed to this activity. Since the value is a currency, you multiply the number you are sending by 1000. In the above example the value being sent represents $15.30. So we would do this if we thought every login to our web app was worth $15.30.
If you receive activity data in multiple currencies (e.g. you sell products in the United States, Europe, and Australia), you can set a conversion value for any currency type using "prc::v". For example, "prc::v": { "c": AUD, "a": 15300, "d": { "year": 2024, "month": 3, "day": 1, "timezone": "Australia/Sydney" }}
NOTE: If you supply both int::v and prc::v in the same payload, then prc::v will take priority and be used as the conversion value.
Learn more about how Ortto handles attribution. See also the List of currencies for an example of multi currency data ingestion and valid currencies.
Track as touch
This option will update the "Last seen" on the person associated with the activity. A login event is the perfect example of when you would want to track the activity as touch because we know we have seen the user at the time they logged in.
Passive activities which were not initiated by the user should leave this option disabled.
Create a person activity via API
Requests to create a person activity event in Ortto are submitted as a single POST method to the following URL:
https://api.ap3api.com/v1/activities/createNOTE: Ortto customers who have their instance region set to Australia or Europe will need to use specific service endpoints relative to the region:
For example: https://api.eu.ap3api.com/v1/
All other Ortto users will use the default service endpoint (https://api.ap3api.com/).
For our login demo we will use the Private API key generated in previous steps.
Below is a basic example of sending a login activity to Ortto via the API using the cURL command. This sends through the attributes we specified above when creating the activity.
shell
curl --location\ --request POST 'https://api.ap3api.com/v1/activities/create'\ --header 'X-Api-Key: PUT-YOUR-REAL-KEY-HERE'\ --header 'Content-Type: application/json'\ --data-raw '{ "activities": [ { "activity_id":"act:cm:logged-in", "fields": { "str::first": "Chris", "str::last": "Smith", "str::email": "chris.smith@example.com" }, "attributes": { "str:cm:payment-plan": "$100 starter plan", "bol:cm:account-owner": true, "str:cm:web-browser": "Google Chrome", "int::v": 1530 }, "location": { "source_ip": "59.167.135.194" } } ]}'TIP: You can use different merge strategies and find strategies for the activity submissions to manage the contact association for the activities.
Learn more about merge strategies.
Create activity response
If the request is successful you will receive a 200 OK response, and a JSON body like the following:
json
{ "activities": [ { "person_id": "00600e153df0a3b67ce60f00", "person_status": "created", "activity_id": "00600e153c548806f6a4dbda", "status": "ingested" } ] }person_id is the ID of the person which the activity was added to. This could be a new person_id if the person was never seen before based on your merge strategy.
You can also provide person_id in subsequent requests instead of email. To do that, person_id needs to be provided at the root level, as shown in the example below:
json
shell
curl --location\ --request POST 'https://api.ap3api.com/v1/activities/create'\ --header 'X-Api-Key: PUT-YOUR-REAL-KEY-HERE'\ --header 'Content-Type: application/json'\ --data-raw '{ "activities": [ { "activity_id":"act:cm:logged-in", "person_id":"0066ced2f7053cd70d8f9e00", "fields": { "str::first": "Chris", "str::last": "Smith", "str::email": "chris.smith@example.com" }, "attributes": { "str:cm:payment-plan": "$100 starter plan", "bol:cm:account-owner": true, "str:cm:web-browser": "Google Chrome", "int::v": 1530 }, "location": { "source_ip": "59.167.135.194" } } ] "merge_by": ["str::person_id"] }'person_status tells you what happened to the person associated with this activity:
person_status
Description
invalid
A field needed to identify or create the person — as specified in your data source merge criteria — was not provided. Or you provided a person field which does not exist or does exist but the wrong kind of data was provided.
created
A person was created for this activity as it did not previously exist.
merged
A person already existed based on your data source merge criteria, and its fields were updated with any provided.
skipped
A person already existed and your data source merge strategy asked for these to be skipped, so the person was not updated based on the fields provided. The activity, however, was recorded against this person.
by-id
You specified a person_id in the request and the person was found and matched. The activity was applied to this person.
Ortto is strongly typed which means if you provide a type of data which cannot be unmarshaled into the correct type, your activity ingestion will fail.
Additionally, if you provide person fields which do not exist, activity ingestion will fail. Note that this doesn’t apply for unknown attributes on activities, which will simply be ignored.
Create an account activity via API
Requests to create an account activity event in Ortto are submitted as a single
POSTmethod to the following URL:https://api.ap3api.com/v1/accounts/activities/createBelow is a basic example of sending a 'new user added' activity to Ortto via the API.
shell
curl --location --request POST 'https://api.ap3api.com/v1/accounts/activities/create' --header 'X-Api-Key: {{ APIKey }}' --header 'Content-Type: application/json' --data-raw '{ "activities":[ { "activity_id":"act:oc:added-new-user", "attributes":{ "str:cm:appid":"example string value", "str:cm:userid":"example string value", "str:cm:username":"example string value" }, "fields":{ "str:o:name":"CompanyName" } } ], "merge_by":["str:o:name"]}'Why won’t activities work from my website javascript?
You might notice that if you try to run these API calls via your own website you will get a CORS error. This is because the API is only accessible via a backend call, due to security reasons. If activities were allowed to be send from the public website, then the API could be bombarded with fake requests damaging your CDP data.
However, we do have a way for you to send these activities from your website.
Read the guide to sending website activities here.
Providing object fields as part of the payload
When you set up your data source, you specify your merge preferences. This is how the system decides what to do when it encounters a person it has seen before.
In order for an activity to create a new person or account if the record hasn’t been seen before, or apply the activity to an existing record, you need to provide object fields in your payload.
The example below illustrates the structure, and it applies to both person and account activity payloads.
json
{ "fields": { "str::first": "Chris", "str::last": "Smith", "str::email": "chris.smith@example.com" } }If you provide unknown object fields, the activity ingestion will fail.
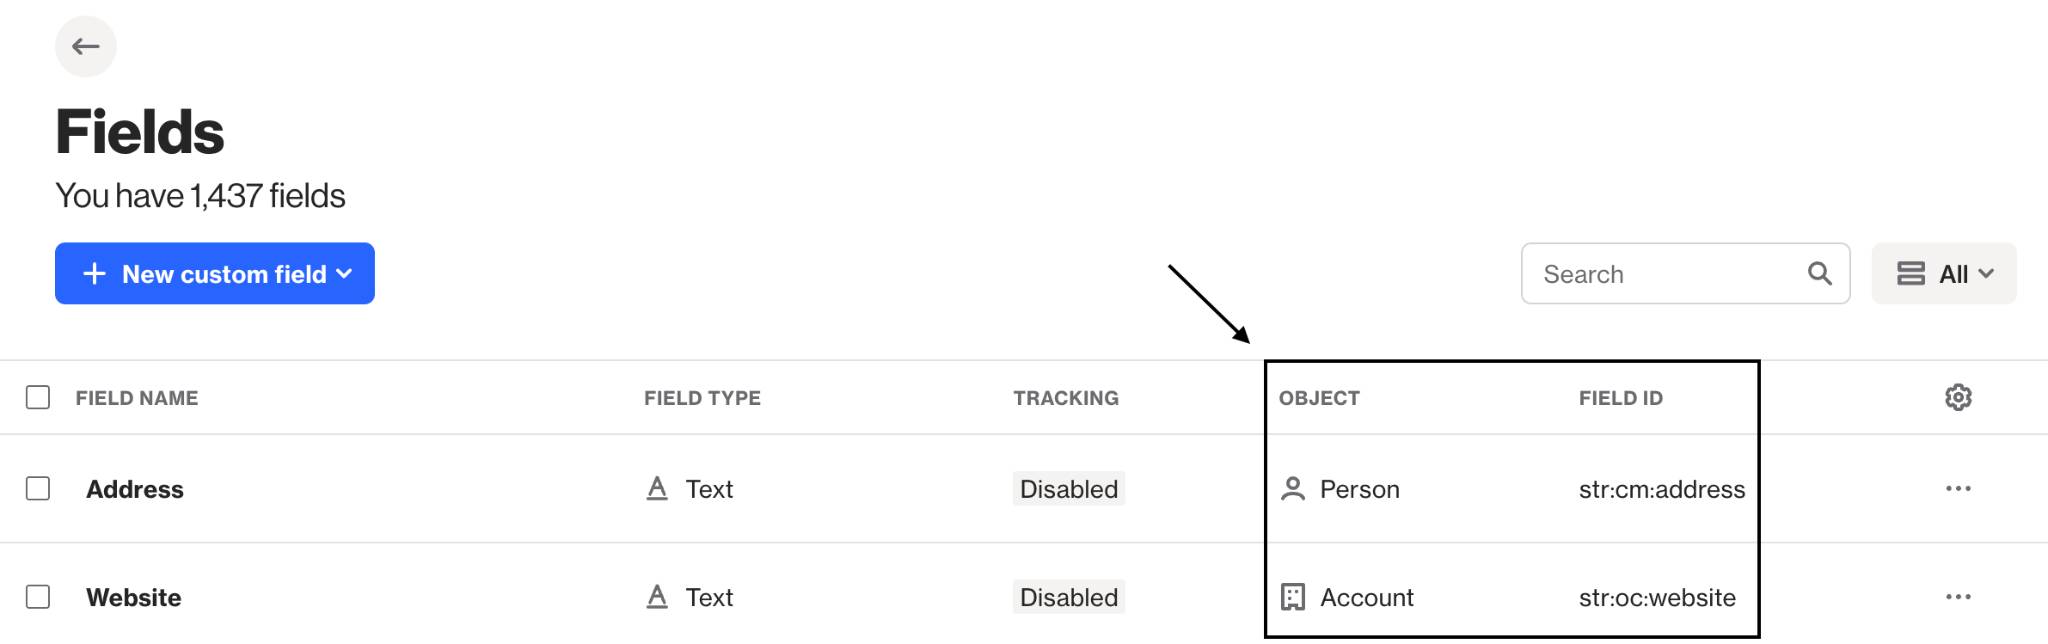
TIP: The field IDs for both persons and accounts can be found on the Fields fields page of your account:
Custom activity request limits
It is possible to send up to 100 activities in the one payload to Ortto. The limits are as follows:
In addition to the above, the number of activities per contact per day is limited. The limit is 50 activity events per activity per contact per 24 hours.
To illustrate, a request like the following, which has 1 activity event for 1 activity, can be sent for the same contact a maximum of 50 times per 24 hours.
shell
curl --location\ --request POST 'https://api.ap3api.com/v1/activities/create'\ --header 'X-Api-Key: PUT-YOUR-REAL-KEY-HERE'\ --header 'Content-Type: application/json'\ --data-raw '{ "activities": [ { "activity_id":"act:cm:logged-in", "fields": { "str::first": "Chris", "str::last": "Smith", "str::email": "chris.smith@example.com" }, "attributes": { "str:cm:payment-plan": "$100 starter plan", "bol:cm:account-owner": true, "str:cm:web-browser": "Google Chrome", "int::v": 1530 }, "location": { "source_ip": "59.167.135.194" } } ]}'See also
Here is an example sending two login activities at once:
shell
curl --location\ --request POST 'https://api.ap3api.com/v1/activities/create'\ --header 'X-Api-Key: PUT-YOUR-REAL-KEY-HERE'\ --header 'Content-Type: application/json'\ --data-raw '{ "activities": [ { "activity_id":"act:cm:logged-in", "fields": { "str::first": "Alex", "str::last": "Smith", "str::email": "alex.smith@example.com" }, "attributes": { "str:cm:payment-plan": "$1900 maxi plan", "bol:cm:account-owner": false, "str:cm:web-browser": "Edge" }, "location": { "source_ip": "127.0.0.1" } }, { "activity_id":"act:cm:logged-in", "fields": { "str::first": "Chris", "str::last": "Smith", "str::email": "chris.smith@example.com" }, "attributes": { "str::email": "john@example.com", "str:cm:payment-plan": "$100 starter plan", "bol:cm:account-owner": true, "str:cm:web-browser": "Google Chrome" }, "location": { "custom": { "country_name": "USA", "region_name": "NY", "city_name": "New York", "position_name": "Vandalay Industries", "lat": 40.730610, "lng": -73.935242 } } } ] }'A successful response will contain multiple results to let you know how each activity in the payload went:
json
{ "activities": [ { "person_id": "00600e15bbf0a3b67ce61200", "status": "ingested", "person_status": "created", "activity_id": "00600e15bb548806f6a4dfde" }, { "person_id": "00600e15bbf0a3b67ce61500", "status": "ingested", "person_status": "created", "activity_id": "00600e15bb548806f6a4e1e0" } ] }Asynchronous activity ingestion
If you do not want to wait for a response from the API in order to ingest activities, you can provide the
async: trueflag in your request. You might want to do this if your code runs synchronously and the requests to Ortto delay your response to the user.When the request contains the async: true flag, the system will queue ingestion of the activities and respond to you immediately.
shell
curl --location\ --request POST 'https://api.ap3api.com/v1/activities/create'\ --header 'X-Api-Key: PUT-YOUR-REAL-KEY-HERE'\ --header 'Content-Type: application/json'\ --data-raw '{ "async": true, "activities": [ { "activity_id":"act:cm:logged-in", "fields": { "str::first": "Chris", "str::last": "Smith", "str::email": "chris.smith@example.com" }, "attributes": { "str:cm:payment-plan": "$100 starter plan", "bol:cm:account-owner": true, "str:cm:web-browser": "Google Chrome" }, "location": { "source_ip": "59.167.135.194" } } ] }'If the request is successful you will get a response like the following:
json
{ "activities": [ { "status":"queued", "person_status":"queued" } ] }Note the
"status": "queued"in the response.NOTE: When sending activity events for activities that are older than 90 days (where data retention is enabled), the activity ingestion will be buffered, even if
"async": false.Geo locating activities
You can optionally provide a location with each activity you send Ortto. In fact, if you do not know the location we can even look it up for you based on IP address. Read about geo locating activities here.
Backdating activities
If you would like to back-date activity data, you can use the
createdfield in your request to specify the date on which the activity occurred. Ortto allows you to send in backdated events up to 90 days in the past, or if you have data retention enabled on your activity, you may provide backdated events up to your selected data retention period.In addition, to make sure you do not backfill the same piece of data more than once, you can include a
keyattribute, which gets combined with thecreateddate to create a unique identifier for each activity. If you provide the same pair forkeyandcreatedmultiple times (such as if you need to run your backfill scripts multiple times), it will merge those requests so you do not get duplicate activities created.shell
curl --location\ --request POST 'https://api.ap3api.com/v1/activities/create'\ --header 'X-Api-Key: PUT-YOUR-REAL-KEY-HERE'\ --header 'Content-Type: application/json'\ --data-raw '{ "activities": [ { "activity_id":"act:cm:logged-in", "created": "2020-02-17T01:30:17.601Z", "key": "125432", "fields": { "str::first": "Chris", "str::last": "Smith", "str::email": "chris.smith@example.com" }, "attributes": { "str:cm:payment-plan": "Free plan", "bol:cm:account-owner": true, "str:cm:web-browser": "Netscape Navigator" }, "location": { "source_ip": "59.167.135.194" } } ] }'As this documentation will age, if you copy the above example verbatim you might get a response like below:
json
{ "request_id": "19ccd5c1-112d-4dfa-bf80-0a3312896742", "code": 400, "error":" Created date is more than 90 days ago" }If you provide a
createddate within the last 90 days (or within your activity’s selected data retention period), you will receive a successful response:json
{ "activities": [ { "person_id":"00602c446af92b7aa1f77a00", "status":"ingested", "person_status":"created", "activity_id":"00602c71a9b346c32c9b7473" } ] }If you provide a
createddate outside of the activity’s selected data retention period, you will receive an error response:json
{ "request_id": "19ccd5c1-112d-4dfa-bf80-0a3312896742", "code": 400, "error":" Created date is outside of activity cold storage" }NOTE: Activities with a backdated date older than 90 days may take up to 2 hours to be processed and recorded in Ortto.
To read more about Ortto’s data retention policy, see the link below:
Email subscription permission
All people added via the API are considered to be "opted in" for email subscription permission. They will appear with "Subscribed via API" on their profile. It is very important that you do not add people via the API if you do not have permission to email them.
If you would like to control either their subscription status, such as setting them as "opted out", or setting their subscribed or unsubscribed reason, you can do this by providing the following fields:
json
{ "bol::p": true, "str::s-ctx": "Subscribed via internal API" }Above is an example of email subscription permission being enabled with the message "Subscribed via internal API" Here is an example of someone who starts off unsubscribed:
json
{ "bol::p": false, "str::u-ctx": "Unsubscribed via internal API" }The default, if you do not provide these fields is:
json
{ "bol::p": true, "str::s-ctx": "Subscribed via API" }Here is a full cURL request example for how to do this:
shell
curl --location\ --request POST 'https://api.ap3api.com/v1/activities/create'\ --header 'X-Api-Key: PUT-YOUR-REAL-KEY-HERE'\ --header 'Content-Type: application/json'\ --data-raw '{ "activities":[ { "activity_id":"act:cm:logged-in", "fields": { "str::first": "Chris", "str::last": "Smith", "str::email": "chris.smith@example.com", "bol::p": false, "str::u-ctx": "Unsubscribed via internal api" }, "attributes": { "str:cm:payment-plan": "Free plan", "bol:cm:account-owner": true, "str:cm:web-browser": "Netscape Navigator" } } ] }'Displaying custom activities
When you send custom activities into Ortto, you can display them in custom formats within Ortto using attributes from the activities.
Here is an example of an activity using custom code to display:
Order number {{attribute.number}} placed for item {{attribute.item_name}}The syntax of this is slightly different to the Liquid syntax used in campaigns. All attributes from the custom activity are available and are put as lowercase and spaces are replaced with underscores.