
SMS assets in journeys
Overview
When setting up an SMS asset in a journey, you have the option to use an existing SMS asset or create a new one. You can start from scratch or use a template to begin.
NOTE: Make sure to set up SMS before configuring assets in your journeys.
Accessing SMS assets
To access SMS assets you have two options:
- Navigate to Marketing > Campaigns > Select your journey > Edit > + > SMS.
- Navigate to Marketing > Asset Manager > New Asset > SMS.
Managing SMS assets
Create a new SMS asset
To create a new SMS
- Navigate to add an SMS asset.
- Select Create new and choose Start from scratch or a relevant template.
Using a template
- Select the appropriate template.
- Click Use template to continue.
Next
- Name your SMS.
- Proceed to the Setup.
- Move to the Content tab for further editing.
When ready
- Proceed to the Review tab.
- Publish the SMS asset to use it in the journey.
- The SMS asset will be activated ("ON").
- Click Publish in the top right corner to save your changes.
NOTE:
- Publishing does not activate the journey.
- If you do not publish the SMS asset, the shape will be turned OFF.
- To turn the SMS asset ON, go to the journey's edit mode, click on the (...) on the shape, and then select Switch ON.
TIP: Explore SMS settings.
- Learn more about the setup tab.
- Learn more about the content tab.
- Learn more about the review tab.
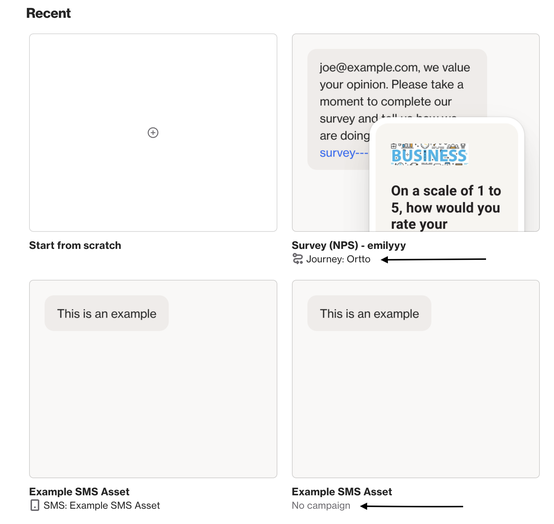
Use an existing SMS asset
To use an existing SMS asset:
- Navigate to add an SMS asset.
- Choose Select existing.
Selecting Select existing displays your assets, where you can:
- Start from scratch to create a new asset.
- Duplicate an asset linked to another campaign (check for the campaign name below the asset). Click the asset, then Duplicate & add SMS. Duplicating is necessary for accurate reporting.
- Choose an asset not yet linked to another journey/playbook (look for "No campaign" below the asset).
IMPORTANT: After adding the asset to the journey, if it's linked to another journey, rename the SMS asset for easier filtering, reporting and condition shapes.
- To Rename the SMS, go to the journey's edit mode, click on the (...) on the shape, and then select Rename.
EX:
- If you don't rename an asset and later try to filter or report on the SMS, you'll encounter multiple SMS with the same name. This can make it difficult to distinguish which one to select in a filter.
- The same issue applies when using conditions in journeys to track clicks etc. for the SMS. It's important to rename assets to avoid confusion and ensure accurate tracking and reporting.
Contacts waiting on an SMS asset
On the preview page, you'll find analytics related to the SMS asset, displayed based on your chosen date range. Adjust the date range by clicking the calendar icon.
Metrics include Sent, Delivered and Clicked.
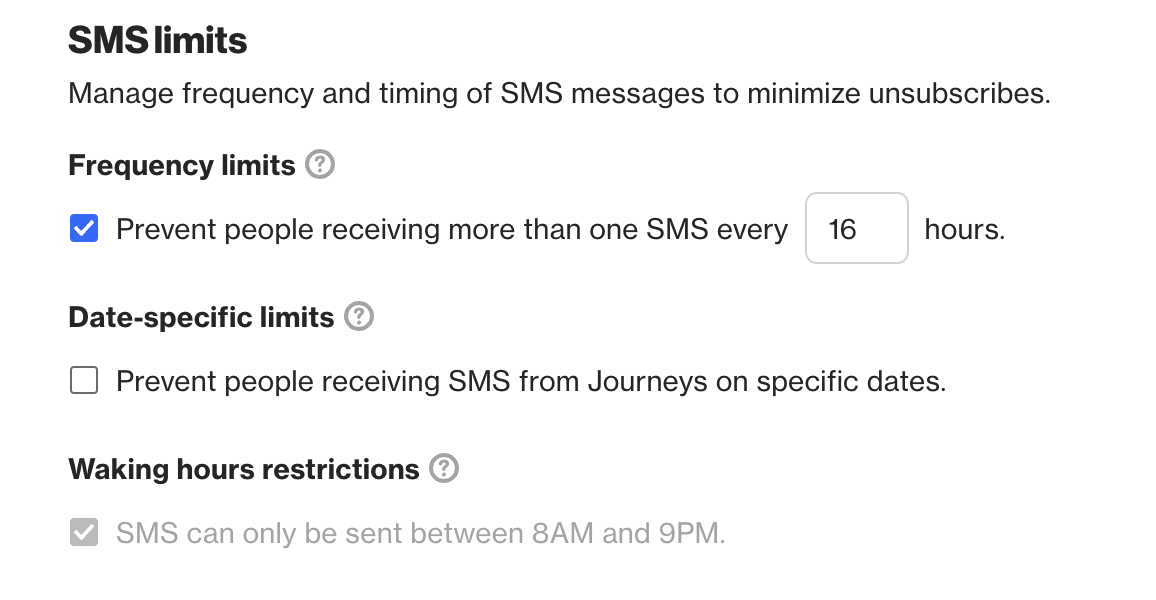
If you see Waiting this means contacts have not been sent the SMS yet and are waiting to proceed. Contacts typically wait here if your account has an SMS limit set.
- This helps manage SMS frequency, reducing the risk of unsubscribes.
- To check or alter this setting navigate to > Settings > Channels > SMS > SMS limits and fallback.
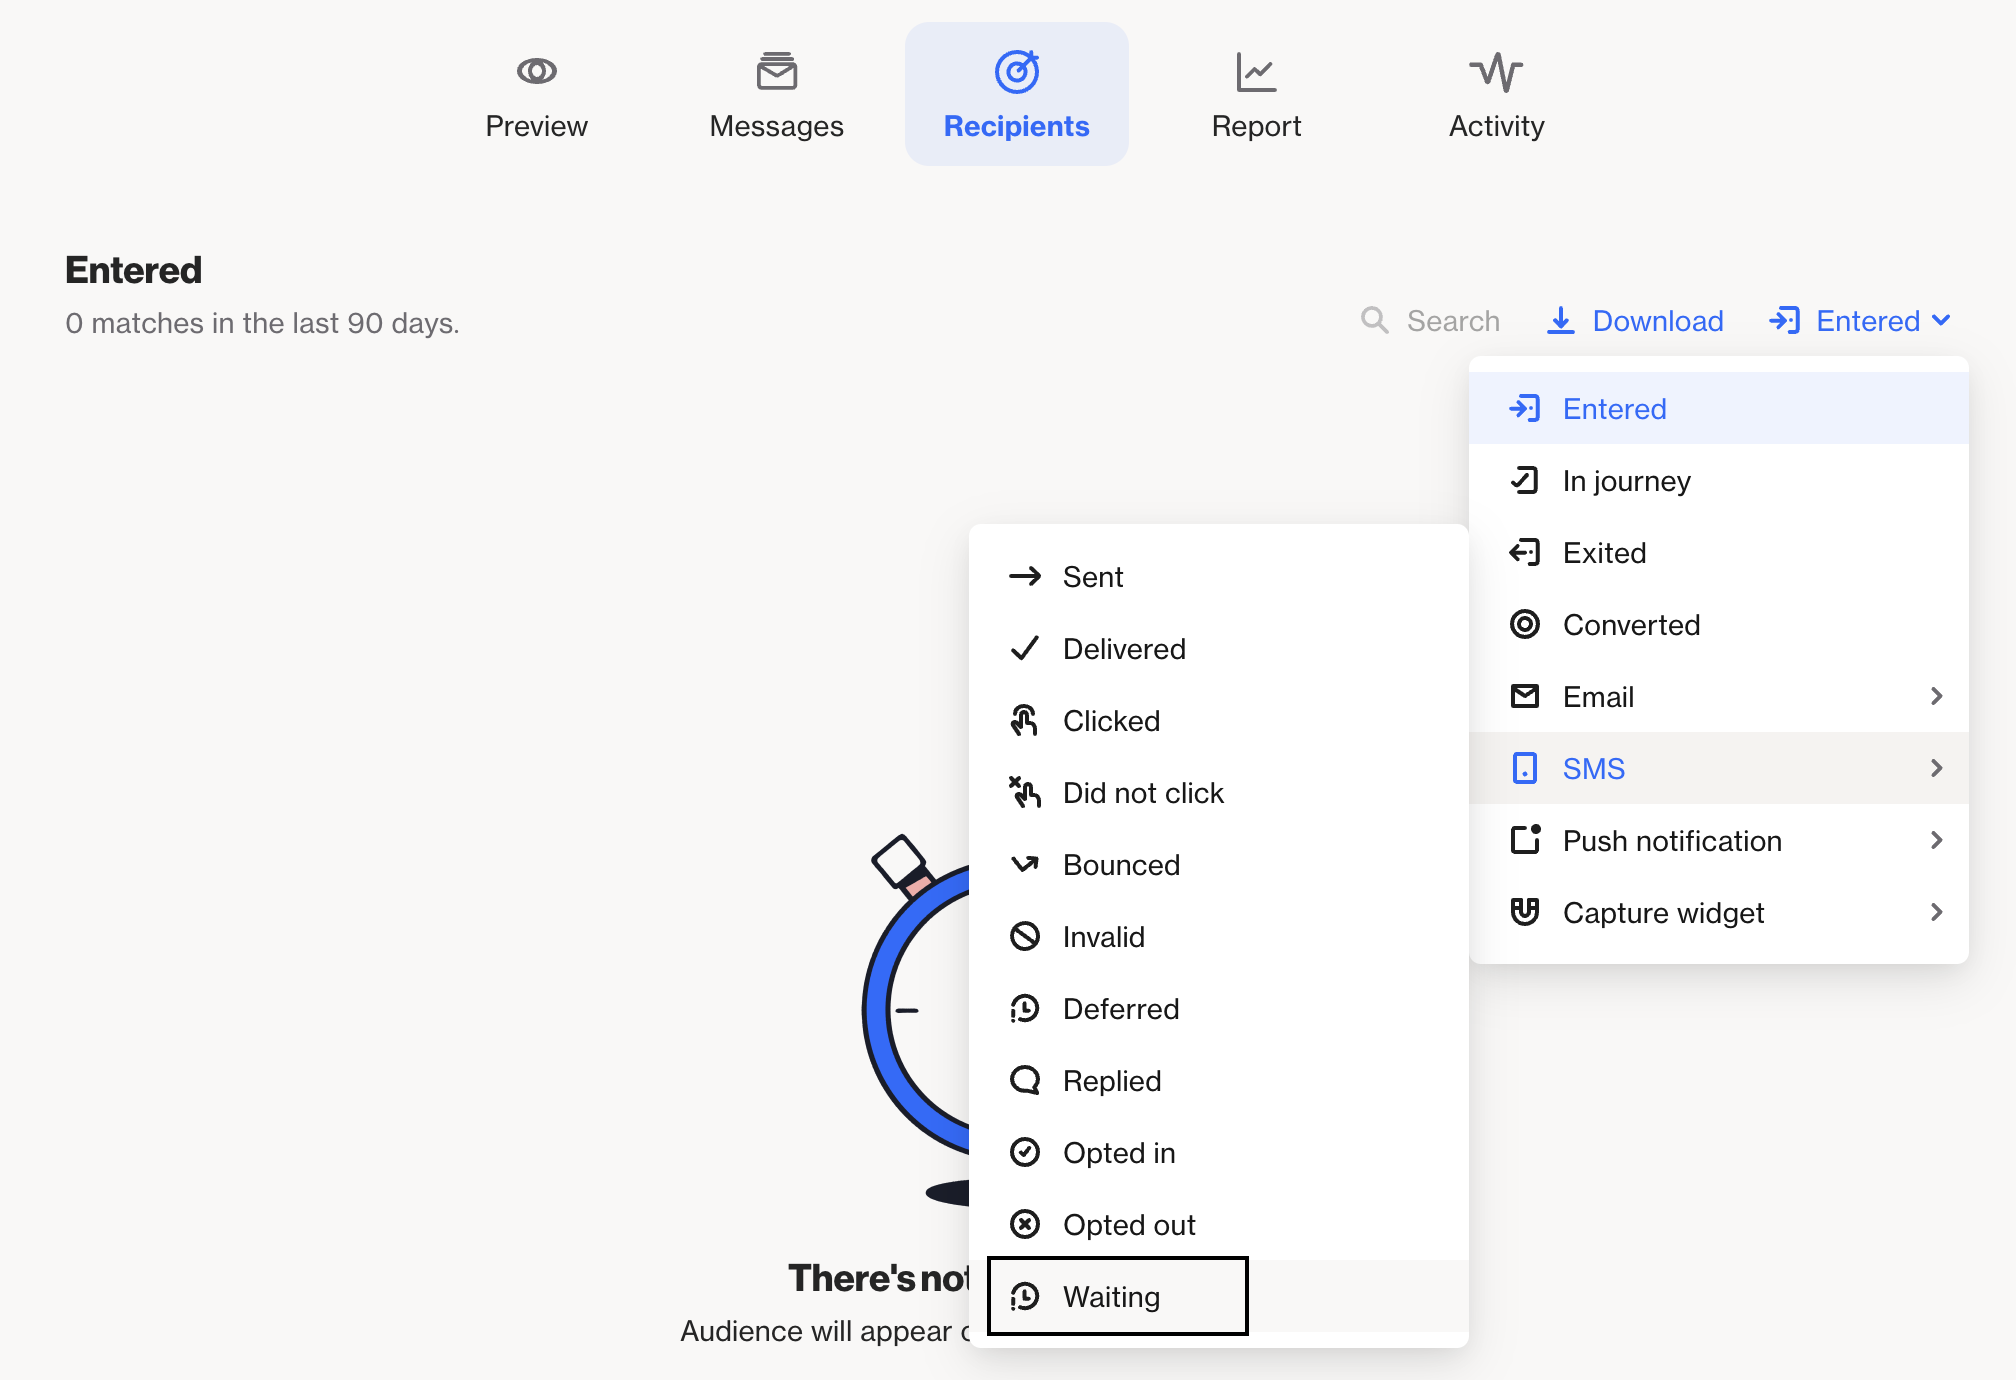
To find contacts Waiting:
- Navigate to > Recipients on the journey preview page.
- Select Entered > SMS > Waiting.
- This lists all contacts Waiting in any SMS asset shape.
- You can then visit their Profiles to check when they were last sent an SMS.
- Use the Sent SMS filter to see the date and time of their last SMS.
- Once the SMS limit time has passed, the contact will be sent the SMS.
To find contacts Waiting on a specific SMS asset:
- Navigate to > Messages on the journey preview page.
- Select … next to the relevant message.
- Select View.
- Select Recipients.
- Select Sent > Waiting.
- This lists all contacts Waiting in that specific SMS asset shape.
- You can then visit their Profiles to check when they were last sent an SMS.
- Use the Sent SMS filter to see the date and time of their last SMS.
- Once the SMS limit time has passed, the contact will be sent the SMS.
NOTE:
- To ensure the SMS is sent promptly, disable the SMS limit setting.
- However, it's not recommended as it may lead contacts to unsubscribe if they receive too many SMS.
- Transactional SMS are exempt from these limits and will be sent immediately, regardless of any previous SMS sent within the SMS limit time frame.
SMS non-delivery
Non-deliveries mean SMS messages aren't reaching recipients.
To find contacts with an Invalid SMS activity:
- Navigate to > Recipients on the journey preview page.
- Select Entered > SMS > Invalid.
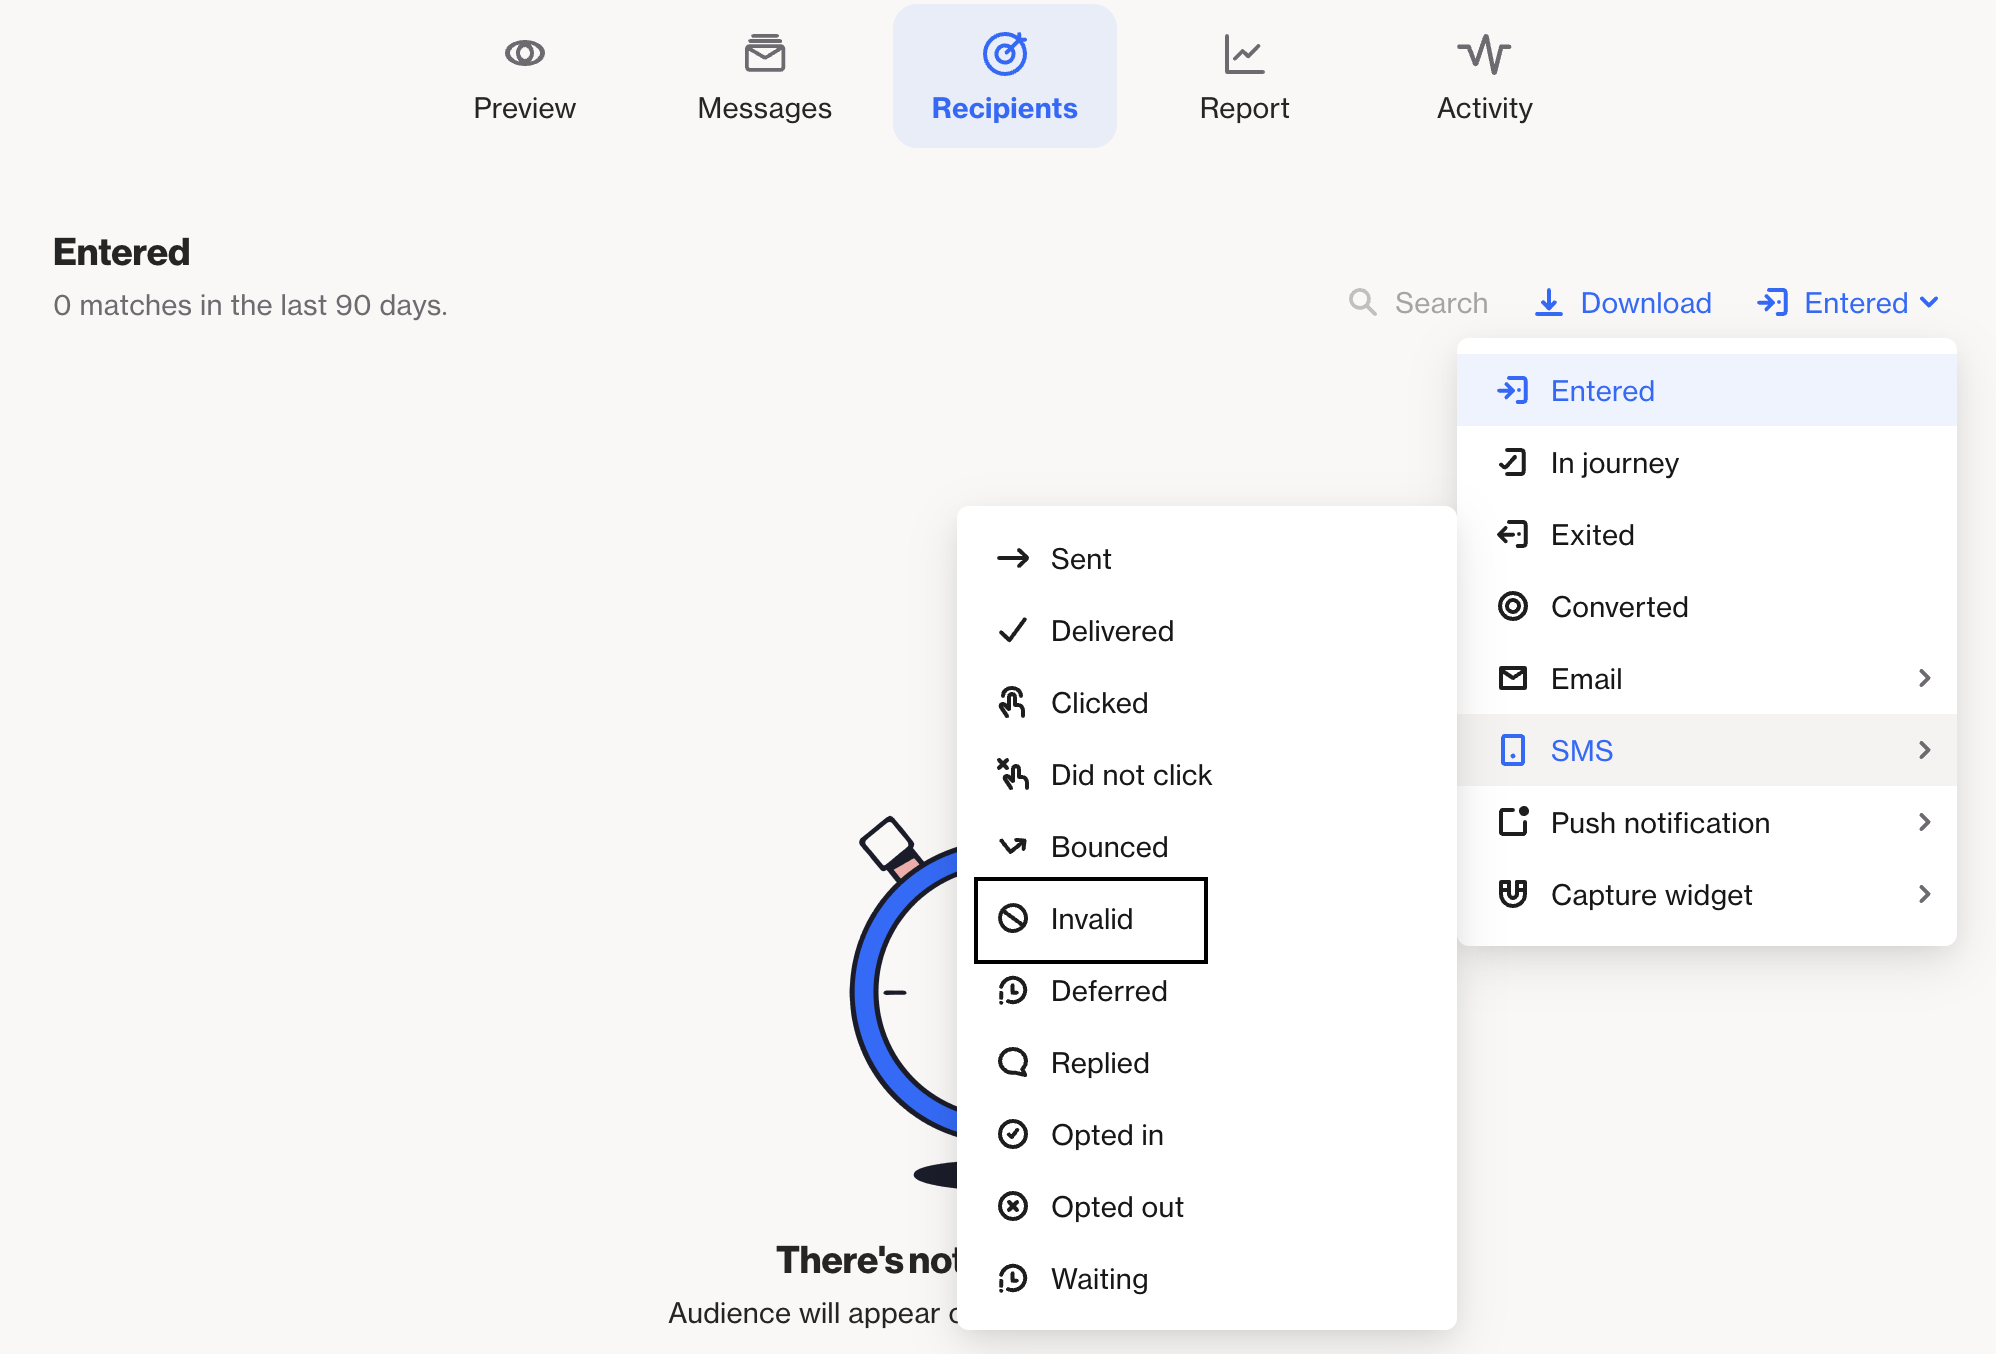
- This lists all contacts with an Invalid SMS activity in any SMS asset shape.
- You can then visit their Profiles to check the reason for the invalid SMS activity.
- Use the Invalid SMS activity filter to see the reason.

Learn more about SMS non-delivery.