
Understanding email unsubscribes
Overview
In Ortto, there are several ways someone might be unsubscribed from your communications—such as opting out, a bounced email, or manual unsubscription. This guide will explain these scenarios and show you how to resubscribe them.
Learn more about:
Unsubscribe from email activity
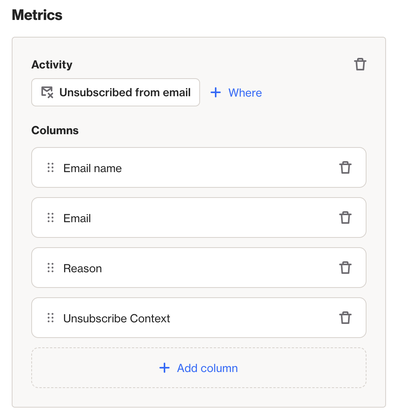
When a person is unsubscribed from emails an Unsubscribe from email activity is logged on the person's activity history.
Attribute | Description |
|---|---|
Email name | The email name where the recipient clicked the unsubscribe link. |
Campaign name | The name of the campaign associated with the email the recipient unsubscribed from. |
Campaign type | The type of campaign the email was sent from (e.g. Email, Playbook, or Journey). |
Reason | If provided by the recipient, feedback on why the recipient has unsubscribed. |
Reason (other) | Feedback comments provided by the recipient on why they had unsubscribed. |
Subject | The subject line of the email the recipient unsubscribed from. |
Unsubscribe context | How the recipient unsubscribed (e.g. clicked on the unsubscribe link in an email, Sunset policy, manually unsubscribed). |
NOTE: If a recipient clicks the unsubscribe link in an email that was sent over 30 days ago, Ortto won’t link this action to that email.
- Instead, you'll see Message data missing reason: Message is expired or missing.
Unsubscribe methods
People can unsubscribe from emails directly within emails they receive by clicking the unsubscribe link.
Users can update the email permissions field using the following methods:
Manually update the email permissions field for a single person
To manually update the email permissions field, follow these steps:
- Navigate to the person's record.
- Locate the Email permission field.
- Toggle it to False and save.
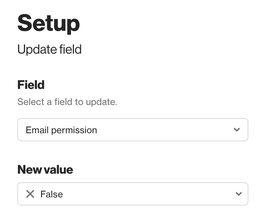
Update the email permissions field in a journey
To update the email permission field in a Journey, follow these steps:
- Add the Update Field action shape in a Journey.
- Select Email permission as the field to update.
- Select False as the new value.
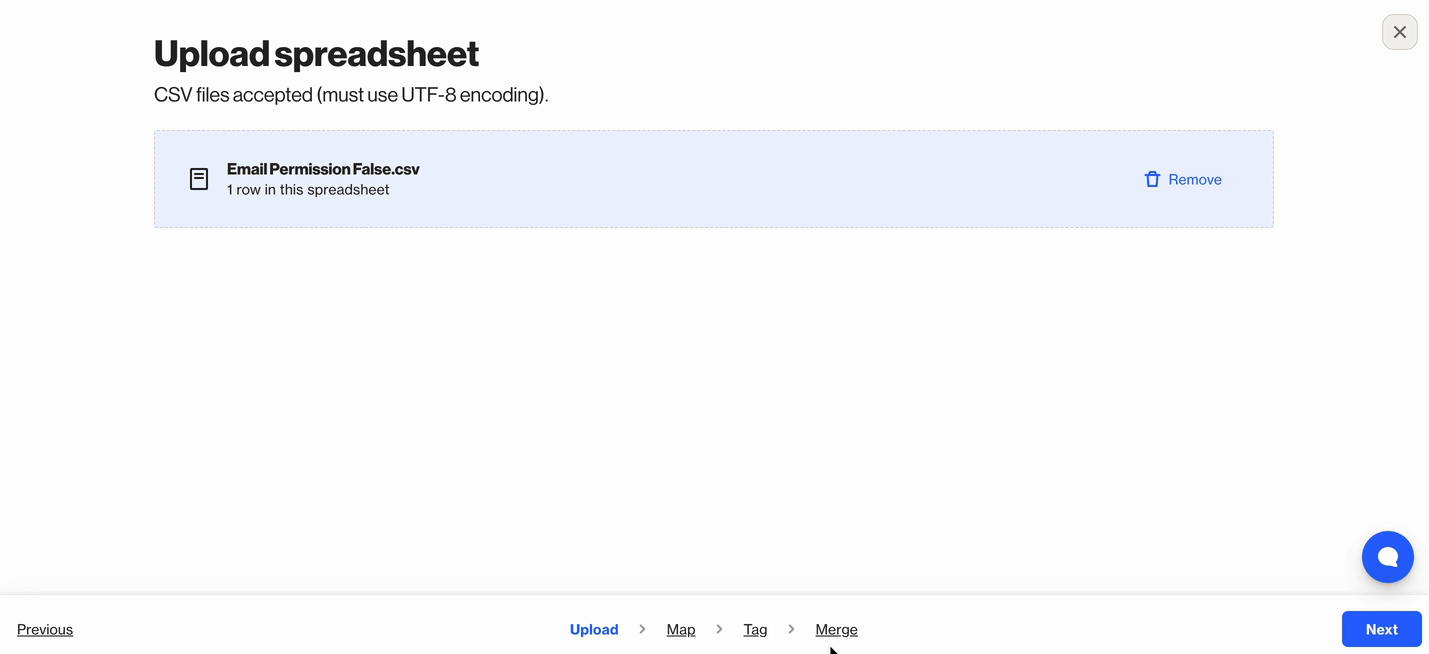
Upload a CSV file
To unsubscribe a contact via a CSV import, follow these steps:
NOTE: Prior to uploading, ensure the CSV file contains a column for Email permission with the value set to False.
- Click CDP > People from the sidebar.
- Click More > Import.
- Select Spreadsheet import and follow the prompts.
- On the Map page, map the Email permission CDP field against the Email permission column.
- Tick the checkbox: I certify that I have the appropriate permission to send emails to these contacts.
Learn more about importing data from a CSV file.
API
To unsubscribe a contact via API, use the POST /v1/person/merge endpoint to update the person's Email permission field to False.
Sunset policy
To unsubscribe contacts via the Sunset policy, follow these steps:
- Click Settings from the sidebar.
- Click Customer data.
- Click Sunset policy.
- Toggle Auto-unsubscribe on > Use the default conditions or add/remove conditions.
- Click Save.
NOTE: People who hard bounce or mark an email as spam are automatically unsubscribed from receiving future emails. This is done to protect the sender's reputation.
Review the Email non-delivery and complaints documentation to learn more about how Ortto handles bounces and complaints.
Resubscribe methods
Recipients can resubscribe themselves using the following methods:
- Submit their email address in a capture widget or form.
- Navigate to the Email preference center from an email they've previously received > Click the link to opt in.
Users can update an unsubscribed person's Email permission to True as long as the user has received explicit opt-in consent from the unsubscribed person.
Users can resubscribe an unsubscribed person's Email permission using the following methods:
Manually update the email permissions field for a single person
To manually update the email permissions field, follow these steps:
- Navigate to the person's record.
- Locate the Email permission field.
- Toggle it to True and save.
Update the email permission field in a journey
To update the email permissions field in a journey, follow these steps:
- Add the Update Field action shape in a Journey.
- Select Email permission as the field to update.
- Select True as the new value.
Upload a CSV file
To resubscribe a contact via a CSV import, follow these steps:
NOTE: Prior to uploading, ensure the CSV file contains a column for Email permission with the value set to True.
- Click CDP > People from the sidebar.
- Click More > Import.
- Select Spreadsheet import and follow the prompts.
- On the Map page, map the Email permission CDP field against the Email permission column.
- Tick the checkbox: I certify that I have the appropriate permission to send emails to these contacts.
API
To resubscribe a contact via API, use the POST /v1/person/merge endpoint to update the person's Email permission field to True.
Auto-resubscribe
To resubscribe contacts via Auto-resubscribe, follow these steps:
- Click Settings from the sidebar.
- Click Customer data.
- Click Sunset policy.
- Toggle Auto-resubscribe on > Use the default conditions, or add/remove conditions.
- Click Save.
NOTE: Auto-resubscribe will only work for contacts that have previously been auto-unsubscribed.
Reporting on unsubscribes
To quickly view your unsubscribes and their reasons, create a ledger report:
- Navigate to Analytics > Reports.
- Select New report.
- Choose Start from scratch.
- Select Ledger.
- Add Unsubscribed from email activity.
You can also include additional columns such as:
- Campaign/Email name.
- Contact Email/Contact name.
- Unsubscribe reason.
- Unsubscribe context.
Frequently asked questions
What happens when a person is unsubscribed?
- The system Email permission field is updated to Unsubscribed.
- This means they will no longer receive marketing emails, but they will still get transactional emails.
What happens when an unsubscribe person is archived?
Once a person is archived, their activities will no longer be tracked. Any archived person that is not restored within 29 days will automatically be deleted on the 30th day.
If Ortto receives an activity involving an archived person from a data source, then a new person record will be created in the CDP.
The new person record will not retain the person's original subscription status (unless created as an unsubscribed record via a data source or via the appropriate API call, or the person has been added to the Email suppression list).
TIP: After updating email permissions in data sources like Salesforce, wait 48 hours before archiving the unsubscribed person. This gives Ortto time to track the unsubscribe activity before archiving, which halts further activity tracking.