Email suppression list
Overview
An email suppression list is used to store a list of contact email addresses that are considered suppressed, meaning that email messages cannot be sent to the listed addresses.
Accessing email suppression list
To access the email suppression list page, go to Settings > Customer data > Email suppression list.
Managing email suppression list
The email suppression list page allows users to:
Email suppression list methods
An email address can be added to the suppression list via the following methods:
- Directly from the Email suppression list page.
- Via a journey action (Archive & suppress).
- By meeting an associated criteria in your sunset policy.
- If they hard-bounce or we receive a spam complaint.
Key points about suppression list management
Email status
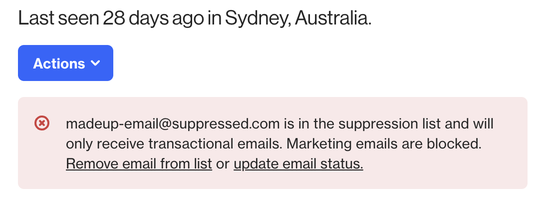
The email status determines whether an email address should be suppressed from receiving all emails, including transactional. Or, whether an email should be suppressed only from receiving marketing emails, but transactional emails can still be sent.
- Transactional only: Only transactional emails will be sent. Marketing emails are blocked.
- Never email: No emails of any kind (marketing or transactional) will be sent.
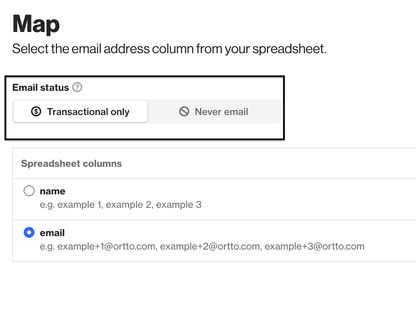
NOTE: When importing a CSV file into the suppression list, you will need to select the email status. This will be applied to all contacts being imported.
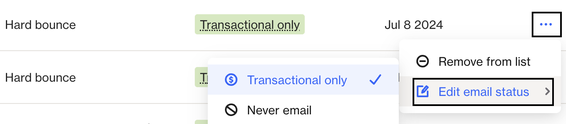
Editing the email status
As mentioned above, contacts can be suppressed from transactional emails only, or from all emails. To change this setting for a suppressed contact, follow these steps:
- Click the three dots (…) on the right-hand side of the contact you want to edit.
- Select Edit email status > choose the new option.
Archiving and unsubscribing
Adding an email address to the suppression list does not automatically archive or unsubscribe the associated person in your CDP. This action solely prevents further communication to that address.
Identifying contacts whose email address has been suppressed
Whenever you add an email address to the suppression list (by any method), all existing contacts with that email address as their primary email will receive an Email suppressed activity, including the details of how the email address was suppressed. A date field titled Suppressed at will also be populated for that contact with the time at which their email address was suppressed.

Similarly, any time an email address is removed from the suppression list, any existing contacts with that email address as their primary email will receive an Email unsuppressed activity, and a date field titled Unsuppressed at will be populated for them with the time the email addressed was removed from the suppression list.
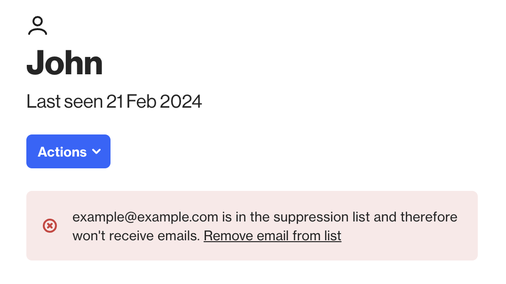
Furthermore, whenever you are viewing a contact whose primary email address is in the suppression list, you will see a warning on their profile alerting to the fact their email address is suppressed.
Deleting contacts
Deleting a contact whose email address is on the suppression list will not automatically remove their email address from the suppression list. These actions are independent of each other.
Permission requirements
Only users with Admin roles or custom user roles with suppression list permissions can manage the suppression list. This ensures controlled access to sensitive contact information.
Storage limitations
The suppression list has a capacity limit of 2 times your account's contact limit. For example, an account with a contact limit of 20,000 contacts can store up to 40,000 suppressed email addresses.
Account contact limit
If a contact is present in both your CDP and the suppression list, they will still contribute to your total account contact limit. If you prefer these contacts not to be included in your account's contact limit, you must remove them from the CDP.
NOTE: If contacts are deleted from the Customer Data Platform (CDP), they will remain on the suppression list.
Create an email suppression list
- Navigate to the Email suppression list
- Once you're on the Email suppression list page, you have two options for adding people to the suppression list:
Import from CSV
- Click on the Import CSV option to create a list from a CSV, XLS, or XLSX file.
- Follow the provided instructions to upload your file.
- Ensure your file format is compatible and contains the necessary information.
- Choose whether to only allow transactional emails or suppress all emails.
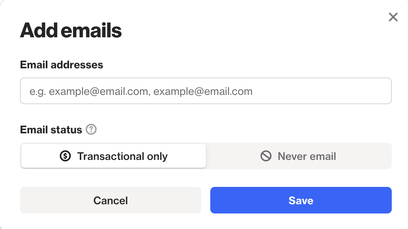
Manually add emails
- Alternatively, select the Add emails option.
- Enter one or more email addresses manually.
- Separate each email address with a comma to create a list.
- Choose whether to only allow transactional emails or suppress all emails.
NOTE: If you are importing a CSV/XLS/XLSX file that contains more than one column, during the upload process (at Map) you will need to select which column contains email addresses.
TIP: You can use API to retrieve, add, or remove emails from the suppression list. Learn more about managing the email suppression list via API.
View the email suppression list
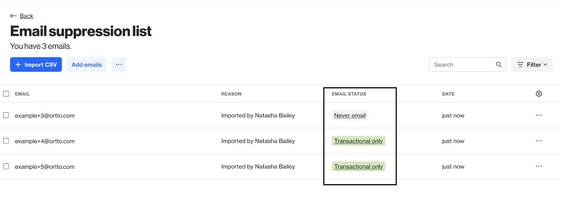
When reviewing the email suppression list, entries are accompanied by values in the Reason and Date columns, providing insights into how and when a contact was added to the list.
Reason
- Email added manually by <user>: Indicates that a specific user manually added the email address using the Add emails option within the system.
- Imported CSV by <user>: Denotes that the entry was added through a CSV import, with the specified user responsible for the action.
- Journey action: <Journey name>: Signifies that the contact was added as a consequence of an Archive action within a linked journey. This action is typically set to Archive & suppress contacts.
- Sunset policy: Indicates that the entry resulted from an action performed in accordance with the Sunset policy, typically involving the suppression of contacts.
- Hard bounce: The email address hard-bounced at least once. Learn more about bounces.
- Spam report: The recipient has previously reported one of your emails as spam.
Viewing entries
To streamline your viewing experience, you can filter entries based on one or more reasons. Simply click on the Filter option and select/deselect the reasons you wish to view.
Date
The Date column displays the timestamp for when the contact was added to the suppression list.
Remove an email from the suppression list
To eliminate an entry from the email suppression list, follow these steps:
Individual entry removal
- Locate the entry you wish to remove and click on the more icon (...) beside it.
- From the dropdown menu, select Remove from list.
Bulk removal
- Alternatively, select the Checkbox next to one or more entries.
- Then, click on Remove from list to remove all selected entries simultaneously.
Removing from profile view
- When viewing a person's profile, if their email address is on the suppression list, you'll notice a red banner indicating this status.
- Simply click on Remove email from list within the banner to remove the email address from the suppression list.
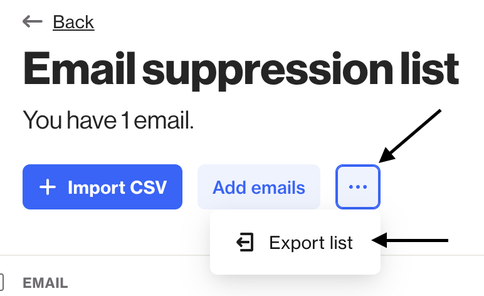
Export list
To export the list of emails on the suppression list, follow these steps:
- Navigate to the Email suppression list
- Select the … next to Add emails
- Select Export list.
NOTE: The exported list will be in CSV format and will include only the email addresses, without any reasons or dates.