
Using capture widgets in journeys
Overview
Using Capture widgets in journeys means they appear for contacts when they reach the widget stage in the journey. The widget will be displayed to the contact the next time they visit your website or page where is configured to display.
Accessing capture widgets in journeys
To access capture widgets in journeys, go to > Campaigns > Journeys > Create/Edit a Journey > + > Widget.
Managing capture widgets in journeys
Create a capture widget
You can create a new capture widget or choose an existing capture widget asset.
Create new
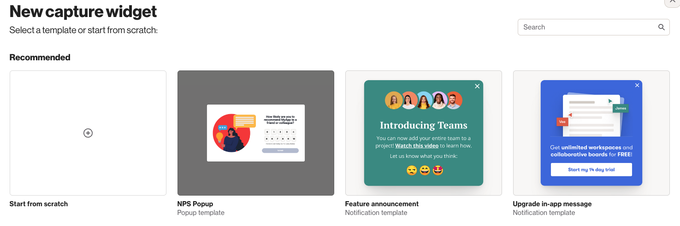
Choosing Create new takes you to the templates page where you can select a relevant template or start from scratch.
Select exisiting
Opting for Select existing shows your widget assets.
From here, you can:
- Start from scratch to create a new asset.
- Duplicate an existing asset linked to another campaign.
- Indicated by the Campaign name below the asset.
- Click on the asset and then Duplicate & add widget.
- Choose an asset not yet attached to another journey/playbook.
- Indicated by No campaign below the asset name.
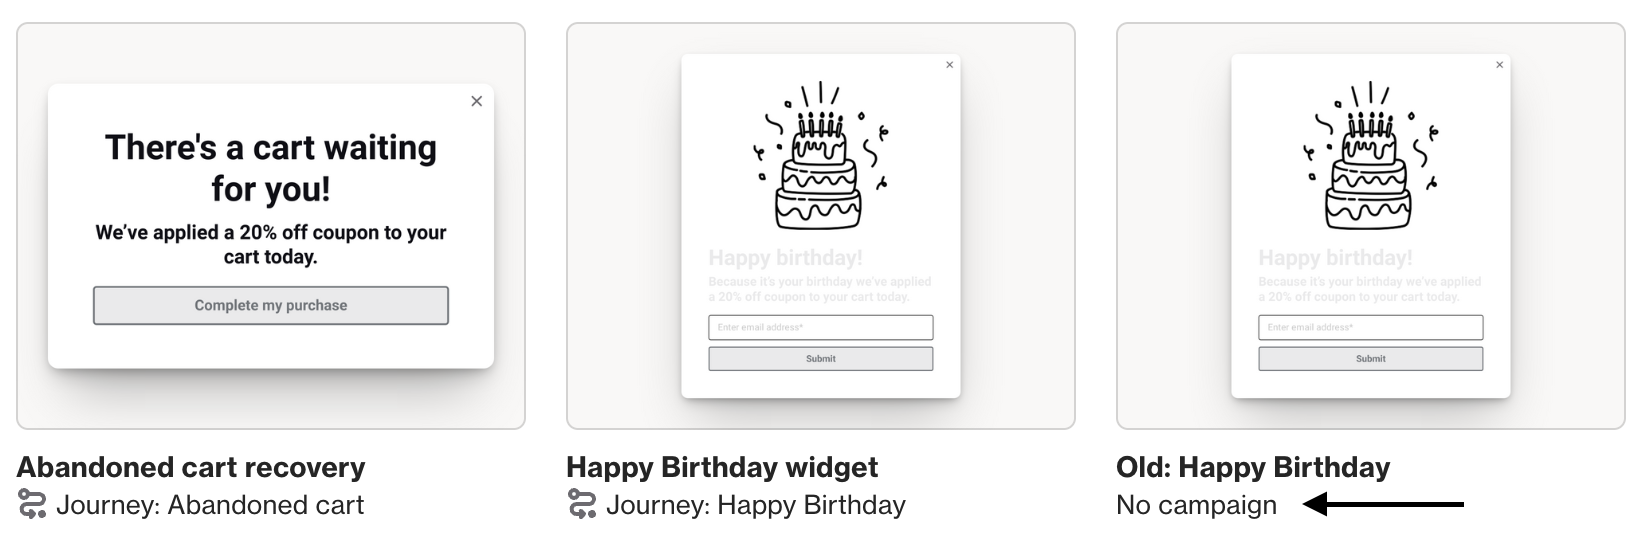
Example indicators for existing assets attached and not attached to campaigns. Learn more about managing assets in the Asset Manager.
NOTE:
- Each asset can only be used once per campaign, so duplication is necessary.
- This is due to reporting purposes.
- Widgets you create or use in the journey are managed exclusively through the Asset Manager and won't appear on the Capture page.
- Journey widgets have unique configuration options compared to regular capture widgets, and each journey widget can only be used in one journey.
Widget display prioritization
Widget display prioritization allows you to define the importance of each widget. This ensures that users see the most relevant content at each interaction stage, maintaining clarity and focus.
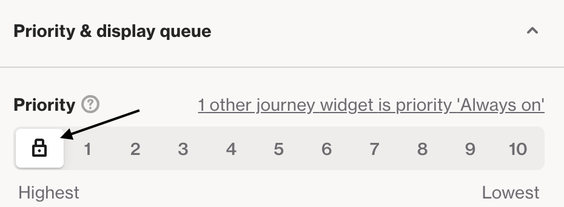
- When you select the lock icon, the widget will always display when its trigger rules are met, overriding other widgets and their priorities.
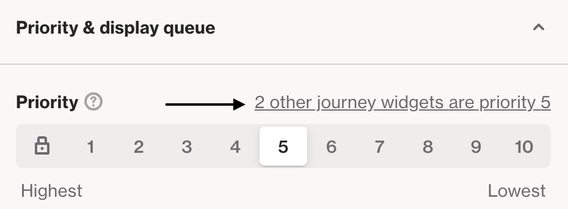
- You can assign a priority level ranging from 1 (highest) to 10 (lowest). If other Journeys include widgets with the same priority, you'll find a link to manage these priorities efficiently.
Widget display queue
This feature lets you manage the order in which your widgets appear and how they behave when a contact qualifies for newer widgets.
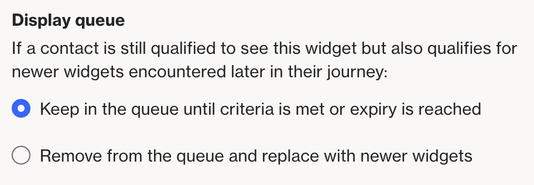
- Keep in the queue until criteria is met or expiry is reached: When a contact qualifies for this widget, it stays in the queue until they engage with it, dismiss it, or until it expires based on a set time limit.
- Remove from the queue and replace with newer widgets: If a contact qualifies for Widget A and later qualifies for Widget B from the same Journey, Widget A will be removed from the queue and replaced by Widget B. This means that Widget A will no longer appear for that contact.
NOTE:
- If multiple widgets share the same priority, one will be randomly selected to appear first.
- Journey widgets always take priority over regular capture widgets.
EX: A journey widget with priority 10 will appear before a regular capture widget with priority 1.
Expiring a capture widget when a contact leaves the journey
By default, Journey widgets will keep attempting to display even after contacts exit the journey. If you'd like to prevent unseen journey widgets from showing when contacts exit, follow these steps:
- Click to edit the People exit when section.
- Select the option Stop attempting to show unseen journey widgets when contacts exit.
- Click Save.
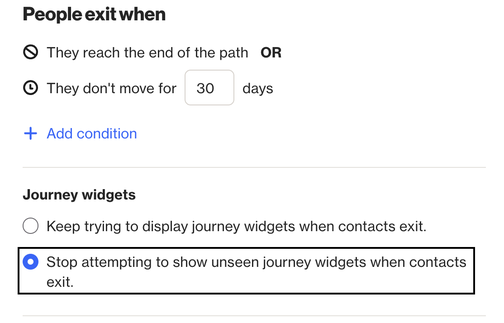
NOTE: This option will only appear after you've added at least one capture widget to the journey.
Learn more about configuring a capture widget.
What happens when a journey is switched off
When a journey is turned off after widget shapes have already been processed, the widgets are automatically disabled in the background and will not be displayed while the journey remains off. If the journey is turned back on, the system will attempt to display the widgets again, provided the contacts are still eligible.
NOTE: There may be a delay of up to approximately 5 minutes before these changes are reflected on the website.