
Build and manage the preference centers
Overview
A well-designed email and SMS preference center offers several key benefits:
- Better retention: Give subscribers more control over the content they receive, improving satisfaction and reducing unsubscribes.
- More engagement: Let subscribers personalize their experience, keeping them engaged with your brand.
- Valuable insights: Gain deeper understanding of your customers' interests to guide future marketing and product decisions.
A strong sender reputation relies on high engagement, so giving subscribers the option to choose what they receive helps keep your list active and engaged. You can segment your audience based on content types and frequency, such as:
- Monthly newsletters
- Weekly promotions
- Daily sale alerts
- New product updates
This approach ensures you’re sending relevant content to the right people, which helps maintain a positive sender reputation.
Giving subscribers more control helps you create more targeted marketing campaigns, benefiting both you and your customers.
Add an audience to the email or SMS preference center
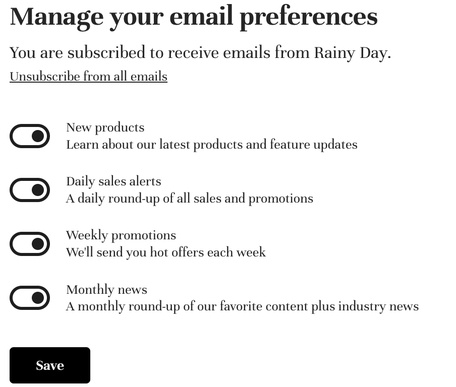
Subscription preferences are tied to audiences, allowing users to unsubscribe from all communications or just specific audiences through the preference center.
To make the experience easy and clear for your subscribers, ensure your preference centers are detailed and user-friendly.
Subscribers will only see the audiences that are:
- Public (enabled) and,
- Relevant to their subscriptions (they must be a member).
You can set an audience as public (enabled) or private (disabled) in the audience settings for either SMS or email preference centers.
EX: If you have 6 public audiences and a subscriber is a member of 3, they’ll only see those 3 relevant audiences in their preference center.
TIP: Use clear, descriptive names for public audiences to help customers easily understand what types of communications they'll receive if they subscribe.
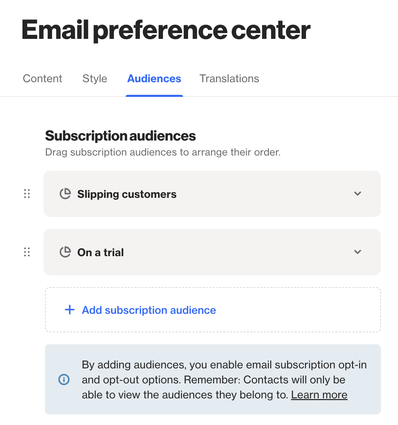
Email preference center
To add an audience to your email preference center:
- Navigate to Settings > Channels > Email > Preference center.
- Click the Audiences tab.
- Click Add subscription audience.
- Select an audience.
- Once the audience has been added, click its name to expand the display text options.
- Click Save & exit to finish.
Learn more about the email preference center.
NOTE: You can also access this page from the audience view under Preference Centers. Click the edit icon to go to the email preference center settings.
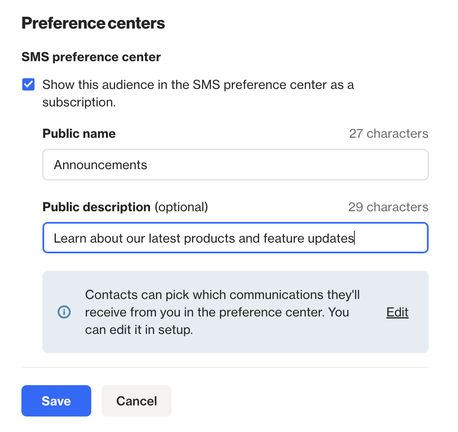
SMS preference center
To add an audience to your SMS preference center:
- Navigate to CDP > Audiences and click the audience you want to configure.
- In the left panel, under Preference centers, click the edit icon next to SMS subscription.
- Check the box to enable the audience for the SMS preference center.
- Enter a public name and description for the audience.
- Click Save when you're done.
Learn more about the sms preference center.
Subscription preferences in email and SMS messages
The subscription management options in your email message footer depend on the audience settings.
- Private audience: If you send an email to a private audience, the footer will include:
- Unsubscribe: Unsubscribes the person from all email communications.
- Update your preferences: Takes the person to the email preference center to update their preferences.
- Public audience: If you send an email to a public audience, the footer will include:
- Unsubscribe from this list: Unsubscribes the person from the specific audience the email was sent to.
- Update your preferences: Takes the person to the email preference center to update their preferences.
NOTE: For SMS campaigns, all messages include an opt-out link, regardless of audience type. This link takes the person to the SMS preference center.
- You can edit SMS opt-out content under Settings > Channels > SMS > Consent opt-out and default responses.
Learn more about email unsubscribe links.
Learn more about consent, opt-out and default responses.