Email settings

Overview

The Email section is where you can manage your default sender details, email domains, how subscribers opt in, and set email limits.

Accessing email

To access the email page, go to Settings > Channels > Email > Email.

Managing email

The email page allows users to:

Saving changes

Be sure to click Save at the bottom of the page to apply your updates.
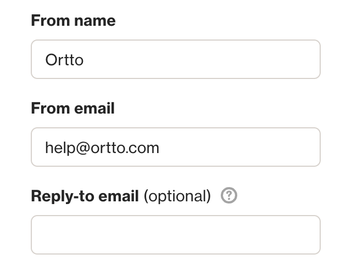

Default from name and from email

This is the name and email your campaigns will be sent from unless you customize during the campaign setup.


Email domains

A Custom domain means your emails will appear as if they're coming directly from your own domain (e.g., you@yourbrand.com), rather than from @autopilotmail.com. You can choose a default sender domain, or customize it per campaign if you prefer not to use the default.

  • Domains will appear as pending until you complete the setup on the provider's side.

Learn more about setting up custom domains.


Opt-in method

Notify new subscribers automatically or enforce double opt-in.

By default, contacts added via your CDP are automatically subscribed. Each data source has its own email subscription options, and these setups can differ between sources.

For contacts added directly via the CDP, choose one of these options:

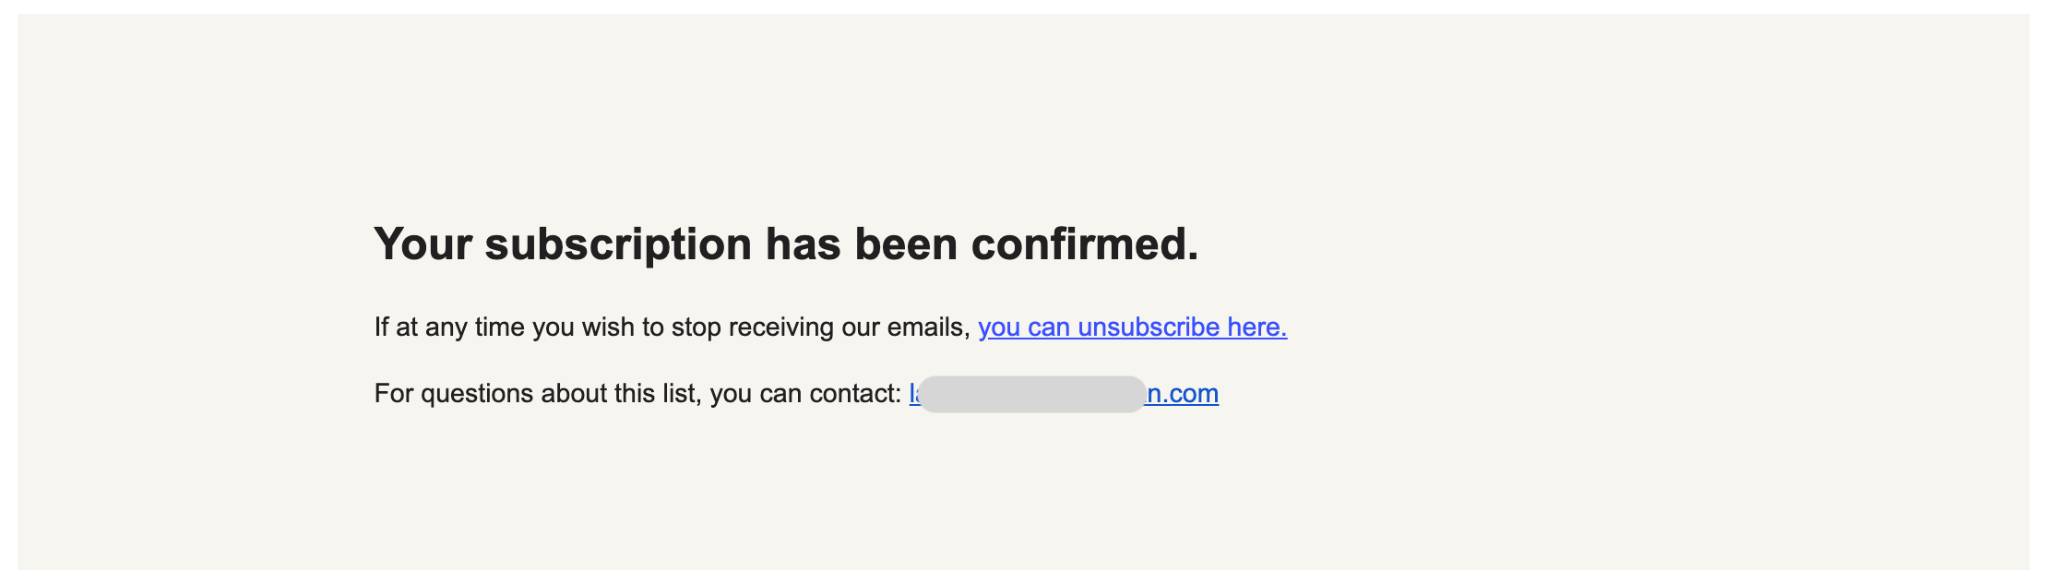
  1. Disable opt-in notification: Contacts become subscribers without receiving an email notification confirming their subscription.
  2. Single opt-in: Contacts receive an email confirming their subscription when they sign up via a capture widget. They will receive an email confirmation that includes an unsubscribe link and your email address so they can contact you about the subscription if required.
Example email received with single opt-in enabled
  • Double opt-in (an email is sent to confirm the subscription). Contacts added via a capture widget receive an email asking them to confirm their subscription. They must click the confirmation button to complete the subscription. This email also includes your contact information for any subscription queries.
Example email received with double opt-in enabled

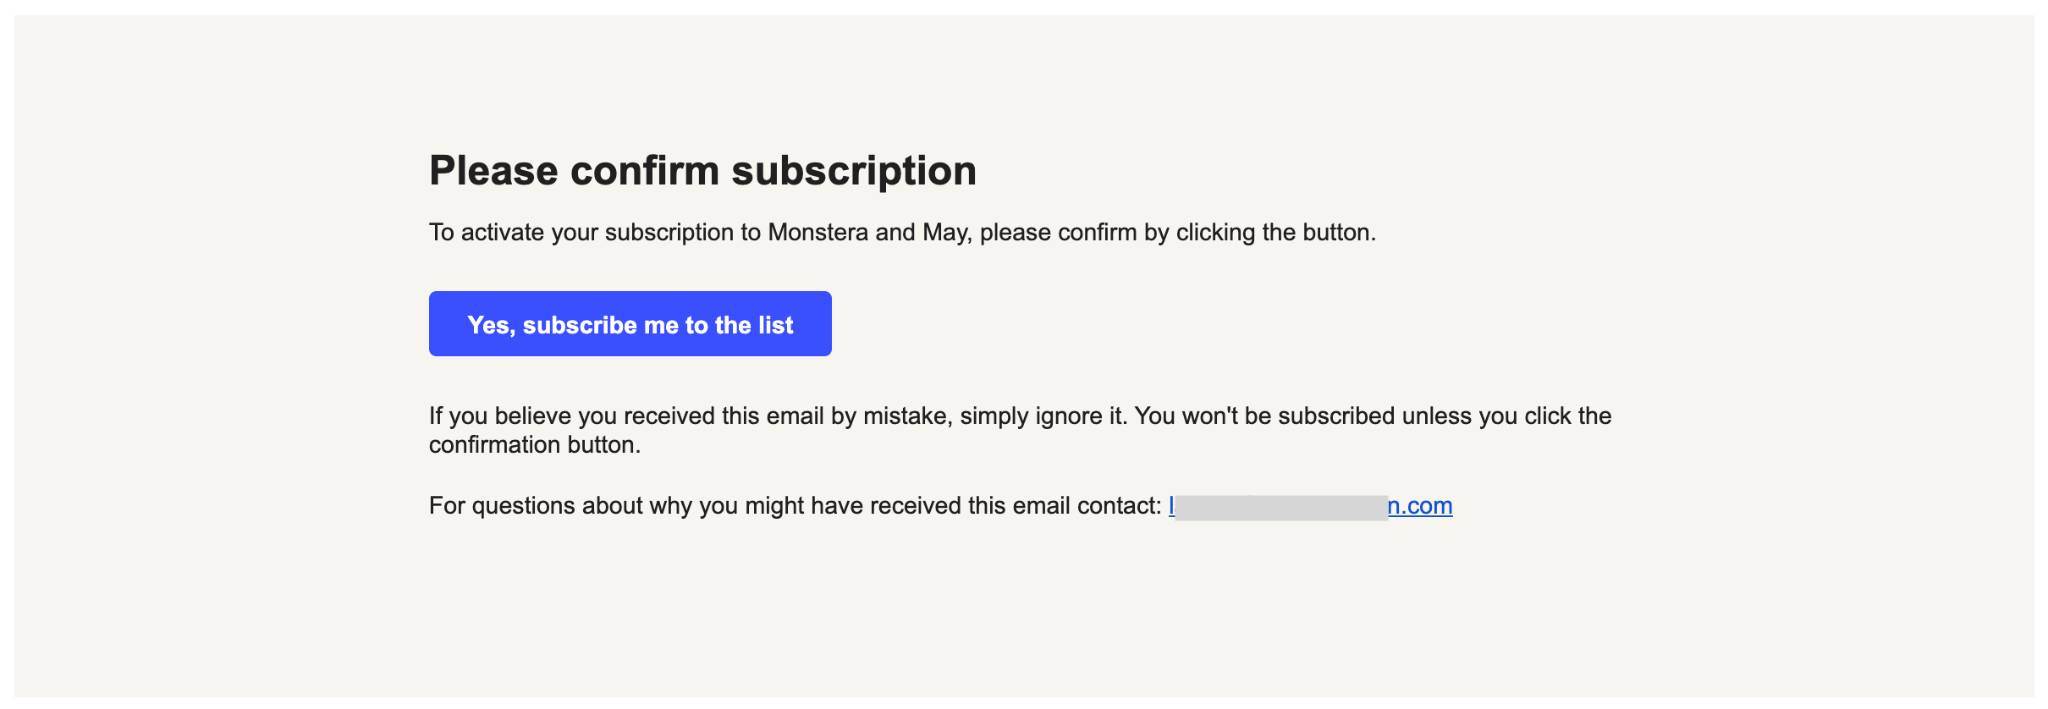
NOTE: The subscription confirmation link sent in the double opt-in email does not expire.


Email limit

This setting limits how often subscribers receive emails, which helps prevent overload and reduces the chance of them unsubscribing. By default, subscribers cannot receive more than one email every 16 hours. You can also prevent playbook and journey emails from being sent on specific dates, like holidays such as Christmas Day, to ensure emails are not sent during those times.

Example of email limit settings.

What happens when the limit is reached?

When an Email limit is reached, the outcome depends on the type of campaign:

  • Email campaign or playbook: If you try to send an email through a single-send email campaign or playbook, and the subscriber has already received an email within the limit window, we will automatically skip sending them the email. This information is reflected in both the subscriber's activity log and the campaign report.

CAUTION: For single-send emails and playbooks, once the email limit has been exceeded, the campaign will not be sent to them.

  • Journey campaign: If you attempt to send an email in a journey and the subscriber has reached their email limit, they will remain at the email step until the specified time has passed (e.g., the 1 email every 16 hours limit). Once this time has elapsed, the email will be sent to them as scheduled.

How to resend a single-send email to ineligible contacts

If you still want these contacts to receive the email they were previously ineligible for, follow these steps:

  1. Duplicate the original email.
  2. On the Recipients tab of the email, select filter.
  3. Create a filter like so:
    1. Invalid email has occurred where Email name is [INSERT EMAIL NAME] AND Email status is Email prevention limit reached.
    2. Make sure to insert the name of the original email sent.
Example of a filter to run for ineligible contacts.

NOTE:

  • You need to wait the designated time (e.g., 16 hours) from the contact/s last sent email activity before you can resend the email.
    • Otherwise, they will receive another Invalid activity for email prevention limit reached notification on their contact profile if the email is sent before the designated time has passed.
    • To view the last email sent to a contact/s, go to their profile and filter for sent email activity.
      • Click on X hours ago under the activity to see the exact time of the last email sent.
  • We recommend checking the email limit setting first before proceeding to ensure you know the appropriate time to resend the email.

How do I stop sending email on specific dates?

To stop sending emails on specific dates for playbooks and journey messages, any emails scheduled for those dates will be sent at the next available time, considering other set limits.

For example: If you choose to stop sending on December 25th (Christmas Day), any scheduled emails will be sent the following day at 12:00 AM (midnight on December 26th). If you have an email limit of 1 per 48 hours and a person receives an email on December 24th at 2:00 PM, any journey emails scheduled for December 25th will be sent 48 hours after the last received email. This means the next email would be sent on December 26th at 2:00 PM.

To prevent playbooks and journey emails from being sent on specific dates:

  1. Navigate to > Email.
  2. Locate Email limit.
  3. Tick Prevent automated playbook and journey messages from being sent on specific dates.
  4. Click Add a date and select the relevant date. Add more dates as required.
  5. Click Save to confirm.

Can I override this setting in certain circumstances?

You can override email limits by marking an email message as transactional. This feature is intended for messages directly tied to actions, like sending a customer an order confirmation immediately after a purchase in your store.

NOTE: Transactional emails are only available on certain Ortto plans.

To mark an email as Transactional:

Single-send email

  1. Navigate to the Email.
  2. Select the Setup tab.
  3. Underneath Transactional email > tick This email is transactional.
  4. Type in the Purpose of the transactional email.
    1. This disclaimer will be injected in to the email footer as subscribers cannot unsubscribe from transactional emails.

Journeys

  1. Navigate to the Journey.
  2. Select Messages.
  3. Locate the Email you want to mark as transactional.
  4. Select the (…) then select Edit.
  5. Underneath Transactional email > tick This email is transactional.
  6. Type in the Purpose of the transactional email.
    1. This disclaimer will be injected in to the email footer as subscribers cannot unsubscribe from transactional emails.

Playbooks

  1. Navigate to the Playbook.
  2. Select Messages.
  3. Locate the Email you want to mark as transactional.
  4. Select the (…) then select Edit.
  5. Underneath People can receive this message > select Edit.
  6. Tick This email is transactional.
  7. Type in the Purpose of the transactional email.
    1. This disclaimer will be injected in to the email footer as subscribers cannot unsubscribe from transactional emails.

TIP: Alternatively, you can send transactional email via Ortto's API.

NOTE: Sending transactional emails requires approval from Ortto beforehand and should only be used for genuine transactional purposes. These emails will be sent regardless of a person’s subscription status, including if they are unsubscribed.

Learn more about transactional emails at Making journey and playbook campaign messages transactional.