
Viewing and editing a person
Overview
The Person's view displays all data associated with a person (and their account (previously organizations), if enabled) in your CDP, including recent activities, audiences, and campaigns they’re involved with.
From this view, you can:
Viewing a person
Navigate to CDP > People > Click on any person to open their profile.
Managing a person
The Person’s view is split into two sections:
- Right side: Displays involvement with Ortto features, including:
- Left side: Shows editable person details, including:
Activities
The Activities feed shows all activities linked to the person.
You can filter activities by clicking Filter activity and selecting your filter criteria.
NOTE: The feed only shows activities from the last 90 days, regardless of data retention settings. However, activities with data retention enabled will still be available for filtering and reports.
The feed also includes links to related features, such as campaigns and audiences, allowing you to quickly view those details.
NOTE: Any filter changes you make will apply to all person views. Clearing a filter for one person will clear it for others as well.
Audiences
The Audiences section shows the audiences the person is part of, along with their subscription preferences.
Here, you can:
- Unsubscribe the person from all email communications (click the … more icon).
- Manage audience preferences by selecting or clearing checkboxes next to relevant audiences.
Under Subscription status, you can view the person’s subscription status for each type (email, SMS, and push notifications). A person can have the following statuses:
- Subscribed: They’ve opted in to receive communications.
- Unsubscribed: They’ve opted out or were automatically unsubscribed.
- No permission: For push notifications, they haven’t responded to the permission request.
For each subscription, you can:
- Unsubscribe the person (click the edit icon).
- Manage preferences by selecting or clearing checkboxes.
Preference center audiences (public audiences) are those the person belongs to and can manage via the email or SMS preference center, where they can subscribe or unsubscribe.
NOTE: A person cannot subscribe to an audience unless they meet the entry criteria for that audience.
Learn more about working with subscription preferences.
Campaigns
The Campaigns list shows details of campaigns the person is or has been part of.
Click Show activity under any campaign to view more details.
Edit a person
In the Person details panel, you can edit a person's data and customize what information you see.
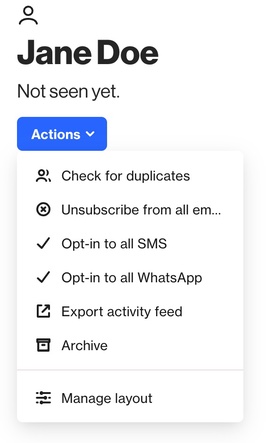
Actions
The Actions button gives you quick access to key tasks:
- Check for duplicates: Confirm if there are duplicate records with the same unique identifier. Duplicate checks are available once every 5 minutes.
- Unsubscribe from all email: Confirm to immediately unsubscribe the person from all email communications.
- Opt-in to all SMS: Confirm you have permission to subscribe the person to all SMS communications.
- Opt-in to all WhatsApp: Confirm you have permission to subscribe the the person to all WhataApp communications.
- Export activity feed: Export the person’s activity feed to a CSV file.
- Archive: Soft deletes the person. They’ll no longer be part of campaigns, reports, audiences, or activities. You can restore them by clicking Restore.
- Learn more about archiving or restoring people.
- Manage layout: Customize the sections visible in the person details panel by selecting or clearing checkboxes. You can also:
- Reorder sections by dragging them.
- Create new sections and move fields into them.
- Delete custom sections (you’ll need to move fields elsewhere first).
- Rename custom sections (you'll need to click on the Edit icon > Rename field > Save).
Actions you can take within a person’s record.
NOTE: Changes to the section layout will apply to all people records.
For example, If you move fields from About to Details for one person, the same layout will apply when viewing other people.
You can create up to 10 custom sections.
Edit the person’s field data
You can edit certain fields, like name, birthday, or country.
To edit:
- Hover over the field you want to change and click Add value or the edit icon.
- Enter the new value and click the tick icon to save.
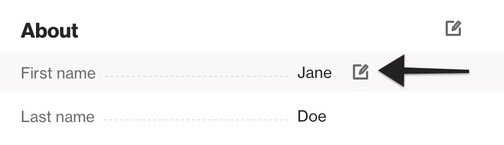
NOTE: Some fields, like activity-generated data (e.g., engagement), cannot be edited.
Learn more about editing exisiting custom fields.
Edit the about, details and custom sections
- About section: Displays basic info like name, email, and engagement score.
- Details section: Shows how the record was created, including data source and UTM parameters.
- Custom sections: You can create these and move both existing and custom fields into them.
To edit a section:
- Edit fields: Click the edit icon to modify fields.
- Show/hide fields: Use checkboxes to display or hide fields.
- Reorder fields: Learn how to create and reorder fields for more details.
- Move fields: Click the arrows icon to move a field to another section.
- Create a new section: Click New section to add a new section and move fields into it.
- Delete a field: Click the trash icon and confirm by typing
PERMANENTLY DELETEin uppercase.
Accounts (previously organizations)
The Accounts section appears in the person details panel only if the accounts feature is enabled in your Ortto account.
You can enable it through Settings > General, or it may be automatically enabled if you've integrated a data source that supports accounts.
By default, this section shows data about the accounts linked to the person, and you can edit it to show or hide different data types.
Learn more about, about, details and custom sections.
Linking a person to an Account
NOTE: Accounts are de-duplicated based on their name. If you have duplicate accounts and are unable to select the correct one, we recommend temporarily renaming the account you need to access or merge any duplicates.
- Click Link an account and select from the list.
- Click the tick icon to confirm.
Once linked, you can click the account name to view its details.
Changing the linked account
- Click the link icon.
- Choose a different account and click the tick icon to confirm.
Unlinking an account
Click the X next to the account name to unlink it.
Tags
- Add a Tag: Click Add Tag to select a tag from your existing list.
- Remove a Tag: Click the X next to the tag you want to remove.
Learn more about tagging and untagging people.