
Push notifications in Journeys
Overview
When setting up a Push notification in a Journey, you have the option to use an existing push notification or create a new one. You can start from scratch or use a template to begin.
NOTE: Make sure to set up Push notifications before configuring assets in your Journeys.
Accessing Push notification assets
To access Push notifications go to Marketing > Campaigns > Select your Journey > Edit > + > Push.
Managing Push notification assets
Create a Push notification via a Journey
- Navigate to Push notifications.
- Select Create new and choose Start from scratch or a relevant Template.
Using a template
- Select the appropriate Template.
- Click Use template to continue.
- Name your Push notification.
- Select OK.
Setup
Platforms
- Proceed to the Setup page where you can select the platforms you wish the notification to show:
- Web.
- iOS.
- Android.
NOTE: If a subscriber has chosen to receive notifications on multiple platforms, they will be notified on each platform they are subscribed to.
- You have additional options for A/B Testing.
People will wait on shape
Also known as TTL (Time to Live), this feature lets contacts wait on the shape until they receive the notification or until a specified amount of time—measured in minutes, hours, days, or weeks—has passed.
Transactional Push
- Ignore sending limits
- e.g. for user-initiated or transactional notifications.
People can receive this message
- Only once
- More than once
Advanced options
UTM tracking
- Automatically add UTM tracking links to this push notification.
Content
Message
The message box includes a title and message section, with options to use emojis, merge tags, and add an image.

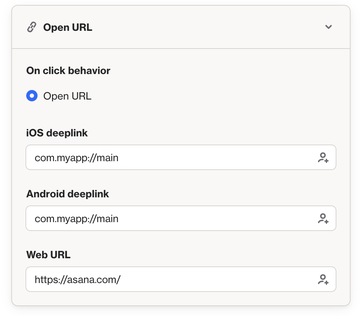
Primary action
Triggered when the user clicks the notification.
Secondary actions
Allows you to add an additional button option.
NOTE: Secondary actions don't appear on Safari or Firefox.
Review
Review the Push notification settings, and publish when you’re ready.
TIP: Set the attribution in the attribution settings under Settings > Attribution.
Use an existing Push notification
To use an existing push notification, follow these steps:
- Navigate to Push notifications.
- Select Select existing.
- Choose the relevant push notification.
- Click Add Push Notification.
The Push notification will be added to the Journey. To modify it, click the three dots in the top right corner of the shape and select Edit.
Push notification non-delivery
Non-deliveries mean push messages aren't reaching recipients.
Learn more about Push non-delivery and complaints.