
Installing Ortto's core SDK for iOS
Ortto provides a core SDK which supports our push notifications and in-app notifications features, each of which have their own installation instructions.
The prerequisite for the push notifications and in-app notifications SDKs is the installation of Ortto's core SDK. Once the core SDK is installed, you then have the option to configure your application to support push notifications and/or in-app notifications — one is not dependent on the other (unless you want to trigger an in-app notification from a push notification, then you need to configure both).
NOTE: Installing the core SDK is only a prerequisite for iOS apps and is not required for Android apps.
Install the core SDK for iOS
To start, you’ll need to set up your dependencies.
Below are instructions for each Swift package manager and CocoaPods, simply read the section relevant to you.
Instructions for Swift package manager
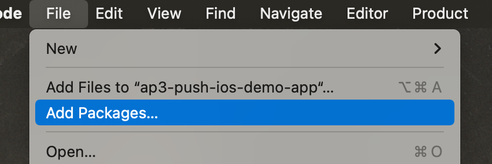
In Xcode, in your app’s project, select File > Add Packages.
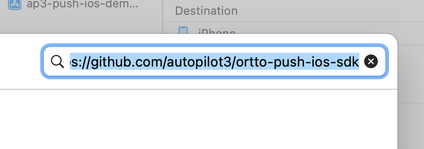
In the package manager, paste the URL for Ortto’s iOS SDK GitHub repository: https://github.com/autopilot3/ortto-push-ios-sdk.
At Dependency Rule, we recommend you set Up to Next Major Version to keep your app up to date with the latest SDK, including new features that are added.
We maintain a list of releases on GitHub https://github.com/autopilot3/ortto-push-ios-sdk/tags.
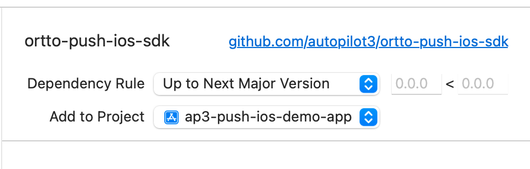
Click Add package.
You’ll see a list of packages available to install. Select OrttoSDKCore (required), then click Add package.
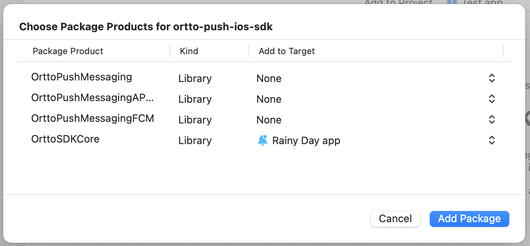
Other package options are only required when configuring your app to support push notifications or in-app notifications (capture widgets for mobile devices).
Instructions for CocoaPods
In your Podfile, add OrttoSDKCore:
pod 'OrttoSDKCore', '~> 1.4'After you have added OrttoSDKCore, run
pod installto install it.Instructions for a UIKit project
To configure OrttoSDKCore, add the following to your project’s
AppDelegateobject:swift
import OrttoSDKCore @main class AppDelegate: UIResponder, UIApplicationDelegate { func application(_ application: UIApplication, didFinishLaunchingWithOptions launchOptions: [UIApplication.LaunchOptionsKey: Any]?) -> Bool { // Prepare Ortto SDK //see note below regarding push endpoint regions Ortto.initialize(appKey: <Ortto_Application_Key>, endpoint: <Ortto_API_Endpoint>) }Instructions for SwiftUI projects
Make this modification to your main app entrypoint:
swift
@main struct MyApplication: App { @UIApplicationDelegateAdaptor private var appDelegate: AppDelegate init() { Ortto.initialize(appKey: "<Ortto_Application_Key>", endpoint: "<Ortto_API_Endpoint>") }NOTE: The
<Ortto_Application_Key>and<API_Endpoint>values can be found in your Ortto account Settings under either In-app notifications or Push notifications.As an example, you can access the required values in the following locations:
NOTE: Ortto’s default push API service endpoint is: https://capture-api.autopilotapp.com/.
Ortto customers who have their instance region set to Australia or Europe will use specific push endpoints relative to the region:
Next steps
Once you’ve installed the core SDK, you can get ready to send push notifications and/or in-app notifications by following the relevant SDK documentation: